201131 3 2007-10-10
Getting Started
CAUTION! Terminate the ANTENNA port of the radio terminal to a 50-Ohm load before applying
power. Place a 50-Ohm termination or ≥20dB fixed attenuator onto the ANTENNA port.
Alternatively, cable the RF port to the antenna system or back-to-back with the other terminal with
at least 40dB of total attenuation between the terminals.
Only apply power after terminating the ANTENNA port. Use the supplied AC adapters or an
external DC source within the indicated voltage range, shown on the front panel of the radio. Use the
provided DC connector for direct DC connections. Follow the wiring polarity below. Test voltage
and polarity on the DC connector before applying power.
Configuration Overview
For proper communication, one radio terminal must be configured as Radio A (radios are configured
as Radio B at manufacture). In addition, for some models, a proper Regulatory Domain Key
(RDK) is required before any system configurations are allowed. Obtain the RDK from your
Exalt distributor or reseller, or follow the RDK instructions provided on and in the radio’s shipping
box. In many cases, the RDK may be found at:
www.exaltcom.com/activate.htm
Other configurations may also be necessary before completing installation. Use the browser-based
GUI for configuration.
Connect an Ethernet port to the AUX connector on the radio using either a straight or crossover
cable.
The computer accessing the Exalt GUI must match the IP subnet of the radio (default IP address is
10.0.0.1). Either change the IP address of the radio(s) to match the computer’s subnet or change the
computer’s IP address to match the radio’s subnet. All radios are configured with the same IP
address at manufacture. To avoid an IP address conflict, use the following procedures to change the
IP address of at least one radio:
• To change the IP address of the computer to match the radio’s subnet:
1. Select the Ethernet network adapter, and select TCP/IP properties.
2. Select for a static IP address, and change the IP address to 10.0.0.x (where, x does
not equal 1 or match any other address planned for either radio).
• To change the IP address of the radio to match the accessing computer, use a ‘straight-through’
serial cable and the following instructions to connect the computer to the CONSOLE port:
1. Set the serial interface using Hyperterminal (or
similar application) as follows
:
Bits per second: 9600 Stop bits: 1
Data bits: 8 Flow Control: None
Parity: None
Pin Function
1 Power Return (-)
2 Ground
3 Power (+)
4 Power (+)
5 Ground
6 Power Return (-)
Pin Function
1 Unused
2 Tx (from radio)
3 Rx (into radio)
4 Unused
5 Ground
6 Unused
7 Unused
8 Unused
9 Unused
1 2 3 4 5 6
(as viewed from radio front panel)
9 8 7 6
(CONSOLE port, as viewed from radio front panel)
201131 4 2007-10-10
2. Connect using a terminal emulation program.
The CLI is now available.
3. Press ENTER to view the login screen.
4. Type admin and then press ENTER.
5. Type password in the password field and then press ENTER.
After successful login, the CLI menu displays.
6. Select 2 to access the Configuration menu.
7. Select 3 to access the Set IP address and mask screen.
8. Follow the on-screen instructions to enter the desired IP address and IP mask.
9. (Optional) Set the IP default gateway (and some other administration settings) in the
Configuration menu of the CLI.
Once the subnet of the IP address of the radio matches that of the accessing computer, the GUI is
available. Use the Exit command from the root menu to exit the CLI.
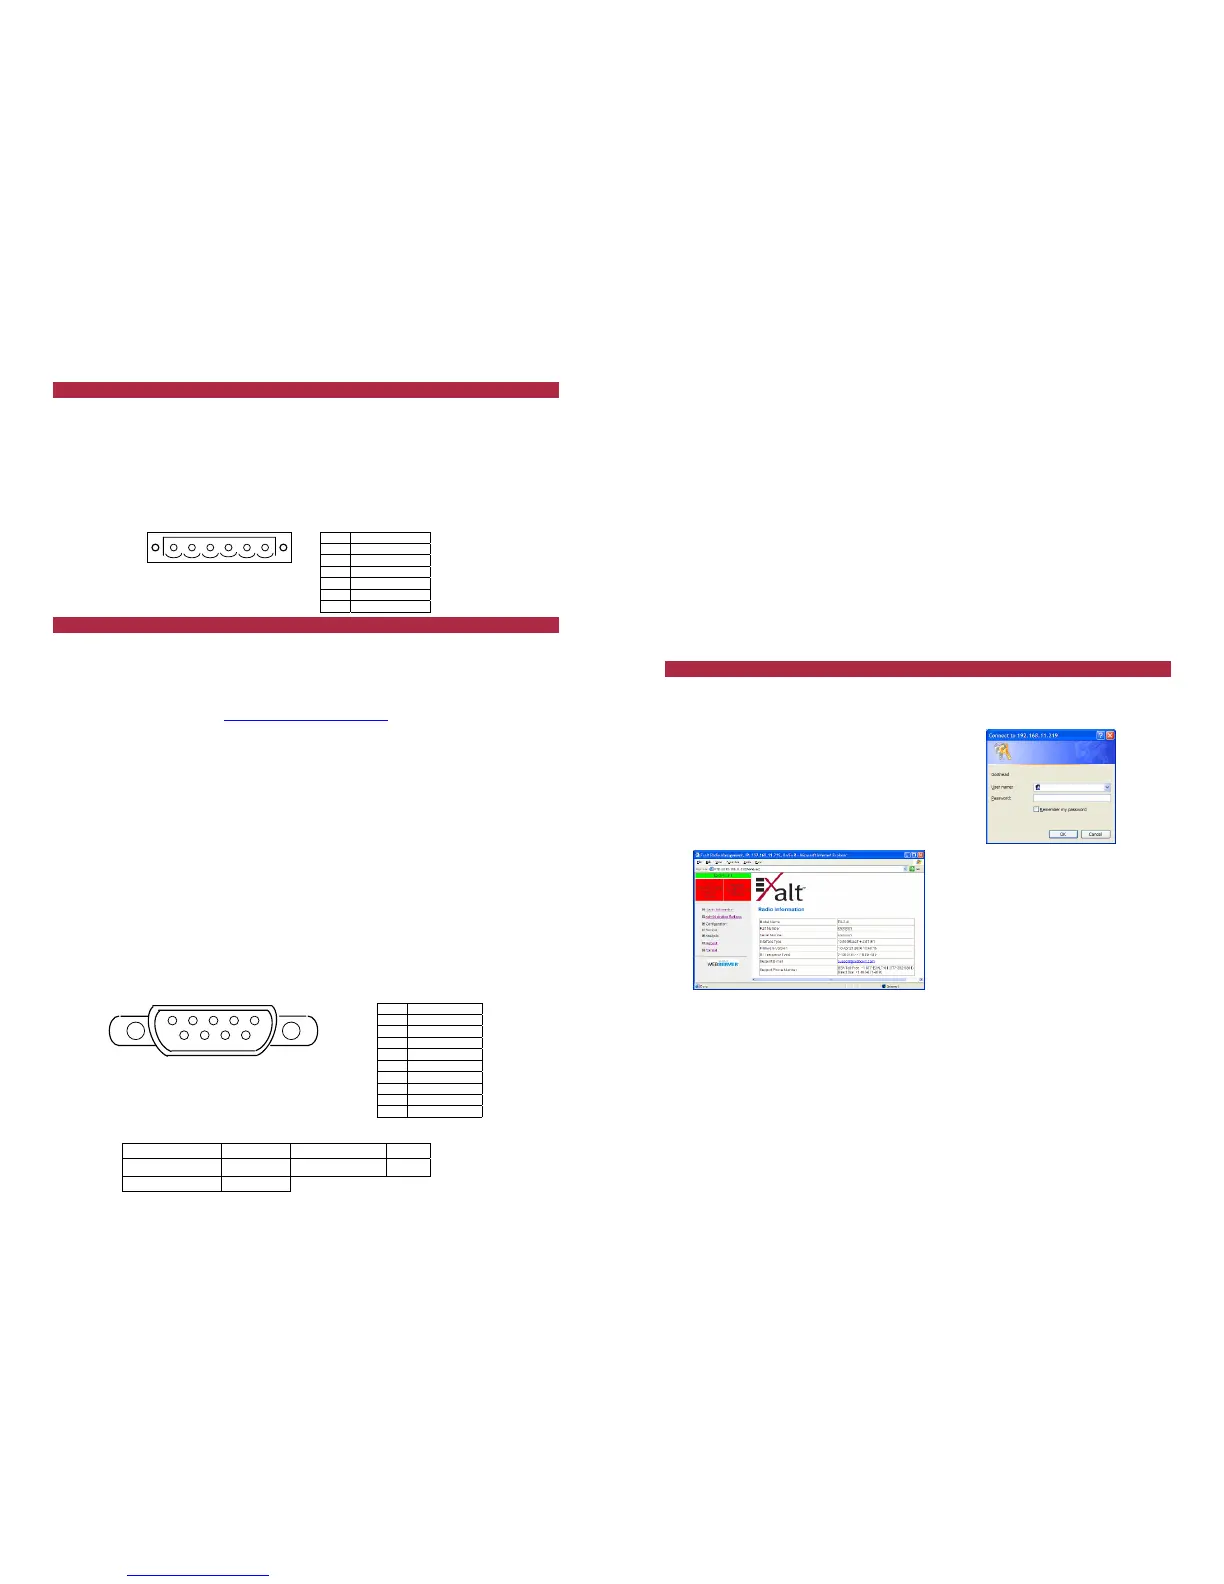
Using the GUI
Use the following procedure to access the Exalt GUI.
1. Open a browser window, type the IP address of the radio (such as, 10.0.0.1) in the
address field, and press the ENTER key.
The password dialog box displays.
2. Type admin in the User name field.
3. Type password in the Password field.
4. Click OK.
The Radio Information page displays.
Use the navigation links in the left panel to
access the configuration and management tool
pages.
To establish a working link:
1. For models with the Regulatory Domain Key (RDK) feature, enter the RDK on the
Administration>Settings GUI page. Each RDK is unique and is tied to the unit’s serial
number.
2. Press the UPDATE button on this page to accept the RDK.
Note: For models with the RDK feature, system configuration is impossible without proper RDK
installation.
3. On the Configuration>System page, change the Endpoint Identifier (Radio A or Radio
B) of one terminal to Radio A. Press the UPDATE button.
Note: Changing the Endpoint Identifier displays a confirmation page and reboots the unit.
 Loading...
