EasyManua.ls Logo

Exped ORION EXTREME - User Manual

Default Icon
2 pages
Print Icon
To Next Page IconTo Next Page
Loading...
INSTRUCTIONSORIONEXTREME2210 | Copyright Exped AG, Switzerland.
TIPS AND TRICKS
Before leaving on your next adventure, check that your
tent is complete and free of damage. Check the tent poles
for cracks and burrs.
Appropriate ventilation can prevent condensation within
the tent. Vent the tent regularly by at least opening the
doors partially at the upper end.
To secure the pegs in loose earth, sand or snow, wrap
the tent cord around the center of the peg and bury it
horizontally. You can also use the packsack filled with
sand or snow, or use the Exped Snow and Sand Achors
available separately.
Note! Never light a stove in a tent as it is a fire hazard or
can lead to carbon monoxide poisoning.
When camping on sand or snow you can dig a trench in
the vestible. Cold air will sink into the trench. At the same
time it can be used to sit comfortably.
If you need more space in the vestibule, partially
unhook the canopy, leave your sleeping gear inside and
use it as a backrest for comfortable lounging.
Should your tent remain stationary over a longer period,
protect it from UV by placing a cheap tarp over it.
A tent footprint (available separately) protects the tent
floor from damage and can also reduce condensation
build up.
For more information visit: exped.com.
INSTRUCTIONS
ORION EXTREME AND
ORION UL
ENGLISH
6
Place the accessory
bag at one end of the
folded tent and roll
together tightly before
placing it in the packsack.
5
Lay out the tent and
fold in thirds lengthwise to
fit the packsack.
3
1
2
4
5
6
TEARDOWN
Clean out the tent and close the zippers leaving
a 10 cm gap. Note! Normally, the canopy and rainfly
remain attached. For tear down in rain, the canopy
can be disassembled and packed away dry. For
the next setup, set up the rainfly first and then mount
the canopy.
1
Remove all pegs and
release the tent cords.
The pegs are stored in the
accessory bag.
2
First, release tension
on the ridge pole and
push it out of the sleeve
(never pull).
3
Next, release tension
on the main poles and
push them out of the
sleeves (never pull).
4
Carefully disassemble
the poles and place them
in the pole sack.
REFINED GEAR FOR ADVENTURE
Question and Answer IconNeed help?

Do you have a question about the Exped ORION EXTREME and is the answer not in the manual?

Summary

Teardown Instructions

Step 1: Remove Pegs and Release Cords

Remove all pegs and release the tent cords. Store pegs in the accessory bag.

Step 2: Release Ridge Pole Tension

First, release tension on the ridge pole and push it out of the sleeve without pulling.

Tent Tips and Tricks

Tent Safety: Fire Hazard

Never light a stove in a tent as it is a fire hazard or can lead to carbon monoxide poisoning.

Tent Setup Guide

Step 1: Lay Out Canopy;Rainfly

Lay out the combined canopy and rainfly with orange guy loops facing downwind.

Step 2: Secure Head End

Secure the head end with two pegs using the dark green guy loops.

Step 3: Insert Long Poles

Insert the two long poles into color-coded pole sleeves No. 1+2 until they curve.

Step 4: Insert Ridge Pole

Insert the ridge pole into the color-coded sleeve No. 3 until it curves.

Step 5: Secure Pole Tips

Secure pole tips into grommets, tension rainfly with webbing, and secure corners with pegs.

Step 6: Apply Guy Lines

Apply guy lines in a star-shaped configuration and secure with pegs, then tension.

Alternative Setup Options

Overview

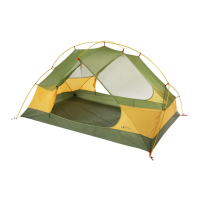
The Exped Orion Extreme and Orion UL are advanced tents designed for various outdoor adventures, offering a blend of innovation, quality, and refined details.

Function Description

These tents provide shelter and protection from the elements, with a design that differentiates between windward and leeward sides for enhanced weather protection and increased ventilation. The doors are strategically placed on the leeward side. The canopy can also be set up independently as a ventilated shelter or bug tent, or as a canopy alone for a quick setup.

Important Technical Specifications

The tent utilizes a three-pole system: two long poles and one ridge pole. The pole sleeves are internal, flat, and color/number coded for easy setup, designed to reduce wind resistance and shed rain and snow efficiently. The guy lines are made of Dyneema, are reflective, and feature buckles for stepless adjustment. The rainfly fabric on the windward side extends to the ground to keep out wind, sand, and snow, while the leeward side has a small gap for enhanced ventilation.

Usage Features

Setup:

  1. Lay out the tent: Position the combined canopy and rainfly with the orange guy loops facing downwind.
  2. Secure the head end: Use two pegs (dark green guy loops) to secure the head end.
  3. Insert long poles: Insert the two long poles into the color-coded pole sleeves (No. 1+2) until they curve.
  4. Insert ridge pole: Insert the ridge pole into the color-coded sleeve (No. 3) until it curves.
  5. Secure pole tips: Place the pole tips into the grommets.
  6. Tension rainfly: Use the webbing straps to tension the rainfly.
  7. Secure corners: Peg down the tent corners.
  8. Apply guy lines: Deploy the guy lines found on the pole sleeves in a star-shaped configuration, placing a peg in the loops of the guy lines and tensioning them.

Setup Options:

  • Canopy on its own: Undo the canopy from the rainfly. Thread both long poles through the elastic loops, place ends into webbing pockets for tension, and secure with pegs. Attach a tent cord to the center of each pole and tension it. This creates a ventilated shelter or bug tent.
  • Canopy alone: Insert poles into sleeves (steps 3-5 of setup), secure with pegs, and deploy guylines. An optional footprint can be used as ground cover.

Tips and Tricks:

  • Ventilation: Regularly open doors partially at the upper end to prevent condensation.
  • Pegging: For loose earth, sand, or snow, wrap the tent cord around the center of the peg and bury it horizontally. Alternatively, use the packsack filled with sand/snow or Exped Snow and Sand Anchors.
  • Vestibule space: Partially unhook the canopy, leave sleeping gear inside, and use it as a backrest for comfortable lounging.
  • Cold weather camping: Dig a trench in the vestibule when camping on sand or snow; cold air sinks into the trench, and it can be used for comfortable seating.
  • UV protection: For long-term stationary use, protect the tent from UV damage by placing a cheap tarp over it.
  • Footprint: An optional tent footprint protects the tent floor from damage and can reduce condensation.

Safety Note: Never light a stove inside the tent due to fire hazard and the risk of carbon monoxide poisoning.

Maintenance Features

Teardown:

  1. Clean out and close zippers: Clean out the tent and close all zippers, leaving a 10 cm gap.
  2. Remove pegs and release cords: Remove all pegs and release the tent cords. Store pegs in the accessory bag.
  3. Release ridge pole: Release tension on the ridge pole and push it out of the sleeve (do not pull).
  4. Release main poles: Release tension on the main poles and push them out of the sleeves (do not pull).
  5. Disassemble poles: Carefully disassemble the poles and place them in the pole sack.
  6. Fold tent: Lay out the tent and fold it in thirds lengthwise to fit the packsack.
  7. Roll and pack: Place the accessory bag at one end of the folded tent and roll together tightly before placing it in the packsack.

Pre-adventure check: Before each trip, check the tent for completeness and damage. Inspect tent poles for cracks and burrs.

Condensation management: Appropriate ventilation prevents condensation. Regular re-tensioning of the tent is necessary as nylon fabrics absorb moisture, expanding, and then contracting when dry, affecting optimal stability.

Pole repair: Pole repair tubes are integrated into the supports of the air vents (Orion UL: in the accessory bag) for immediate access if needed.

Cord Stuffsacks: These prevent tangling of tent cords during packing. To use, insert three fingers into the Cord Stuffsack, wrap the tent cord around fingers, and then turn the stuffsack inside out.

Contents: The tent comes with a pre-mounted canopy and rainfly, an accessory bag (containing 3 tent poles, pegs, spare zipper slider, repair tube, spare pole segment, guylines, fabric patches), and a packsack.

Exped ORION EXTREME Specifications

General IconGeneral
BrandExped
ModelORION EXTREME
CategoryTent
LanguageEnglish

Related product manuals