The power supply wires (GND and +12v) and the remote wire (IN and OUT) may use
0,5mm² gauge (24awg) or bigger.
The REMOTE IN comes from player and the REMOTE OUT wired to the signal from
the amplifiers. This connection is necessary for correct operation of the system.
Input voltage: +10v to 15v.
Current Consumption: 0,35A.
The installation must be done in a local covered and ventilated place and without
vibration.
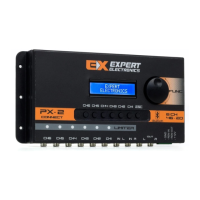
The processor has 8 buttons to configure as the owner wish.
Encoder: Correspond to 28 bands for equalization.
CH: Allow accessing the 6 channels.
ESC: Return to initial display.
Initial display:
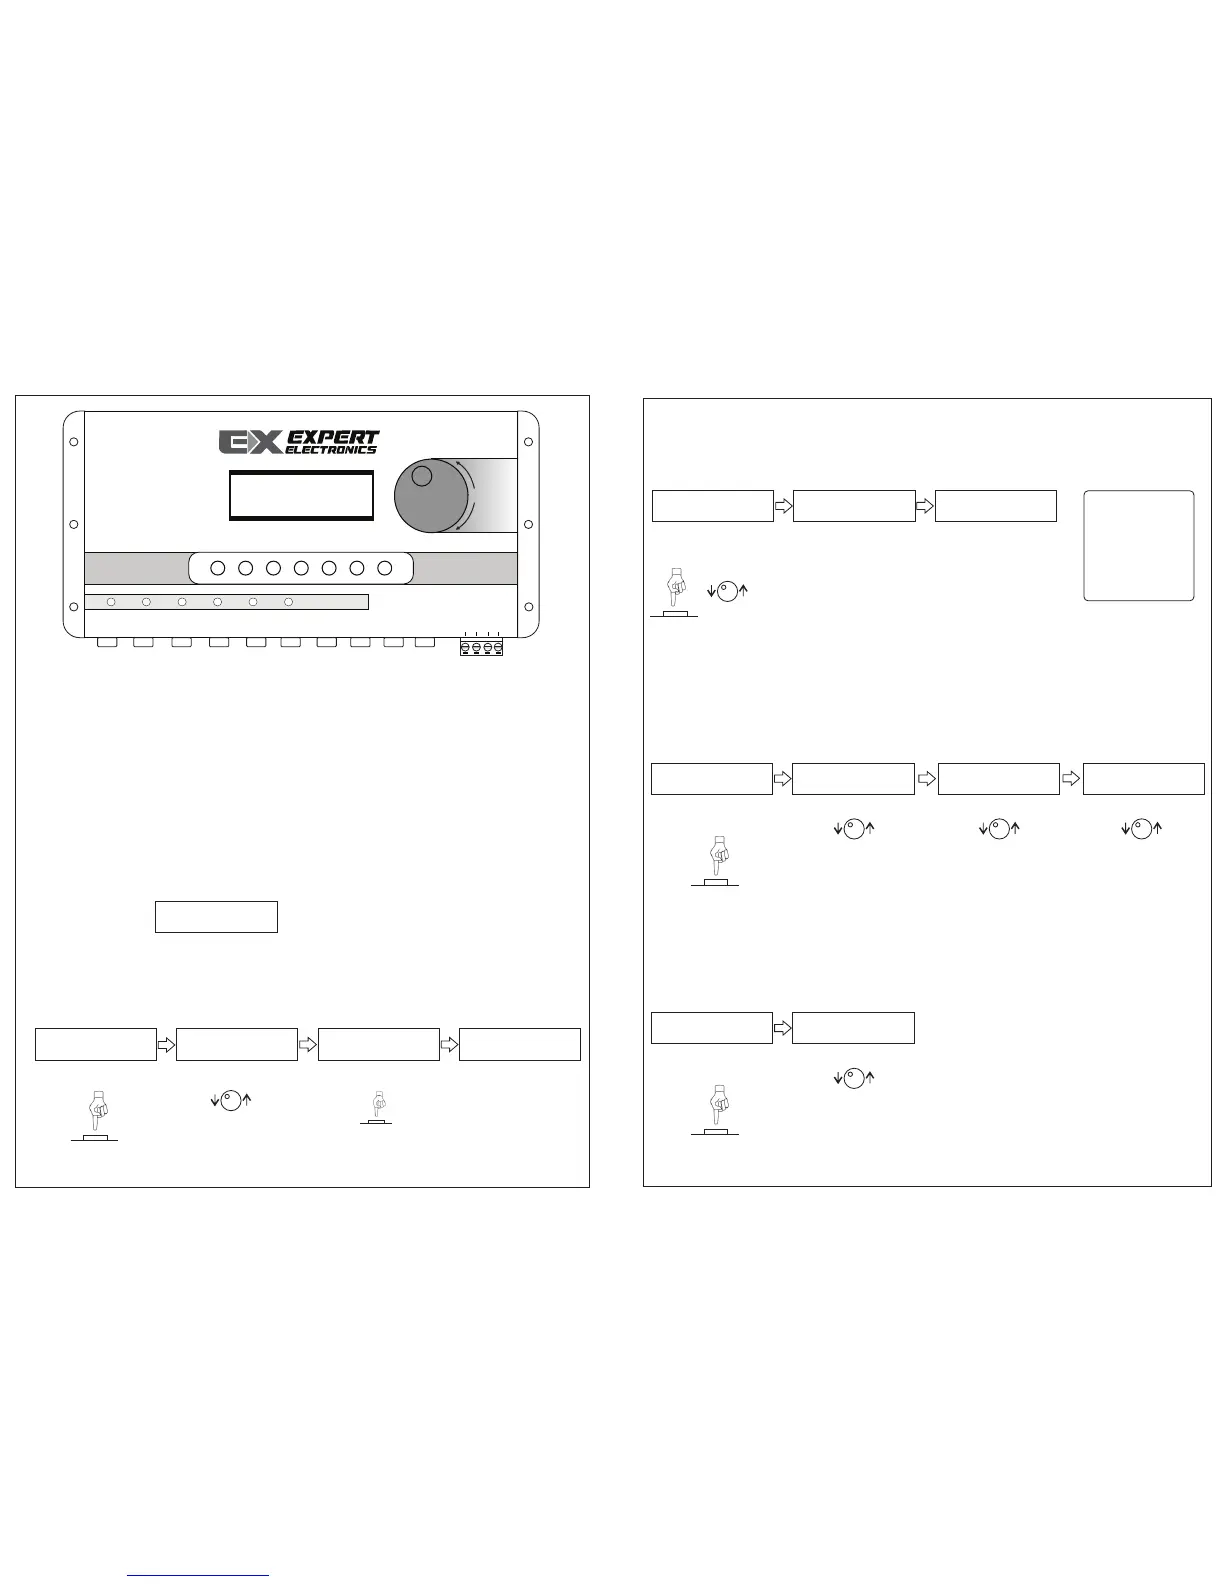
1. HOW TO CONFIGURE THE EQUALIZER:
Press the ESC button to go initial display, turn the encoder until EQ IN.
In the display the user can see:
Repeat the 2º and 3º
steps to configure
other 27 frequencies.
The gain level has
steps of 1dB and
limited between -12dB
and 12dB.
Press the Encoder to
change the equalizer’s
frequency.
2. HOW TO CONFIGURE THE PRESETS (CUSTOM1, CUSTOM2, CUSTOM3):
Press ESC to go initial display and then turn or press the encoder until
CROSS/EQ/LIM/ALL CUSTOM, the user can see:
Press or turn the
encoder.
See the display
changed to next user’s
definition (CUSTOM2),
now the user can
configure a new preset
that will be saved in
memory selected.
For accessing the next
memory, repeat the
first and second steps.
OBS: the user’s
definitions save
others
configurations
changed on
processor, and
not just the
equalizer.
3. HOW TO EQUALIZER CHANNELS (CH1, CH2 , CH3, CH4, CH5 CH6):
Press the ESC button to go initial display.
Turn the Encoder until the EQ CH function.
Press the CH to be
equalized.
Press the Encoder to
choose the Q (quality)
factor.
Press the Encoder to
choose the level gain.
Turn up or down the
gain level. Repeat the
steps 2, 3 and 4 to
configure the others
ones.
4. HOW TO CONFIGURE THE CHANNELS:
Press the ESC button to go initial display.
Turn the Encoder until the Routing Channel function:
Press to choose the
channel to be routing.
Choose L, R or L+R
(mono). Press ESC to
go back, choose the
next channel and
repeat the 1 and 2
steps or choose the
function.
Configuration and installation processor guide Configuration and installation processor guide
EQ IN
Freq: 31Hz
G: 0dB=>
Press the Encoder.
1º Step: 2º Step: 3º Step:
Turn the Encoder:
Press the Encoder:
4º Step:
CROSS/EQ/LIM/ALL
CUSTOM
1º Step: 2º Step: 3º Step:
EQUALIZER
CUSTOM 1
EQUALIZER
CUSTOM 2
EQ CH
F1: 500 Hz
1º Step: Channels 2º Step: Choose the freq
1
3
4
EXPERT
ELECTRONICS
Turn the Encoder:
:
Channel
Routing
OUT
CH1: R
1º Step: Channels 2º Step: Choose the Input
Turn the Encoder:
Q1: 2.0
3º Step: Choose the Q
Turn the Encoder:
G1: 0 dB
4º Step: Choose the Gain
Turn the Encoder:
Freq: 40Hz
=>G: 0dB
GND
+12V
REM IN
LIMITER
FUNC
Ch6 Ch5 Ch4 Ch3 Ch2 Ch1 IN L IN R L R
Ch6 Ch5 Ch4 Ch3 Ch2 Ch1 ESC
PX- 2
REM OUT
EXPERT
ELECTRONICS
OUT
6 CH
46 - EQ
Freq: 63Hz
=>G: 0dB
 Loading...