EasyManua.ls Logo

EZPOLE DEFENDER - User Manual

EZPOLE DEFENDER
2 pages
Print Icon
To Next Page IconTo Next Page
Loading...
Instructions for the DEFENDER Sectional Flagpole
Tools & Material Needed:
l Post Hole Digger/Shovel
l Level
l Tape Measure
l Mixing Container
l 80 lbs. + of Quick Setting Cement
l Approximately 3” of Gravel
Flagpole Kit Includes:
l Aluminum Ground Sleeve
l Aluminum Gold Ball
l 3 to 5 Aluminum Flagpole Sections
(Depending on Size—13’ 3 sections, 17’ 4 sections, 21’ 5 sections)
l Top Cap installed on Top Section
l Section with Button for Half-mast purposes
l 3’ x 5’ Nylon Sewn USA Flag
(*Note not all vendors add ag)
l 2 - 2” Swivel Sleeves
l Clip Pack: 4 stainless steel clips, top swivel,
washer and ag etiquette leaet
l Manufacturer Product Warranty Registration
(Must be Returned within 90 Days of Purchase or
Warranty is Void)
See back for assembly instructions including how to y at half-mast.
STEP 1: Select agpole location. Call 811 before you dig. Check for
underground sprinklers, water and electrical lines. Make sure your ag
has clearance to y in all directions. Are you too close to the house?
Watch the roof!
STEP 2: Dig a hole approximately 26” deep by 12-18” in diameter (26”L x
12-18”W).
STEP 3: Place approximately 3” of gravel in hole to allow for drainage.
STEP 4: Place aluminum ground sleeve into gravel – to prevent concrete
from owing inside.
STEP 5: Mix cement and pour around ground sleeve. Repeat until hole is
lled (the more cement the better). It is OK to have your ground sleeve
an inch or two above ground level. Can be lled in with mulch, dirt and/
or ower bed.
STEP 6: Carefully insert pole section swedge end up into ground sleeve
as cement will be wet . Use a level to make sure pole is straight. Remove
pole section after level, concrete must cure for at least 24 hours.
STEP 7: Assemble your agpole. Flip over for proper assembly
instructions.
STEP 8: Insert agpole into ground sleeve! Enjoy!
Manufacturer suggests taking agpole down during high winds and strong storms also
storing agpole during winter for those in aected regions.
FOR PARTS AND SERVICE:
EZPOLE FLAGPOLES/ 1489 EAST 363RD STREET/ EASTLAKE, OHIO 44095
TOLL FREE: 888-454-9164/ LOCAL: 440-951-1011/ FAX: 440-951-2933/ www.ezpole.com
26”
12-18”
In Ground
Sleeve
Gravel
6-8”
3”
Concrete
Question and Answer IconNeed help?

Do you have a question about the EZPOLE DEFENDER and is the answer not in the manual?

Summary

Assembly Instructions

Installation Steps

Guide covers site selection, digging the hole, adding gravel, placing the sleeve, and setting with cement.

Final Assembly and Placement

Instructions for assembling flagpole sections and inserting the pole into the ground sleeve.

Flag Attachment and Flying

Details on attaching the flag to swivel sleeves and the top cap for display.

Flying Flag at Half-Mast

Procedure for flying the flag at half-mast using the designated button and swivel sleeves.

Overview

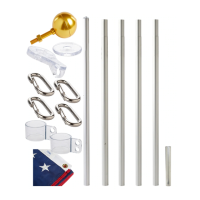
The DEFENDER Sectional Flagpole is a versatile and durable flagpole system designed for easy installation and use. It is available in various heights, including 13', 17', and 21', achieved by assembling 3 to 5 aluminum flagpole sections, respectively. The kit includes all necessary components for a complete setup, from the ground sleeve to the flag itself.

Function Description:

The primary function of the DEFENDER Sectional Flagpole is to proudly display a flag, typically the USA flag, in a residential or commercial setting. Its sectional design allows for convenient assembly and disassembly, making it suitable for seasonal use or relocation. A key feature is its ability to fly a flag at half-mast, a common practice for honoring events or individuals. The flagpole is designed to be sturdy and withstand various weather conditions, though the manufacturer recommends taking it down during high winds and strong storms, and storing it indoors during winter in affected regions.

Important Technical Specifications:

  • Material: The flagpole sections, ground sleeve, and gold ball are all made of aluminum, ensuring durability and resistance to corrosion.
  • Height Options: Available in 13' (3 sections), 17' (4 sections), and 21' (5 sections).
  • Ground Sleeve Dimensions: The ground sleeve is designed to be installed in a hole approximately 26" deep and 12-18" in diameter. It requires about 80 lbs. or more of quick-setting cement for secure installation, along with approximately 3" of gravel for drainage.
  • Flag: The kit includes a 3'x 5' Nylon Sewn USA Flag (*Note: not all vendors include the flag, as indicated in the manual).
  • Hardware: The kit comes with 2-2" swivel sleeves, a clip pack containing 4 stainless steel clips, a top swivel, and a washer. These components are crucial for attaching and allowing the flag to move freely without tangling.
  • Half-Mast Feature: A dedicated section with a button is included for half-mast purposes. On 13' and 17' models, this button is on the top section. For the 21' model, it's on the section directly beneath the top section.

Usage Features:

  • Installation Process: The installation involves several straightforward steps:
    1. Location Selection: Choose a suitable location, ensuring clearance from underground utilities (call 811 before digging), sprinklers, electrical lines, and structures like roofs.
    2. Digging the Hole: Dig a hole 26" deep by 12-18" in diameter.
    3. Drainage: Add approximately 3" of gravel to the bottom of the hole for drainage.
    4. Ground Sleeve Placement: Insert the aluminum ground sleeve into the gravel, ensuring no concrete flows inside.
    5. Concreting: Mix and pour quick-setting cement around the ground sleeve until the hole is filled. The ground sleeve can be an inch or two above ground level and can be covered with mulch, dirt, or a flower bed.
    6. Initial Pole Insertion & Leveling: While the cement is wet, carefully insert a pole section (swedge end up) into the ground sleeve. Use a level to ensure the pole is straight. Remove the pole section after leveling, and allow the concrete to cure for at least 24 hours before proceeding.
    7. Flagpole Assembly: Once the concrete is cured, assemble the flagpole sections. The top section with the gold ball and top cap goes at the very top. The section with the half-mast button is placed according to the model's height (top section for 13'/17', second from top for 21'). Remaining plain sections go underneath.
    8. Final Insertion: Insert the assembled flagpole into the cured ground sleeve.
  • Flag Attachment: The top of the flag attaches to the top swivel with a stainless steel clip. The bottom of the flag attaches to the top hole of the first 2" swivel sleeve with a stainless steel clip. A second 2" swivel sleeve is provided for flying a second flag.
  • Half-Mast Operation: To fly the flag at half-mast:
    1. Unclip the flag from the top swivel and the first 2" bottom swivel sleeve.
    2. Clip the top clip of the flag to the first 2" bottom swivel sleeve, which will rest on the half-mast button.
    3. Clip the bottom clip of the flag to the second 2" bottom swivel sleeve.
  • Ease of Use: The sectional design simplifies assembly and allows for compact storage when not in use.

Maintenance Features:

  • Warranty Registration: The manufacturer requires product warranty registration within 90 days of purchase; otherwise, the warranty is void. This highlights the importance of timely registration for any potential maintenance or replacement needs.
  • Weather Considerations: While durable, the manufacturer advises taking the flagpole down during high winds and strong storms to prevent damage. For regions with harsh winters, storing the flagpole indoors is recommended. This proactive approach helps extend the lifespan of the product.
  • Parts and Service: EZPOLE FLAGPOLES provides dedicated support for parts and service, with contact information including a toll-free number, local number, fax, and website. This ensures that users can easily obtain replacement parts or assistance if needed, contributing to the long-term usability and maintainability of the flagpole.
  • Included Leaflet: A flag etiquette leaflet is included in the clip pack, providing guidance on proper flag handling and display, which indirectly contributes to the care and respect of the flag and flagpole system.

EZPOLE DEFENDER Specifications

General IconGeneral
BrandEZPOLE
ModelDEFENDER
CategorySports & Outdoors
LanguageEnglish