Do you have a question about the Faber-Castell Creativity for Kids Etch-It Workshop and is the answer not in the manual?
Press lightly on plastic. Pressing too hard creates a rougher finish.
Foam stencil may create dust. Stop tool and remove dust with hand or paper towel.
Push the tip back into place and continue use. An extra button is included.
Ensure fresh batteries are used. Pushing too hard may slow the tool.
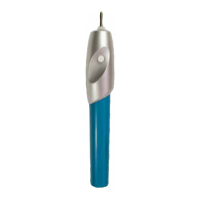
Hold the tool as shown. Press and hold the button to turn on; it turns off automatically.
Test the tool on a plastic square. Experiment with different pressure amounts.
A light touch creates a cleaner etch. Choose your accessory and design.
Peel stencils from backer, position on accessory, and trace design outlines. Peel carefully after use.
Normal wear is expected. Stencils are typically intended for one-time use.
Place the inside of the stencil on your accessory to etch around the outside.
Plan your design before etching. Do not stick stencils to paper.
Use alphabets on the back page. Trace outlines with the etching tool for words or initials.
Add colorful inserts or photos to backpack clips, frames, and room signs.
Trace frame onto insert, cut out, and place inside. Consider etching both sides.
Trace image onto paper or photo, insert into frame, and replace back.
Thread string through holes in backer and sign. Secure with a knot for hanging.
| Brand | Faber-Castell |
|---|---|
| Model | Creativity for Kids Etch-It Workshop |
| Category | Educational Equipment |
| Language | English |