Do you have a question about the Faber Galileo BK A830 and is the answer not in the manual?
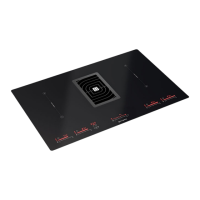
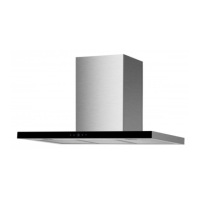
This document describes the GALILEO BK A830, a combined induction hob and extractor appliance designed for domestic kitchen use. It integrates cooking functionality with an extraction system to remove kitchen smells.
For safe and correct operation, users must read the manual thoroughly before installation and use. It's crucial to keep these instructions with the appliance for future reference or if the appliance is sold. Users should be fully aware of the appliance's operation and safety features.
Induction systems in these hobs comply with EMC standards and the EMF Directive, ensuring they do not interfere with other electronic devices. However, individuals with heart pacemakers or other electronic implants should consult their medical doctor or the implant manufacturer to confirm sufficient interference resistance.
Electrical connections must be performed by a specialized technician, adhering to the guidelines in the "ELECTRICAL CONNECTION" chapter. For appliances with supply cords, the terminal arrangement and conductor length between the cord anchorage and terminals must ensure that current-carrying conductors become taut before the earthing conductor if the cord slips out. The manufacturer disclaims liability for damages resulting from incorrect or improper installation.
Before installation, verify that the mains voltage matches the rating plate inside the product. Disconnection means must be incorporated into the fixed wiring according to wiring rules. For Class I appliances, ensure adequate earthing.
The extractor must be connected to an exhaust flue using an appropriate pipe. Refer to the installation manual for purchasable accessories (minimum circular pipe diameter 120 mm). The flue route should be as short as possible. The product connects to the power net via an omnipolar switch. Air discharge regulations must be met. Do not connect the extractor to ducts carrying combustion fumes from boilers or fireplaces.
If the extractor is used with non-electrical appliances (e.g., gas burners), ensure sufficient room aeration to prevent exhaust gas backflow. When used with appliances supplied by energy other than electric, the room's negative pressure must not exceed 0.04 mbar to prevent fumes from being drawn back. Air must not be discharged into a flue used for exhausting fumes from gas or other fuel-burning appliances.
If the supply cord is damaged, it must be replaced by the manufacturer, service agent, or similarly qualified person to avoid hazards. The plug should be connected to an accessible socket compliant with current regulations. Technical and safety measures for fume discharging must strictly follow local authority regulations.
Before installation, remove all protective films. Use only the provided screws and small parts for appliance support. Failure to install screws or fixing devices according to instructions may lead to electrical hazards. Avoid looking directly at the light through optical devices. Children should not perform cleaning or user maintenance without supervision and must be supervised to prevent playing with the appliance.
This appliance is not intended for use by persons (including children) with reduced physical, sensory, or mental capabilities, or lack of experience and knowledge, unless supervised or instructed by a responsible person. Children aged 8 and above, and persons with reduced capabilities, can use the appliance if supervised or instructed on safe use and understanding of hazards.
The appliance and its accessible parts become hot during use; avoid touching heating elements. Children under 8 years old must be continuously supervised. Filters should be cleaned or replaced after the specified period to prevent fire hazards (refer to "Care and Cleaning"). Adequate room ventilation is required when the appliance is used simultaneously with gas or other fuel-burning appliances (not applicable for recirculation models).
If the surface is cracked, switch off the appliance to prevent electric shock. Do not switch on the device if the surface is cracked or if there is damage to the material thickness. Do not touch the appliance with wet body parts. Do not use a steam cleaner for cleaning. Metallic objects like knives, forks, spoons, and lids should not be placed on the hob surface as they can become hot. After use, switch off the hob element via its control, not relying on the pan detector. Unattended cooking with fat or oil can be dangerous and cause fire. Never extinguish a fire with water; instead, switch off the appliance and cover the flame with a lid or fire blanket.
Cooking processes must be supervised continuously. The appliance is not intended for operation via an external timer or separate remote-control system. Do not store items on cooking surfaces due to fire risk. Ensure the device is installed to allow disconnection from the power supply with a contact opening distance of 3 mm, ensuring complete disconnection in category III overvoltage conditions. Ensure the device is not exposed to atmospheric agents (rain, sun). Ensure appliance ventilation complies with manufacturer instructions.
The extractor appliance is designed exclusively for domestic use to eliminate kitchen smells. Never use it for other purposes. Deep fat fryers must be continuously monitored as overheated oil can burst. Do not operate the appliance with an external time switch or separate remote control system. The appliance should not be installed behind a decorative door to avoid overheating. Do not climb on the appliance to avoid damage. Do not place hot cookware on the frame to prevent damage to silicone grouting. Do not cut or prepare food on the surface or drop hard objects onto it. Do not drag cookware across the surface.
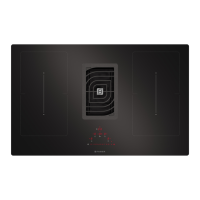
The appliance features controls for both the hob and the integrated extractor.
Hob/Hood ON/OFF: Press to turn ON, press again to turn OFF. By default, the hood operates in automatic mode when the hob/extractor is turned on. The LED indicates automatic mode. Touching the selection bar deactivates automatic mode, allowing manual control of the extractor fan. The LED turns off in manual mode.
Timer Activation: Press and hold the button for 5 seconds to activate delay mode with a preset 15-minute timer. The delay indicator LED turns on. Press and hold the button again for 5 seconds to deactivate the delay. An acoustic signal sounds for 2 minutes when the timer finishes, or it stops if the On/Off button is pressed. The countdown is not visible; the LED provides visual feedback.
Stop&Go / Recall: This function allows suspending and restarting any active hob function, setting cooking power to zero. Press to activate, then press again and slide the indicated slider from left to right to deactivate. If the Pause function is not deactivated after 10 minutes, the hob automatically turns off. This function also recovers all hob settings in case of accidental shutdown: turn the hob back on and press within 6 seconds.
Locking/Unlocking the Hob: This feature blocks hob settings to prevent accidental tampering, keeping active functions running. Repeat the operation to deactivate.
Cooking Zone Position Indicator: Cooking zones can work in combination, creating a single zone with the same power level (Bridge function). To activate, touch the two bars and the symbol lights up. Use the master zone selection bar to choose the power level. To deactivate, repeat the activation procedure.
Cooking Zone Selection / Increase/Decrease Power Level: Select a cooking zone and adjust its power level.
Supplementary Power Feature (Power Booster): This feature remains active for 10 minutes, then returns to the previously set value. Touch and scroll along the selection bar to activate Power Booster. The display shows "P" for the selected zone. To end PowerPlus, swipe down the bargraph to the desired power level.
Temperature Manager: Activates temperature management, indicated by "U" on the display.
Bridge Zone: Indicated by "]" between two cooking zones when activated.
Child Proof Lock: With the appliance switched on, touch and simultaneously for a few seconds until an acoustic signal is emitted. The display locks. If the display switches off, the lock remains active upon restarting the hob. To deactivate, press and simultaneously for a few seconds.
Extractor Fan Selection / Increase/Decrease Extraction Speed (Power): Adjust the fan speed.
Activation/Deactivation of Automatic Function: By default, automatic mode is active. Touching the cooker hood selection bar deactivates automatic mode, allowing manual fan operation. The LED turns off. To reactivate, press the button, and the LED lights up.
Charcoal Filter Activation: Press the button on the hood for 5 seconds the first time it's switched on. The lit icon indicates when charcoal filter maintenance is needed. The grease filter cleaning notification via LED is always enabled.
Resetting Activated Carbon Odour Filter Saturation: After filter maintenance, press and hold the button for 5 seconds. The grease LED turns off, and the indicator countdown restarts. Press and hold the button for 5 seconds. The odour LED turns off, and the indicator countdown restarts.
INTENSIVE 1 Speed: Runs for 10 minutes, then returns to the previous speed.
INTENSIVE 2 Speed: Runs for 5 minutes, then returns to the previous speed.
Induction hobs differ significantly from conventional hobs. An induction coil beneath the glass ceramic creates a rapidly alternating magnetic field, directly heating the magnetizable base of the cookware. The glass ceramic is only heated by the hot cookware. If cookware is removed, the power supply is immediately interrupted.
Pan Detection: Each cooking zone has pan detection, recognizing cookware with a magnetizable base. If cookware is removed or unsuitable cookware is used, the bargraph flashes with "U". If no cookware is placed on the zone for 10 seconds, the zone switches off automatically, and "U" is displayed.
Cookware: Only cookware with a fully magnetizable base is suitable. The magnet should adhere to every point on the entire base. Cookware must be metal with magnetic properties and a sufficiently large base.
Noise During Cooking: Cookware may produce noise, which does not indicate malfunction. Noise depends on the cookware; changing cookware may help if it's disturbing.
Energy-Saving Advice: The pan base diameter should match the cooking zone diameter. When buying a pan, check if the diameter refers to the base or top. For long cooking times, use a pressure cooker to save time and energy and preserve vitamins. Ensure the pressure cooker has enough liquid to prevent overheating. Always cover pans with a suitable lid. Choose a pan appropriate for the food quantity to avoid energy waste.
Induction technology creates electromagnetic fields that heat cookware directly. Pots and pans can produce various noises or vibrations depending on their manufacturing.
The manual provides a table mapping power levels to cooking methods and uses:
These settings allow defrosting food, gently melting butter/chocolate/honey, keeping ready-cooked food warm at 74°C, and slow cooking at 92°C to preserve nutritional value. To activate: select the cooking zone, press the button multiple times to cycle through the settings (Melting, Keep Warm, Slow Cooking), indicated by "I", "II", "III" respectively.
This function allows two individual cooking zones to be adjusted together. Press the bargraphs of the two cooking zones; the display shows "[" on one side and "]" on the other. If one zone is already running, its power level and operating time are used for both. If both are running, their times are cleared, and power levels are displayed. Boost speed cannot be set in Bridging function.
Maintenance on electrical components should only be carried out by the manufacturer or customer service. Damaged cables must be changed only by the manufacturer or customer service. When contacting customer service, provide the fault type, appliance model (Art./Cod.), and serial number (S.N.), found on the data plate on the bottom side of the product.
The manual lists various error codes, their descriptions, possible causes, and remedies:
The Activated Charcoal odour filter can be regenerated; follow the instructions on the kit for regeneration and replacement times. Grease filters (Z) must be cleaned every 2 months, or more frequently with heavy usage, and can be washed in a dishwasher.
General Recommendations: Never use scouring pads, steel wool, muriatic acid, or other products that could scratch or mark the surface. Do not consume food that accidentally falls or settles on the hob's functional or aesthetic elements.
Cleaning the Appliance: Clean the appliance after every use to prevent food residues from burning. Dried-on and burnt-on dirt requires more effort. For everyday dirt, use a soft cloth or sponge with water and a suitable cleaning agent, following the manufacturer's advice. Protective cleaning agents are recommended. Remove encrusted dirt (e.g., boiled-over milk) with a glass ceramic hob scraper while the hob is still warm. Follow the scraper manufacturer's advice. Remove sugary foods (e.g., marmalade) with a glass ceramic hob scraper while the hob is still warm to prevent damage to the glass ceramic surface. Remove melted plastic similarly. Remove limescale stains with a small amount of lime-dissolving solution (e.g., vinegar or lemon juice) when the hob is cool, then clean with a damp cloth.
The cooking hob is designed for built-in installation in a worktop above a kitchen cabinet of 600 mm or more width. If installed in flammable material, strict adherence to guidelines and standards for low voltage installations and fire protection is required. For fitted units, components (plastic materials and veneered wood) must be assembled with heat-resistant adhesives (min. 100 °C); unsuitable materials or adhesives can cause warping and detachment.
The kitchen cabinet must provide sufficient room for the appliance's electrical connections. Suspended kitchen cabinets above the appliance must be installed at a distance that allows comfortable working. Hardwood decorative borders around the worktop behind the appliance are permitted, maintaining minimum distances as indicated in the installation illustrations (150 mm for side wall, 40 mm for rear, 500 mm minimum for cabinets above). To prevent liquid leakage between the hob edge and countertop, apply the provided adhesive seal along the entire outer edge of the hob before assembly.
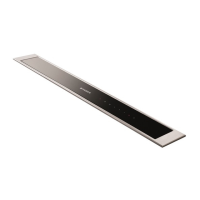
| Type | Wall-mounted |
|---|---|
| Material | Stainless Steel |
| Number of Speeds | 3 |
| Lighting | LED |
| Colour | Black |
| Noise level | 67 dB |
| Number of Motors | 1 |
| Width | 830 mm |
| Control Type | Touch |