8
*%
4 THE OVEN
4.1 STRUCTURE AND ACCESSORIES
4CF-564 E 4CF-644 E
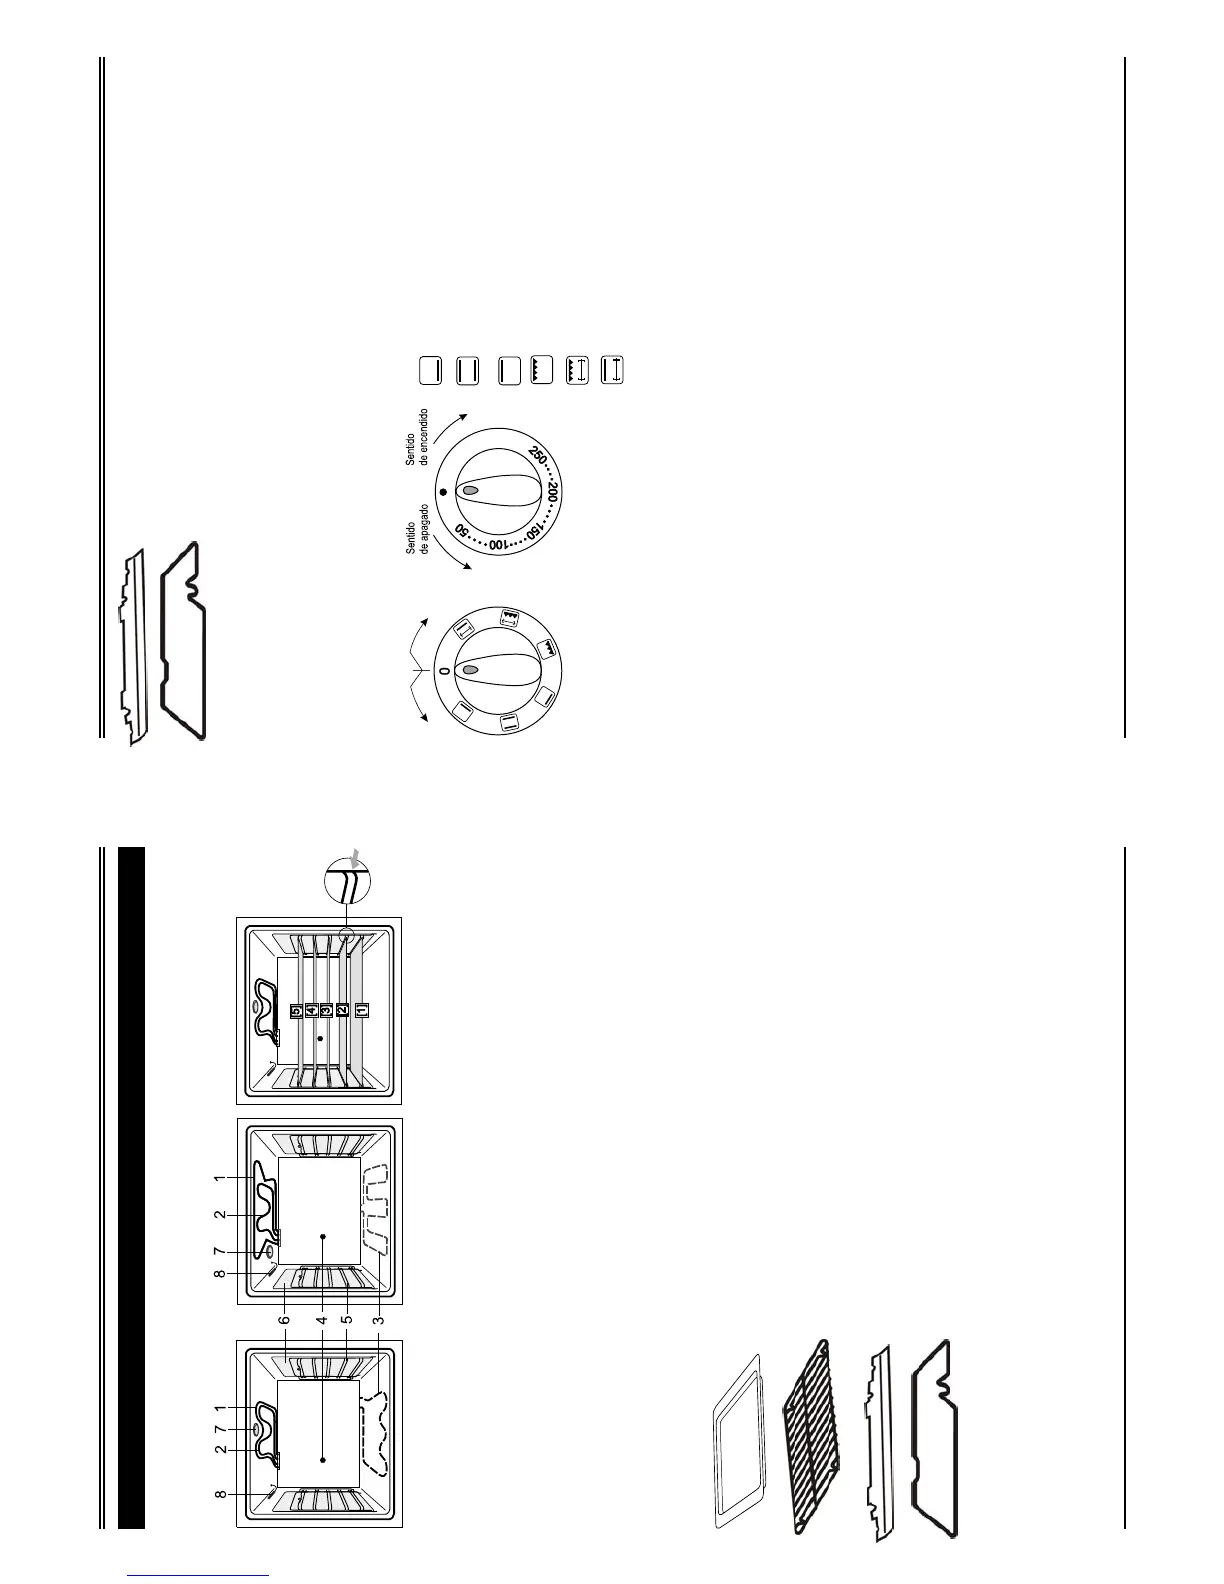
• Installed on five levels, there are guides [1], [2], [3], [4] and [5], for placing the
baking tray or grate shelf with the dishes.
• Installed in the upper part of the oven, there are upper heater 1 and grill heater 2, and
lamp 7 for lighting its interior, and beneath the floor there is (invisible) lower heater 3.
• The oven side walls are equipped with additional covers 6. Covers 6 are coated with
special catalytic enamel featuring self-cleaning properties.
THE OVEN
Fig. 6
1 - upper heater; 2 - grill heater; 3 - lower heater; 4 - turnspit drive; 5 - runners;
6 - side self-cleaning covers; 7 - oven lighting lamp; 8 - temperature sensor
ACCESSORIES
Enamelled baking tray for cooking meat, fish and casseroles.
It can also be used as a drip tray to catch dripping fat when
grilling directly on the grate shelf.
Grate shelf is designed to take normal oven dishes. It can
also be used without a pan for grilling foods, such as fish.
Knob protection screen protects the knobs from overheating.
It should be fitted when grilling foods in the oven with the
oven door not completely closed.
Turnspit frame is used to fit the turnspit.
Fig. 7
4.2 FUNCTION SELECTOR
• On selecting a function the appropriate indicator light will come on and the oven light
will also come on.
• Always turn the function selector back to 0 when you have finished using the oven.
9
(6
HORNO
Protección de mandos protege los mandos del
calentamiento excesivo. Debe colocarse con la puerta
entreabierta, durante la cocción en el horno.
Soporte del girapollos, sirve para fijar el mismo.
Fig. 7
4.2 MANDO SELECTOR DE FUNCIONES
• Después de posicionar el mando selector de funciones (figuras 18 ó 19) en la
posición de trabajo, se enciende el piloto de control y la lámpara del horno.
4.3 MANDO REGULADOR DE TEMPERATURA
• El mando regulador de temperatura (Fig. 20) permite posicionar y mantener de
forma automática la temperatura del horno a nivel preseleccionado.
• En el mando se han marcado las posiciones 50, 100, 150, 200, 250 que
corresponden a las temperaturas del horno medidas en
o
C.
• Al posicionar la temperatura, gire el mando en sentido horario y al apagar - en
sentido antihorario.
• Después de posicionar la temperatura se activan las resistencias y se enciende el
piloto de control. Al llegar a la temperatura deseada las resistencias y el piloto se
apagan automáticamente. Las resistencias y el piloto se encienden y se apagan
como consecuencia del funcionamiento del regulador de temperatura.
4.4 ENCENDIDO Y APAGADO DEL HORNO
4.4.1 ENCENDIDO DEL HORNO
1. Seleccionar el modo de calentamiento girando el selector de funciones.
2. Posicionar la temperatura deseada con el mando regulador de temperatura.
4.4.2 APAGADO DEL HORNO
Cuando el alimento esté listo, gire el mando de selector de funciones y el mando
regulador de temperatura hasta la posición cero 0.
- horno apagado
- resistencia inferior
- resistencia inferior y superior
- resistencia superior
- resistencia del grill
- girapollos y resistencia del grill
- girapollos y resistencia superior
• Después de terminar la cocción apague siempre el horno.
El mando dispone de siguientes posiciones:
Fig. 8 Fig. 9
0
 Loading...