6
(6
3.1 PLACA ELÉCTRICA
¡ADVERTENCIA!
Al aparecer cualquier grieta en la placa eléctrica, desconecte el aparato
inmediatamente y avise al personal autorizado para realizar reparaciones.
Alcance de uso del mando de 7 posiciones
Fig. 2
ENCIMERA
- el cable no debe entrar en contacto con las superficies cuya temperatura sea
superior a 75
O
C,
- en caso de que el aparato se entregue sin cable, utilizar uno del tipo H05RR-F ó
H05V2V2 con la sección adecuada como arriba se ha indicado.
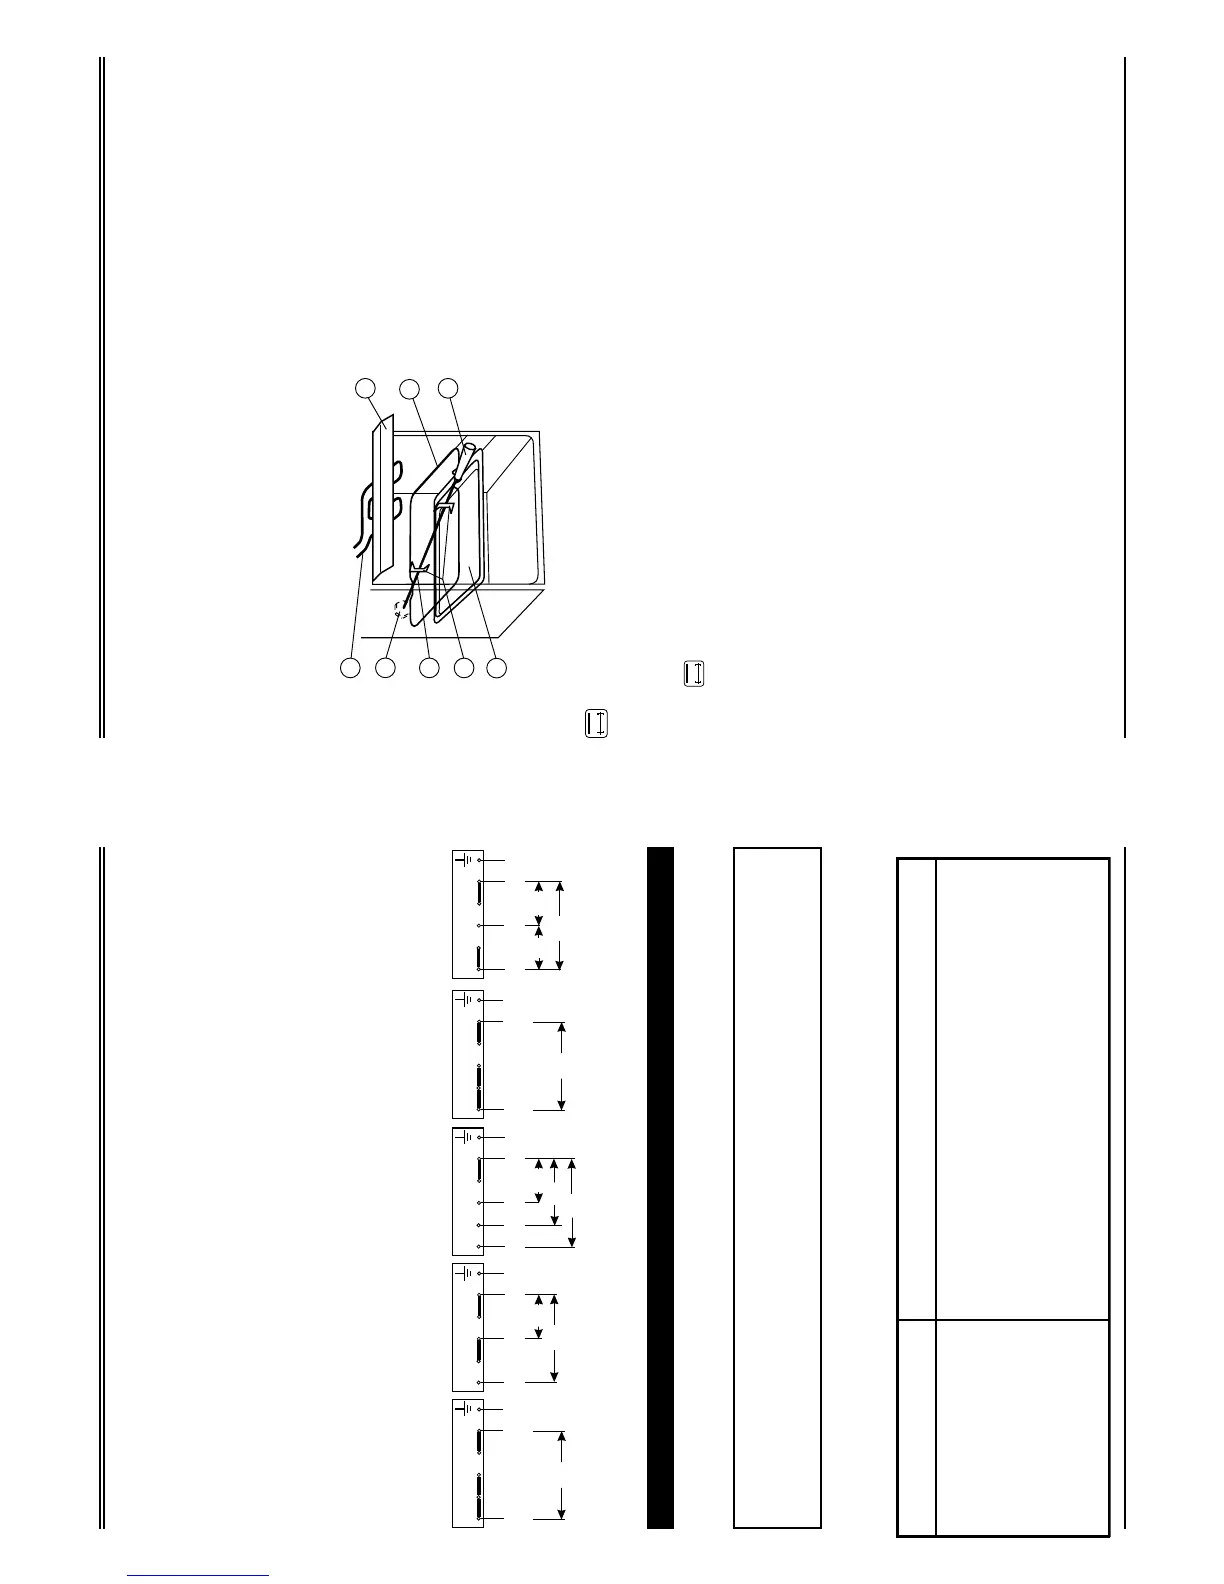
A continuación se representa el esquema de posibles conexiones:
3 ENCIMERA
Posición del mando Sirve para
6
5
4
3
2
1
0
hervirrápidamente o asarasar
fuertemente carnes y pescados
asar suavemente
cocinar alimentos voluminosos, sopas densas
cocinar patatas, sopas
estofar verduras, pescados en salsa
placa apagada
L
1
L
2
L
3
N
230V
230V
230V
PE
L
1
L
L
2
3
NN
3N ~400V 50Hz
5 x 1,5 mm
2
L
1
L
2
N
230V
230V
PE
L
1
L
L
2
3
NN
2N ~400V 50Hz
4 x 2,5 mm
2
L
1
N
230V
PE
L
1
L
L
2
3
NN
1N ~230V 50Hz
3x6mm
2
L
1
L
230V
PE
L
1
L
L
2
3
NN
2 ~230V 50Hz
3x6mm
2
2
L
1
L
2
L
230V
230V
230V
PE
L
1
L
L
2
3
NN
3 ~230V 50Hz
4 x 2,5 mm
2
3
Int.nominal
por fazes
34,8 A
Protección
40 A
Int.nominal
por fazes
26,1 A
Protección
32 A
Int.nominal
por fazes
13,0 A
Protección
16 A
Int.nominal
por fazes
34,8 A
Protección
40 A
Int.nominal
por fazes
22,6 A
Protección
25 A
11
*%
–
slide one fork onto the spit and stick meat onto it while paying attention it is
symmetrical along the stick; then slide in the second fork and secure it in its
position by tightening the set screw;
– insert the pointed end of spit into the roast-spit drive connection, push it home
and rest the other end of spit on the frame;
– screw out the handle, install the knob protection screen and keep the oven door
totally open;
– turn on the oven, adjust the temperature and, possibly, set the time of grilling.
Fig. 11
1 - grill heater;
2 - roasting-spit drive;
3 - forks;
4 - spit;
5 - baking tray;
6 - roasting-spit frame;
7 - knob protection screen;
8 - handle.
THE OVEN
3
4
5
6
7
8
1
2
UPPER HEATER TURNED ON
The function enables slower roasting of the food on the rotating spit;
recommended for grilling sausages. When operating the oven accomplish the
same steps as in previous point but the function selector knob turn to position
.
4.6 GENERAL HINTS ON PREPARING DISHES
4.6.1 HINTS ON OPERATING THE OVEN
• When the indicator lamp goes off, it means the oven reached the temperature
required. If along with the baking tray delivered with cooker you use other baking
tins, they shall be placed in the centre of the wire shelf.
• When selecting the temperature of baking, consider the following rules:
Dough rolled out to thin cake - high power, short baking time.
Thick and liquid dough - lower power, longer baking time.
• To check if the baking food is ready, insert a wooden stick into it a few minutes before
the oven is turned off. If the pastry does not stay stuck to the stick - the food is ready.
After the baking, leave the pastry in the oven for another 5 minutes.
4.6.2 BAKING / ROASTING IN THE OVEN
The baking should be carried out using the convectional heating after setting the required
temperature. Place the dish in the oven when the red indicator light goes out.
 Loading...