3
GB
4. Only use proper tools to install this product.
5. Ensure to tighten screws well but do not over
tighten them.
3. Installation
Transportation
• The appliance is heavy. Therefore move the appliance whenever possible
by pushing or pulling it, rolling on the castors.
• When lifting is unavoidable, use the recessed handles and lift with two
people.
• Do not move the appliance during operation.
• Wait at least 2 hours after moving before operating the appliance to avoid
damages on the refrigerating circuit.
Placement
When choosing an installation place, consider following points:
• Observe all safety warnings!
• Ensure the minimum surrounding distance in every direction of 30 cm
and 100 cm to other electrical appliances.
• Keep a surrounding distance of minimum 50 cm around the outside
exhaust wall outlet and protect it from entering objects and moisture.
• Make sure the wall behind the appliance is an exterior wall not a divider
and the drill holes can be made in a safe way, not obstructed by hidden
objects in the wall.
• Ensure that a suitable power outlet is within reach at the desired location
and remains accessible after installation.
• Consider that during dehumidifying operation water is collected inside
the appliance, which must be continuously drained through a connected
drainage hose into a suitable container or a nearby drain.
• Ensure there are no obstacles obstructing the airflow.
The appliance is intended for the following ambient temperatures:
Mode Temperature
17 °C (62 °F) - 35 °C (95 °F)
17 °C (62 °F) - 35 °C (95 °F)
13 °C (55 °F) - 35 °C (95 °F)
WARNING! Any other conditions and locations as the mentioned above
may result in reduced performance of the appliance, injuries and damage to
property.
Air exhaust
1. Screw the wall connector and exhaust connector onto either side of the
exhaust hose.
2. Connect the exhaust connector to the air exhaust of the appliance.
3. Use the wall adaptor as template to mark the hole pattern on the wall.
4. Drill the holes with a suitable power tool.
5. Free the holes from dust and mount the wall adapter using supplied
screws and plugs.
6. Connect the wall connector to the wall adaptor.
Notes:
• The exhaust hose can be expanded and compressed, but for optimal
performance, keep the exhaust length to a minimum.
• Do not extend the exhaust hose.
• Avoid over-bending.
• Observe the decommissioning instructions in the respective section, if
the appliance is not to be used for a longer period of time.
Drainage hose
The drainage hose is used to drain water from the upper drain outlet.
1. Slide the drainage hose as far as possible onto the outlet.
2. Lead the other end of the drainage hose into a suitable container or a
nearby drain.
Notes:
• Depending on the set modus the water is either drained directly or
collected in an internal tank. Drain the water respectively.
• Always cover the drain outlets when not in use.
• Observe the decommissioning instructions in the respective section, if
the appliance is not to be used for a longer period of time.
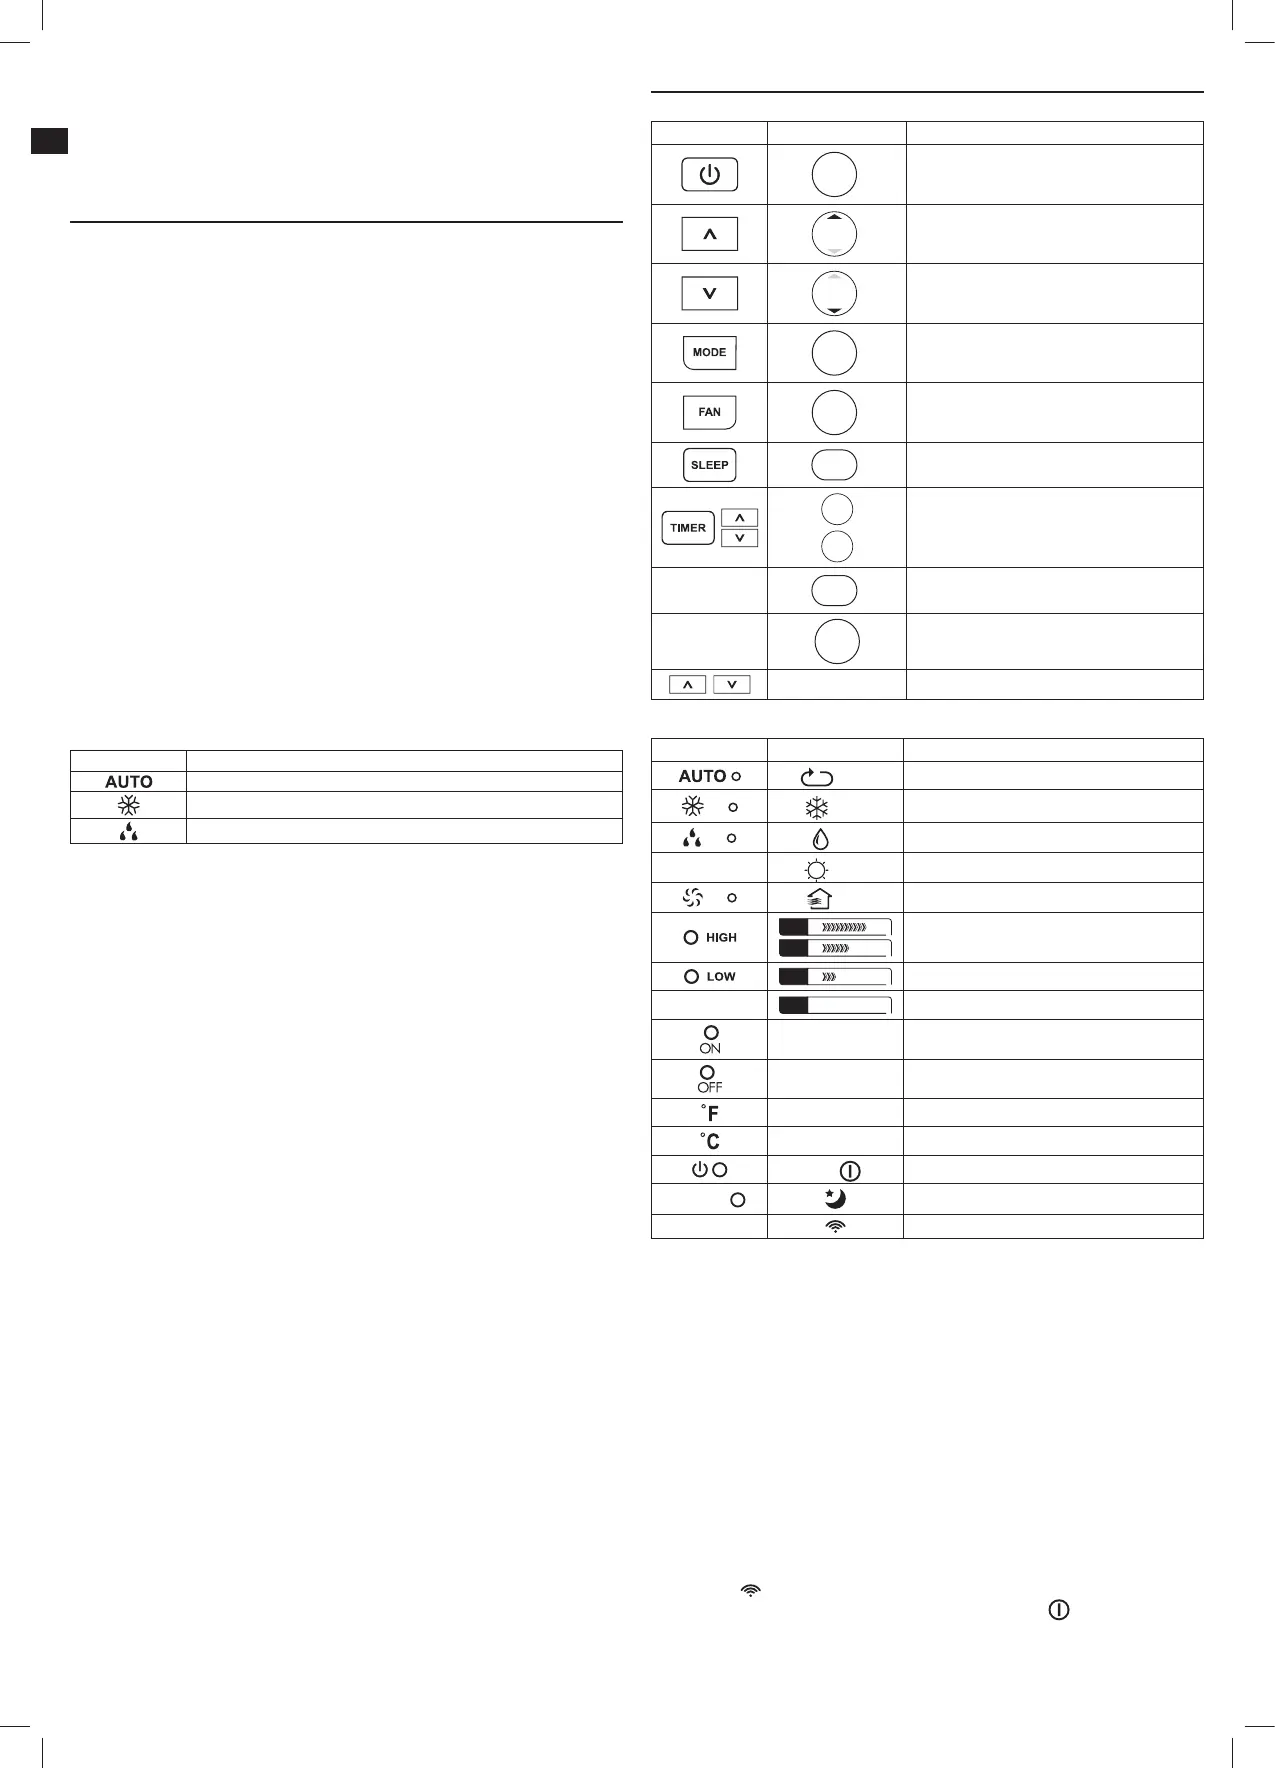
4. Operation
Functions
Control panel Remote control Function
ON/OFF
switch on or into standby
TEMP
increase value
TEMP
decrease value
MODE
toggle through modes
FAN
toggle through fan speeds
SLEEP
switch sleep mode on/off
TIMER
OFF
TIMER
ON
adjustment of timer on and standby time
-
LED
display and indicator lights on/off
-
SHORT
CUT
choose preset mode and temperature
- switch between °C and °F units
Indicators
Control panel Remote control Function
Auto
appliance in automatic mode
Cool
appliance in cooling mode
Dry
appliance in dehumidifying mode
-
Heat
function not provided
Fan
appliance in fan mode
FAN
FAN
fan speed set to high
FAN
fan speed set to low
-
FAN Auto
fan speed set to Auto
Timer On auto-on timer set
Timer Off auto-off timer set
- temperature displayed in Fahrenheit (°F)
- temperature displayed in Celsius (°C)
— /
appliance in standby / on
SLEEP
sleep mode active
-
transmitting signal
Notes:
• Every press of a button on the control panel and every successfully
transmitted signal from the remote control is confirmed by an audible signal.
• All function of the appliance can be controlled via the control panel or
the remote control, with exception of the display illumination LED and
SHORTCUT buttons, which are to be found exclusively on the remote control.
Remote control
Using the control panel and the remote control alternately might lead to a
misalignment of the appliance and the information displayed on the remote
control.
• Press any button on the remote control and the appliance adopts the
current setting from the remote control.
Notes:
• The signals of the remote control will be transmitted with a short delay
after a button is pressed. This process is indicated by the appearing
symbol
on the remote control display.
• The operating appliance is indicated by the symbol
on the remote
control display.
• Shortly after a reset the display of the remote control shows all display
elements for a few seconds.
IM_MAC2300C_A4_161101.indb 3 1/11/16 11:28 AM