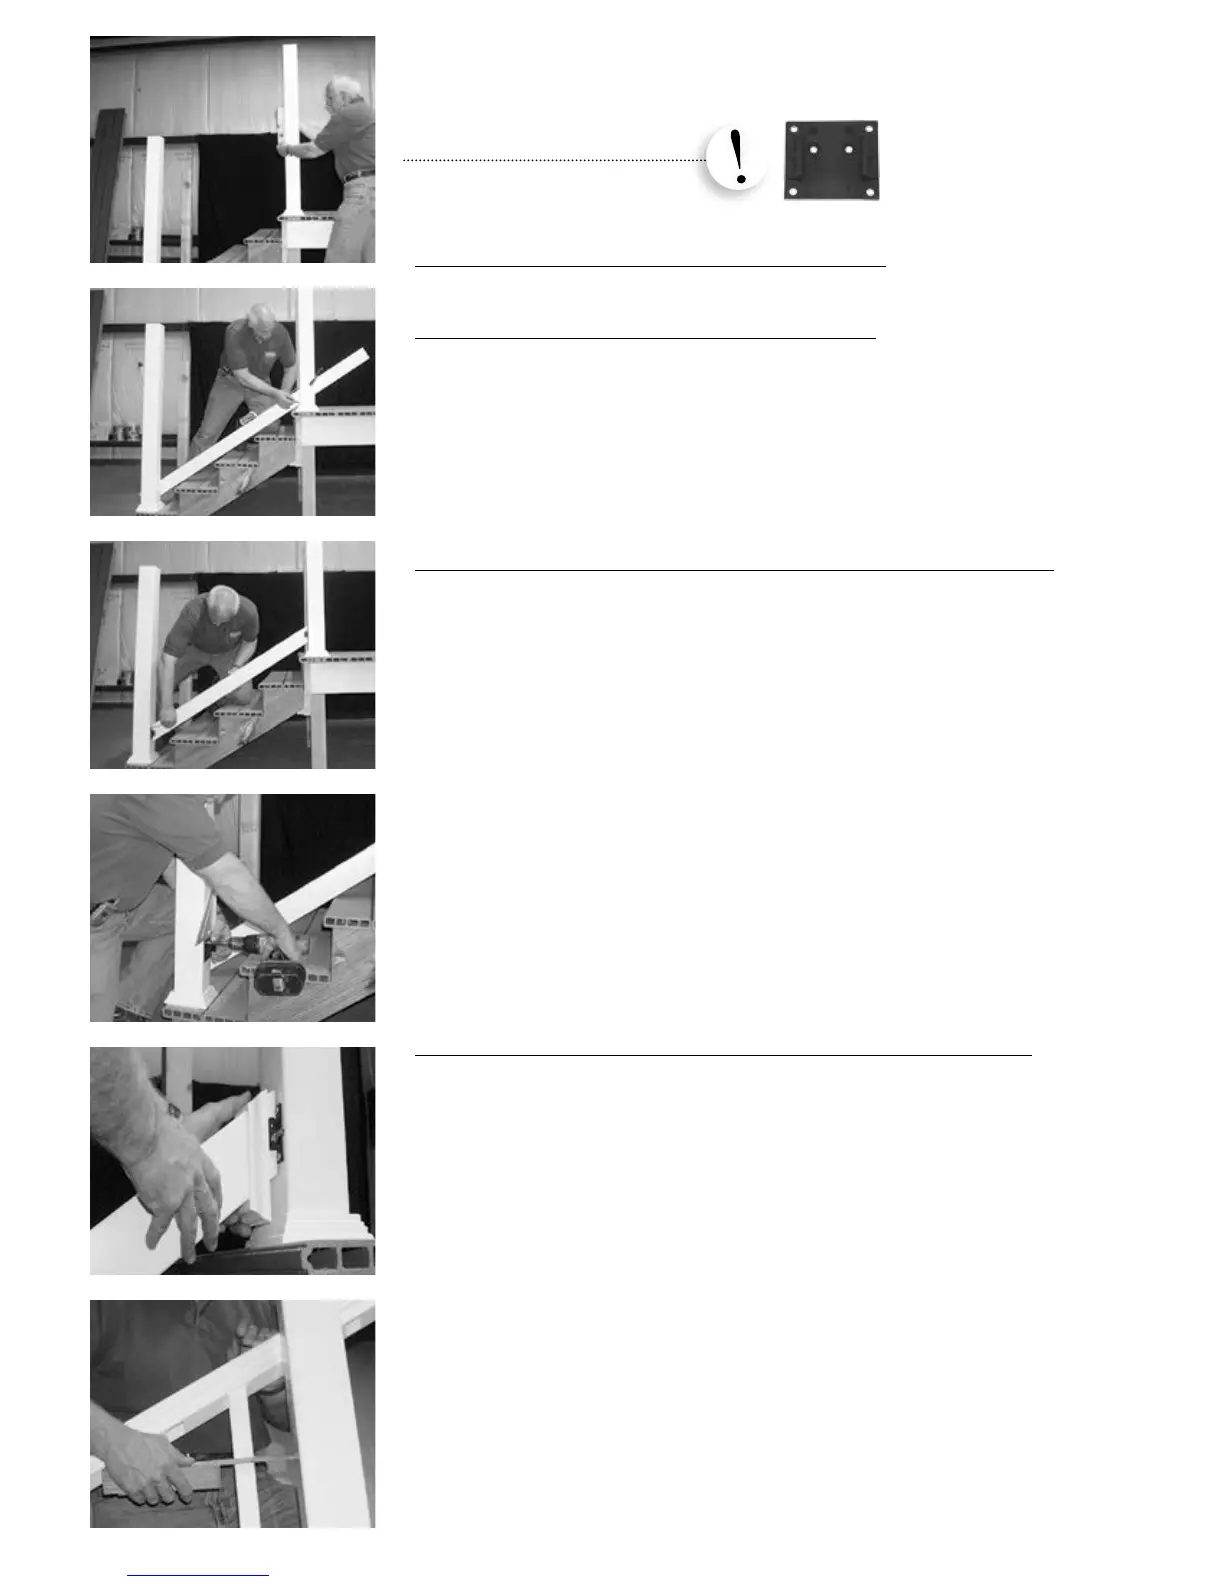
STEP 1 • POST/MOUNTING SURFACE PREPARATION
Plumb post/mounting surface. Slide vinyl post sleeve and post trim ring over post.
(See Rise/Run Chart on next page for proper angle.)
STEP 2 • BOTTOM RAIL & BRACKET PREPARATION
A) Place one end of the bottom rail on deck surface and the other end on the last stair tread nosing.
(Baluster pockets up.)
B) Measure distance from the mounting surface to the first baluster. Make sure you have maximum
and equal distance between baluster pockets at both ends of the bottom rail. With the bottom rail
set in the proper baluster spacing, draw a vertical line with a pencil on the inside of the mounting
surface where the post and rail meet. Repeat on opposite end of rail.
C) With bottom rail marked, deduct 1/4" from each rail end to allow for black mounting bracket.
Cut bottom rail to length. You may cut both aluminum and vinyl at the same time with a power miter
box or hack saw.*
STEP 3 • INSTALL BOTTOM RAIL, BRACKET & TOP RAIL PREPARATION
A)
Slide black mounting brackets onto the ends of the bottom rail and center on end of rail. Place
rail with black mounting bracket between posts set to proper height off deck and bottom tread
nosing. Mark the top of black mounting brackets on post.
(Check with local building code for height and opening requirements.)
B)
Remove the black mounting bracket from the ends of bottom rail, square and center brackets
with
the mark on the posts. Mark the screw holes in the four (4) corners of the black mounting bracket.
Pre-drill four (4) 5/32" holes. Install black mounting brackets with four (4) #12 x 1-1/4" pan head
screws.
C) With both black mounting brackets screwed to mounting surfaces, slide bracket trim rings on
end
of rail,
flat side towards mounting surface. (TIP: If pitch is greater than 32° cut along marks on
inside of all V210 rail bracket trim rings.) Set bottom rail into black mounting brackets making sure
rail is centered. (TIP: You may want to cut blocks to proper height for rail to rest on.) Insert one (1) #8
x 1" self-tapping pan head screw through one of the holes along the side of the black mounting
bracket, through vinyl rail and into aluminum insert. Only one (1) screw per side is needed. Slide
bracket trim ring onto black mounting bracket. Repeat on opposite post.
NOTE: If bracket trim ring will not snap on black mounting bracket, make sure mounting screws
(bracket to post connection) are not over-tightened.
D) Insert a baluster into the baluster pocket closest to the post at each end of stair. Set top rail in
place over balusters. Measure the distance from baluster to post at bottom rail and adjust the top
rail to match. Draw a vertical line with a pencil on the inside of the mounting surface where the post
and rail meet. Repeat on opposite end of rail.
STEP 4 • INSTALL BALUSTERS & TOP RAIL FOR V210 VINYL RAILING
(Skip STEP 4 if using V220 rail)
A) With top rail marked, deduct 1/4" from each rail end to allow for black mounting bracket.
Cut top rail to length.
B) Slide black mounting brackets on each end of rail. Insert two (2) end balusters in bottom rail,
match up with top rail and align top rail in between posts. With top rail in place and black mounting
bracket centered on rail ends, mark black mounting bracket position on post.
Remove the black
mounting bracket from the ends of top rail, square and center brackets
with the mark on the posts.
Mark the screw holes in the four (4) corners of the black mounting bracket. Pre-drill four (4) 5/32"
holes. Install black mounting brackets with four (4) #12 x 1-1/4" pan head screws.
C) With black mounting brackets in place, you may now insert your balusters in bottom rail baluster
pockets. With balusters in place, slide bracket trim rings on each end of top rail, flat side towards
mounting surface. Starting at the bottom of stair run, slide top rail into black mounting bracket.
Insert balusters into baluster pockets as you work upward to top of stair. Continue up to top of stair
run. Insert one (1) #8 x 1" self-tapping pan head screw through one of the holes along the side of
the black mounting bracket, through vinyl rail and into aluminum insert. Only one (1) screw per
side is needed. Slide bracket trim ring onto black mounting bracket. Repeat on opposite post.
D) Make sure all four bracket trim ring rings are snapped over black mounting brackets.
NOTE: If bracket trim ring will not snap on black mounting bracket, make sure mounting screws
(bracket to post connection) are not over-tightened.
STEP 2
STEP 3A
STEP 3B
STEP 3C
STEP 1
STEP 3D
*See saw blade manufacturer’s specs for proper blade
NOTE: If V210 rail bracket trim ring will
not snap on black mounting bracket,
make sure bracket to post mounting
screws are not over-tightened.
V210 & V220 VINYL RAILING
INSTALLATION GUIDE
 Loading...