EasyManua.ls Logo

Fanimation fanSync WFR8159 - User Manual

Fanimation fanSync WFR8159
10 pages
Print Icon
To Next Page IconTo Next Page
Loading...
WFR8159 DC WIFI Receiver
SPECIFICATION and INSTRUCTION SHEET
ELECTRICAL SPECS: 120 Volts, 60 Hertz, Fan 0.6 amp
FAN MODEL USED: Used on Odyn 84 FPD8159 DC motor fan ony.
May be used in conjunction with TR205D Remote or TW206D Wall Remote.
NOTE: If fan or supply wires are different colors than indicated, have this unit installed by a qualified electrician.
WARNING
To avoid possible electrical shock, be sure electricity is
you are not sure if the outlet box is grounded, contact a
licensed electrician for advise, as it must be grounded for
safe operation.
INSTALLATION INSTRUCTIONS:
3. Install Receiver in the Hanger Bracket:
2. The breaker and wall switch that controls the power to the
fan must be in the off position. Please make sure that the
wall switch that controls the power to the fan and ligth kit
if installed, is a true on off toggle or rocker switch. It cannot
have a dimming function on of any kind.
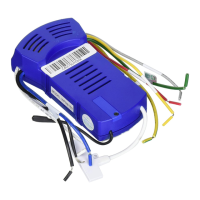
Connect wires using connectors as shown in Figure 3..
installation of ceiling canopy.
4. The receiver has a wifi antenna that can be used if you
experience range issues. (Figure 4)
5. Restore electrical power at the breaker and wall switch.
Figure 4 (Optional)
Figure 1
WIFI antenna
Ceiling
After Installation
WIFI Antenna
mount to ceiling using
wood screw
1. Dip Switch Set Up
NOTE: The remote unit has 32 different code
combinations. To prevent possible interference from or
to other remote units, simply change the combination
code in the remote and receiver.
NOTE: Factory setting is all up. Do not use this position.
WARNING:
To avoid possible fire or shock, make sure that the
electrical wires are completely inside the outlet box and not
pinched between the wall plate and the wall.
WARNING: Check to see that all connections are tight, including
ground, and that no bare wire is visible at the wire connectors,
except for the ground wire. Do not operate fan unless blades are
in place. Noise and fan damage could result.
To set the code on receiver unit, slide dip switches
to the same positions as set on the remote, when using
with the TR205D remote or TW206D wall remote.
(Figure 1)
ANTENNA
(Leave connected
and do not cut)
WIFI Antenna
Hanger Bracket
Figure 2
Figure 3
Dip Switch
1
ON
1 2 3 4 5
BLUE
BLACK
/ WHITE
BLACK
WHITE
L
N
AC
POWER
RED
GRAY
YELLOW
YELLOW
/ GREEN
GROUND
HANGER
BRACKET
HANGER
BALL
DC MOTOR
BLACK
ANTENNA
Question and Answer IconNeed help?

Do you have a question about the Fanimation fanSync WFR8159 and is the answer not in the manual?

Overview

This document describes the WFR8159 DC WiFi Receiver, a component designed for use with specific DC motor fans to enable remote and WiFi control.

Function Description:

The WFR8159 DC WiFi Receiver acts as an interface between a DC motor fan and remote control units (TR205D Remote or TW206D Wall Remote) or a WiFi network via the fanSync APP. Its primary function is to receive control signals for the fan, allowing users to adjust settings such as fan speed and light (if installed). The receiver supports 32 different code combinations, which can be set via dip switches to prevent interference with other remote units. It also features a WiFi antenna for extended range and integration with smart home systems.

Important Technical Specifications:

  • Electrical Specs: 120 Volts, 60 Hertz, Fan 0.6 amp.
  • Compatibility: Designed for use with Odyn 84 FPD8159 DC motor fans only. It can be used in conjunction with TR205D Remote or TW206D Wall Remote.
  • Control Combinations: Offers 32 different code combinations via dip switches.
  • Connectivity: Supports remote control and WiFi connectivity via the fanSync APP. Includes a WiFi antenna for improved range.

Usage Features:

Installation:

  1. Dip Switch Set Up: The receiver has dip switches that must be set to match the code of the TR205D remote or TW206D wall remote. The factory setting is "all up," which should not be used. This step is crucial for preventing interference.
  2. Power Preparation: Ensure the breaker and wall switch controlling the fan are in the "off" position. The wall switch must be a true on/off toggle or rocker switch, without any dimming function.
  3. Receiver Installation:
    • Slide the receiver into the hanger bracket.
    • Connect wires as shown in Figure 3 (Ground, Blue/Black/White, Yellow/Green, Red/Gray/Yellow).
    • Position all connected wires and the receiver antenna to allow for the installation of the ceiling canopy.
  4. WiFi Antenna (Optional): The receiver includes a WiFi antenna that can be mounted to the ceiling using a wood screw if range issues are experienced.
  5. Restore Power: After installation, restore electrical power at the breaker and wall switch.

Safety Warnings (during installation):

  • Always turn off electricity at the main fuse box before wiring to avoid electrical shock.
  • Ensure the outlet box is grounded; consult a licensed electrician if unsure.
  • Make sure electrical wires are completely inside the outlet box and not pinched.
  • Verify all connections are tight, including ground, and no bare wire is visible except for the ground wire.
  • Do not operate the fan unless blades are in place to prevent noise and damage.

Multiple Fan Control:

  • Single Remote Control: If controlling multiple fans with one handheld remote, slide the Dip Switch in ALL receivers to "ON" (Handheld). Then, set up the code for each fan by following Step 1 of the remote control speed set-up process. Each fan needs to be no more than 30 feet from the handheld control. The wall switch controlling the power to the fan(s) should be in the "off" position until programming is complete.
  • Separate Handheld Controls: If controlling multiple fans with separate handheld controls, slide the Dip Switch in the same position in both the receiver and handheld. Set up the code for each fan by following Step 1 of the remote control speed set-up process. Repeat these steps for each fan you wish to program to a separate handheld remote. The wall switch controlling the power to your fan(s) should be in the "off" position until programming is complete.

Remote Control Dip Switch Set Up:

  • Set the remote code with a small screwdriver or ballpoint pen (neither included). Slide dip switches firmly up or down to match the receiver code.
  • The remote unit has 32 different code combinations. To prevent interference, change the combination code in the remote and receiver.
  • Factory Setting: The factory setting is "all up" and should not be used.

fanSync WiFi APP Setup:

  1. Download APP: Visit the Apple App Store or Google Play Store to download the free fanSync WiFi APP.
  2. Create Account: Create your Fanimation fanSync account.
  3. Receiver Installation: Ensure your ceiling fan WiFi receiver is installed and within range of your Wi-Fi router.
  4. Add Device: Open the APP and select "add device."
  5. Connect to Fan: The APP will guide you to connect your phone to a temporary Wi-Fi hotspot broadcast by the Fanimation Ceiling Fan (e.g., "Fanimation_xxxxxx").
  6. Continue Setup: Press "CONTINUE" in the APP.
  7. Connect to WiFi Router: Select your WiFi router and enter the WiFi password. This may take 1-2 minutes.
  8. Name Fan: After connection, you can name your ceiling fan in the APP and customize its settings.
    • Default WiFi SSID: The default Wi-Fi SSID is "Fanimation_XXXXXX" (e.g., Fanimation_402AD4).

fanSync WiFi APP Overview:

The APP provides various control and management features:

  • Home Screen: Displays an overview of your connected fans.
  • Lounge/Fan Control: Allows control of individual fan settings, including:
    • OFF/ON: Power control.
    • Breeze Mode: Options like "NORMAL" and "FRESH AIR."
    • Light Control: OFF/ON and dimming (if applicable).
    • Home Away: A feature for automated operation.
  • Settings: Access to various settings for the fan and APP.
  • Support: Links to product support information.

Advanced APP Features:

  • Set up Real Time Schedule: Create schedules for fan operation (e.g., "Work Days" with specific start/end times and repeat days).
  • Share Device: After one smart device is connected to a fan, other APP users can control the fan by sharing the device with them.
  • Link with Amazon Echo, Google Home, and IFTTT:
    • Select the device to connect and follow the in-app instructions.
    • Amazon Alexa Help: A link is provided for Amazon Alexa support.
    • IFTTT Integration: To connect with NEST, ECOBEE, Samsung Smart Things, Wink, etc., you must connect via IFTTT. Links to IFTTT and Google Home help pages are provided.

Maintenance Features:

  • The document does not explicitly detail maintenance features for the receiver itself, beyond ensuring proper installation and wiring. Regular checks of electrical connections are implied by the safety warnings.
  • The fanSync APP provides a "Support" section, which would likely offer resources for troubleshooting and maintenance of the fan and receiver system.

Fanimation fanSync WFR8159 Specifications

General IconGeneral
BrandFanimation
ModelfanSync WFR8159
CategoryReceiver
LanguageEnglish

Related product manuals