Do you have a question about the fantastic furniture COMO and is the answer not in the manual?
| Brand | fantastic furniture |
|---|---|
| Model | COMO |
| Category | Indoor Furnishing |
| Language | English |
Review the assembly checklist before starting the installation process.
Provides essential tips and warnings for a successful and safe furniture assembly.
List of all furniture components and hardware needed for assembly.
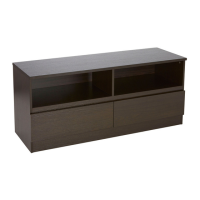
Attach CL Runner Tracks to Drawer Left Side Panel (P3) with small screws.
Attach CR Runner Tracks to Drawer Right Side Panel (P4) with small screws.
Insert dowels into Drawer Left Side Panel (P3) and cam bolts into side panels.
Attach rails (P7x2) to Drawer Left Side Panel (P3) using cam nuts.
Attach Shelf Panel (P5) and Rail (P8) to Drawer Left Side Panel (P3).
Slide Drawer Back Panel (P9) into grooves of Shelf Panel (P5) and Rail (P8).
Attach Right Side Panel (P4) and secure plastic glides to side panels (P3&P4).
Attach Back Panel (P10) to Drawer Right Side Panel (P4) using dowels and cam nuts.
Attach cam bolts to Top Panels (P1&P2) and connect plates to Top Panel (P1).
Attach Top Panel (P1) to the drawer unit using dowels and cam nuts.
Attach cam bolts to Side Panels (P11&12) and secure plastic glides.
Secure Side Panels (P11&P12) to Side Back Panel (P13) using dowels and cam nuts.
Attach Top Panel (P2) to the unit using dowels and cam nuts.
Connect Top Panels (P1&P2) and attach Back Panel (P10) to Left Side Panel (P11).
Attach small cam bolts (H10) to Drawer Front (P14).
Insert cam nuts into drawer sides (P15&P16) and attach to Drawer Front (P14).
Slide Drawer Base (P17) into grooves of Drawer Sides (P15&P16).
Attach Drawer Back (P18) to Drawer Sides (P15&P16) with screws.
Attach DL Runner (H8) and DR Runner (H9) to drawer sides.
Repeat steps 15-19 to assemble the second drawer.
Carefully insert assembled drawers into the desk by guiding runners into tracks.