ASSEMBLY INSTRUCTIONS
STEP 11:
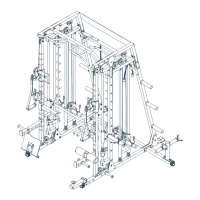
1.Start With the Cable (66).
a). Install Pulley No.1&2 (67) to Pulley Block (22), using two M10X48mm Bolts (92), four M10
Washers (103) and two M10 Nylon Nuts (107).
b). Install Pulley No.3 (67) and two Pulley Bushings (short) (85) to Support Frame (9), using
one M10X70mm Bolt (90), two M10 Washers (103) and one M10 Nylon Nut (107).
c). Install Pulley No.4 (67) to
Upper Cross Beam (8), using one M10X48mm Bolt (92), two
M10 Washers (103) and one M10 Nylon Nut (107).
d). Install Pulley No.5 (67) to Weight Plate Frame (13), using one M10X48mm Bolt (92), two
M10 Washers (103) and one M10 Nylon Nut (107).
e). Install Pulley No.6&7 (67) to Fixing Bracket (12), using two M10X48mm Bolts (92), four
M10 Washers (103) and two M10 Nylon Nut (107).
f). Install
Pulley No.8 (67) and two Pulley Bushings (long) (86) to Weight Support Tube-Left
(11), using one M10X80mm Bolt (89), two M10 Washers (103) and one M10 Nylon Nut
(107).
g). Install Pulley No.9 (67) to Bottom Tube-Left (2), using one M10X48mm Bolt (92), two
M10 Washers (103) and one M10 Nylon Nut (107).
h). Attach the Cable (66) to the Slider Assembly (19), using one M10X20mm Bolt (108), tw
o
M10 Washers (103) and one M10 Nylon Nut (107).
i). Attach the Strap Handle (70) to the other end of Cable (66), using one Buckle (62).
2. Install the other cable (66) with the same procedures.
-16-
 Loading...