6
EN
Protect yourself against the effects of vibration by
maintaining the tool and its accessories, keeping
your hands warm, and organizing your work
patterns.
Description
The numbers in the text refer to the diagrams on
pages 2-3
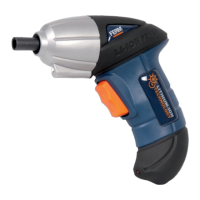
Fig. A
1. Machine
2. Charging socket
3. Charging indication light
4. Bit holder
5. Direction switch
6. On / off switch
7. Work light
8. Charger adaptor
10. Screw driver bit
3. OPERATING
The machine must be charged before
first use.
Charging the machine
and wait for a while. The LED indicator on
charging status.
Charging indication light (3)
Fig.A
The machine has a charging indication light
process:
LED color Status
Red Battery charging in progress
Red+Green Battery charging finished, battery fully charged
hours.
Fitting and removing drills or screwdriver bits
Fig. B
and screwdriver bits with a standard ¼ inch.
hexagonal shaft. To fit a screwdriver bit:
magnet.
it out of the bit holder again.
Adjusting the direction of rotation
Fig. A
’ in
order to drive screws or to use it for drilling.
’ in
order to remove screws.
Switching the machine on and off
Fig. A
machine.
machine.
position to lock the movement of the on/off
switch. It cannot be activated in this position.
The machine is equipped with electronic
overload protection function. When the
machine gets overloaded it will shut
down automatically. When this happens,
please wait for at least 5 seconds to let
the overload protection reset itself.
Spindle lock function
Fig. C
The machine is fitted with an automatic spindle
the battery is empty) as a manual tool.