6
EN
Vibration level
The vibration emission level stated in this
instruction manual has been measured in
accordance with a standardized test given in
EN60745; it may be used to compare one tool
with another and as a preliminary assessment of
exposure to vibration when using the tool for the
applications mentioned.
• Usingthetoolfordifferentapplications,orwith
different or poorly maintained accessories,
may significantly increase the exposure level.
• Thetimeswhenthetoolisswitchedoffor
when it is running but not actually doing the
job, may significantly reduce the exposure
level.
Protect yourself against the effects of vibration by
maintaining the tool and its accessories, keeping
your hands warm, and organizing your work
patterns.
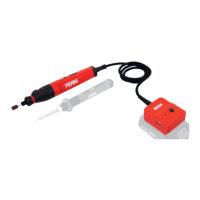
Description
The numbers in the text refer to the diagrams on
pages 2- 3
Fig. A
1. Machine
2. Battery
3. Battery unlock button
4. Charger
5. Charger LED indicators
6. Chuck
7. Direction switch
8. On / off switch
9. Work light
Lithium-Ion technology
The battery provided with this machine have
Lithium-Ion technology.
One advantage of using Lithium-Ion
batteries is that, until the battery is almost
empty, hardly and power fading is
noticeable. The machine can be used
until you start noticing that the power of
the drill is elapsed. The battery is
discharged now and needs to be
charged.
Another advantage is that Lithium-Ion
batteries have no memory effect.
Therefore they can be charged at any
moment without degrading, independent
of the charging state of the battery.
3. OPERATING
The battery must be charged before first
use.
Removing the battery from the machine
Fig. B
• Holdthemachine(1)firmlywithonehand
• Pushdownthebatteryunlockbutton(3)
locatedonthesideofthebattery(2)withthe
other hand.
• Keeppushingthisbutton(3)downandslide
the battery forward out of the machine, like
shown in Fig. B.
Inserting the battery into the machine
Fig. B
Ensure that the exterior of the battery is
clean and dry before connecting to the
charger or machine.
• Holdthemachine(1)firmlywithonehand
• Insertthebattery(2)intothebaseofthe
machine as shown in Fig. B.
• Pushthebatteryfurtherforwarduntilitclicks
into place.
Charging the battery (with the charger)
Fig. C
• Takethebattery(2)fromthemachine
• Turnthebattery(2)toupsidedownposition
andslideitontothecharger(4)asshownin
Fig. C.
• Pushthebatteryuntilitisfullypushedintothe
slot.
• Plugthechargerplugintoanelectricaloutlet
and wait for a while. The LED indicators on
thecharger(5)willlightenupandshowthe
charger status.
LED indicators (5)
Fig.C
Thechargerhas2LEDindicators(5)which
indicate the status of the charging process: