EasyManua.ls Logo

Ferm FBJ-710 User Manual

Ferm FBJ-710
54 pages
To Next Page IconTo Next Page
Page #1 background imageLoading...
Page #1 background image
www.ferm.com 0612-18.1
GB Subject to change
D Änderungen vorbehalten
NL Wijzigingen voorbehouden
F Sous réserve de modifications
E Reservado el derecho de
modificaciones técnicas
P Reservado o direito a modificações
I Con riserva di modifiche
S Ändringar förbehålles
FIN Pidätämme oikeuden muutoksiin
N Rett till endringer forbeholdes
DK Ret til ændringer forbeholdes
Art. no. BJM1001
FBJ-710
www.ferm.com
GB
D
NL
F
E
P
I
S
FIN
N
DK
USERS MANUAL 06
GEBRAUCHSANWEISUNG 15
GEBRUIKSAANWIJZING 24
MODE D’EMPLOI 33
MANUAL DE INSTRUCCIONES 42
MANUAL DE INSTRUÇÕES 51
MANUALE UTILIZZATI 60
BRUKSANVISNING 69
KÄYTTÖOHJE 78
BRUKSANVISNING 87
BRUGERVEJLEDNING 96
Question and Answer IconNeed help?

Do you have a question about the Ferm FBJ-710 and is the answer not in the manual?

Ferm FBJ-710 Specifications

General IconGeneral
BrandFerm
ModelFBJ-710
CategoryPower Tool
LanguageEnglish

Summary

1. TECHNICAL SPECIFICATIONS

Machinedata

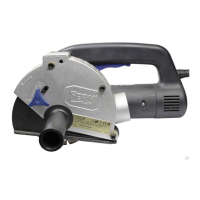
Detailed technical data including voltage, power, speed, dimensions, and weight.

Contents of Packing

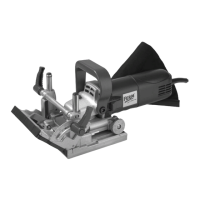
List of all items included with the biscuit jointer.

2. SAFETY INSTRUCTIONS

General Safety Precautions

Fundamental safety rules to follow when operating the machine.

Special Safety Instructions

Specific safety guidelines to prevent injury and damage during operation.

Electrical Safety

Precautions for safe use of electricity and preventing electrical hazards.

3. ADJUSTING THE MACHINE

Adjusting the Cutting Depth

Step-by-step guide to set the correct depth for cutting grooves.

Adjusting the Cutting Angle

Instructions on how to set and adjust the machine's cutting angle.

Adjusting the Height

How to set the correct working height for various materials.

4. MOUNTING ACCESSORIES

Mounting the Saw Blade

Detailed steps for safely installing the saw blade.

Mounting the Dust Bag

Guide on attaching the dust collection bag for effective dust removal.

5. OPERATION

Switching on and off

Instructions for safely turning the machine on and off.

Marking the Workpieces

How to mark workpieces accurately before grooving.

Positioning the Machine

Guidance on correctly placing the machine for various workpiece sizes.

Sawing Grooves

Step-by-step process for cutting grooves with the machine.

Joining the Workpieces

How to assemble workpieces after cutting grooves.

Checking the Cutting Depth

Procedure to verify the accuracy of the cutting depth setting.

6. MAINTENANCE

Cleaning

Instructions for cleaning the machine to maintain performance and longevity.

Lubrication

Information on lubrication requirements for the machine.

Faults

Guidance on identifying and rectifying machine faults.

Related product manuals