MULTIPURPOSE GAS SOLDERING
TOOL
The numbers in the following text correspond
with the pictures at page 2
Features
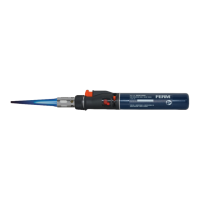
1. Switch
3. Nut
4. Soldering head
5. Filling valve
6. Flow control knob
7. Ignition button
8. Guard
9. Standard tip
10. Diagonal tip (3 mm)
11. Chisel tip (3,5 mm)
12. Hot knife
13. Hot blower
14. Reflector
15. Wrench (7 mm)
16. Wrench (8 mm)
Warnings
• Donotfillgasorstorenearopenflame,heater
or combustible materials
• Useonlyhighqualitybutanegas
• Butanegasishighlyflammable,pleasehandle
with care
• Donotdrop,puncture,orincinerate
• Donotstoreoroperateinaplacewherethe
temperature is above 50º C (122º F)
• Keepoutofreachofchildren
• Cooldownbeforeputtingprotectivecapon
and before storing
Gas filling and refilling
• Ensuretheswitch(1)isturnedtotheOFF
position before filling
• Reversetheunit;insertthegascontainer’s
nozzleverticallyintofillingvalve(5)
• Whengasescapesfromfillingvalve,remove
the nozzle from the filling valve
Ignition
• Movetheflowcontrolknob(6)tothemiddle
position
• Movetheswitch(1)upwardandtotheright
• Pressdowntheignitionbutton(7)tolightup
the open flame
Shutting off
Movetheswitch(1)upwardsandtotheleft.The
switchwillreturntoOFFposition.
Flame lengt or temperature adjustment
After ignition, turn the flow control knob (6) to the
right to increase the flame length of the torch or
the temperature of soldering tip or hot air, to the
left to decrease the flame length or the
temperature.
Operating tips
• Afterfillingorrefillingwithgas,waitfor
approximately2minutessothatthegasinthe
cylindercanbestable.
• Solderingtipsmustbetin-platedbeforeusing
themforthefirsttime.Athinlayerofsolder
should be applied to the tip when it has been
heated.
• SolderingshouldNOTbecarriedouton“live”
circuits, as this soldering unit does not
possessanyspecialelectricalinsulation
• Keepyoursolderingspongemoist
How to fit or replace different
accessoires
Always allow unit to cool before removing
or replacing tips
Replace soldering tips
• With7mmwrench(15)onthesolderingtipor
hot blow head (9 till 14) and 8 mm wrench on
thesolderinghead(4),youcantightthetipor
hot blow head or unscrew them.
• Whenyouunscrewthenut(3),youcan
remove the guard (8) and soldering head (4).
Now the unit becomes an open flame torch.
Troubleshooting
1. Does not ignite
• Emptygas
• Refill butane gas
• Gas pressure too high or too low
• Slide flow control knob (6) to lower or higher
position
2. Torch flame has no proper power
• Insufficient gas power
• Refill butane gas
3. Tip does not heat
• Insufficient gas power
• butane gas
 Loading...