Ferroli F24
32
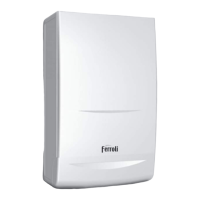
Fig. 33
7.05 Gas valve (fig. 33)
• Isolate gas and electricity supplies
• Remove outer case (two screws bottom rear corners)
• Remove the two securing screws
and lower control panel
• Disconnect electrical connections from valve ("A")
• Disconnect plastic tube "C"
• Loosen the connection "D" on gas pipe and the gas
inlet connection of the boiler "E"
• Remove the two fixing screw "E" below gas valve
• Slide out gas valve
• Remove four fixing screw "F" on top of
the valve and disconnect the gas pipe
• Remove bottom connection from gas valve.
• Fit top + bottom gas connections to the new gas valve
and replace in reverse order
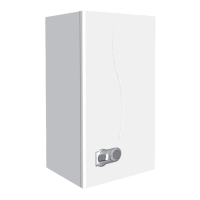
7.07.1 D.H.W. temperature sensor or Central Heating Temperature
Sensor (fig. 35)
• Isolate electricity and water supplies
• Remove outer case (two screws bottom rear corners)
• Remove the two securing screws and lower control panel
• Identify the sensor from figure 35
• Disconnect electrical connection to the sensor
• Drain the affected service either D.H.W. or C.H.
• Unscrew the sensor
• Replace in reverse order
7.07.2 Water Pressure Switch (fig. 35)
• Isolate electricity and water supplies
• Remove outer case (two screws bottom rear corners)
• Remove the two securing screws and lower control panel
• Identify the switch from figure 35
• Disconnect electrical connections + note positions to the switch
• Drain the boiler
• Unscrew the water pressure switch
• Replace in reverse order
7.07.3 Safety Valve (fig. 35)
• Isolate electricity and water supplies
• Remove outer case (two screws bottom rear corners)
• Remove the two securing screws and lower control panel
• Identify valve from fig. 35
• Drain the boiler
• Release the outlet union to the valve and undo the valve union
connection
• Remove the valve outlet fitting
• Replace in reverse order
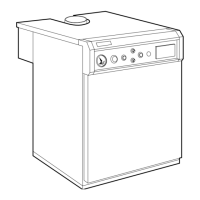
7.06 Air pressure switch (fig. 34)
• Isolate electricity
• Remove outer case (two screws bottom rear corners)
• Open room sealed department
• Remove the two screw "A" fixing air pressure switch
• Disconnect electrical leads "B"
• Remove pressure sensing tubes (white=D; Red=C)
• Note relevant positions of all connections and
replace in reverse order.
Fig. 34
D
C
A
F
E
A
B
C
D
C.H. sensor
Water pressure switch
D.H.W.
sensor
Safety valve
Fig. 35




 To Next Page