EasyManua.ls Logo

Fieldpiece ST4 User Manual

Fieldpiece ST4
2 pages
To Next Page IconTo Next Page
Page #1 background imageLoading...
Page #1 background image
01 02 03 04 05
Controls
Select T1 as thermocouple to display.
Select T2 as thermocouple to display.
Select real time T1-T2 to display.
Display minimum or maximum captured
measurement. Press and hold to clear.
Hold measurement.
Select resolution: 1° or 0.1°
Select temperature scale: °C or °F
Power ON or power OFF.
Adjust calibration offset of T1 Type K jack.
Adjust calibration offset of T2 Type K jack.
Quick Start
1 Install the 9V battery.
2 Press ON OFF for 1 second to power on.
3 Plug 2 Type K thermocouples into the top.
4 Press T1, T2, or T1-T2 to select display mode.
5 Read temperature directly on the display.
Certifications
EN61326-1, CE-EMC
RCM
WEEE
RoHS Compliant
Description
The ST4 Dual Temp Digital Thermometer is
ruggedized for field use and simple to use. The
rubber boot protects against drop impacts and
is comfortable to hold.
Plug in 2 Type K thermo-
couples and see the calculated
difference in real time. Each
thermocouple jack has its
own offset pot for accurate
calibration. Use the ST4 in the
included clear case for added
protection and easy viewing
with magnet.
Indicators
LED shines Red when a required thermocouple
for selected display mode is not connected.
Displaying held measurement.
Displaying maximum measurement.
Displaying minimum measurement.
Displaying T1 thermocouple measurement.
Displaying T2 thermocouple measurement.
Displaying T1-T2 real time calculation.
Displaying temperature in Fahrenheit.
Displaying temperature in Celsius.
Battery needs to be replaced.
Fieldpiece
Dual Temperature
Meter
OPERATOR'S
MANUAL
Model ST4
WARNING
To avoid electrical shock, do not use this instrument when
voltages at the measurement surface exceed 24VAC or 60VDC.
To avoid electrical shock, disconnect thermocouples from the
ST4 before opening case or battery cover.
To avoid damage or burns, do not take temperature measure-
ments in microwave ovens.
When testing hot temperatures, the thermocouple and velcro
may become hot. Do not handle the thermocouple or the velcro
when hot.
AUTO-OFF
ST4
T1 T2
OFFSET
T2
T2
T1
T1
HOLD
HOLD
MIN/MAX
MIN/MAX
°C/°F
°C/°F
1°/0.1°
1°/0.1°
T1-T2
T1-T2
ON OFF
ON OFF
T1
T2
ºF
ºF
ºC
HOLD
MAX
MIN
T1
T1
T2
T1-T2
AUTO-OFF
ST4
T1 T2
OFFSET
T2
T2
T1
T1
HOLD
HOLD
MIN/MAX
MIN/MAX
°C/°F
°C/°F
1°/0.1°
1°/0.1°
T1-T2
T1-T2
ON OFF
ON OFF
T1
T2
ºF
ºF
ºC
HOLD
MAX
MIN
T1
T1
T2
T1-T2
AUTO-OFF
ST4
T1 T2
OFFSET
T2
T2
T1
T1
HOLD
HOLD
MIN/MAX
MIN/MAX
°C/°F
°C/°F
1°/0.1°
1°/0.1°
T1-T2
T1-T2
ON OFF
ON OFF
T1
T2
ºF
ºF
ºC
HOLD
MAX
MIN
T1
T1
T2
T1-T2
AUTO-OFF
ST4
T1 T2
OFFSET
T2
T2
T1
T1
HOLD
HOLD
MIN/MAX
MIN/MAX
°C/°F
°C/°F
1°/0.1°
1°/0.1°
T1-T2
T1-T2
ON OFF
ON OFF
T1
T2
ºF
ºF
ºC
HOLD
MAX
MIN
T1
T1
T2
T1-T2
AUTO-OFF
ST4
T1 T2
OFFSET
T2
T2
T1
T1
HOLD
HOLD
MIN/MAX
MIN/MAX
°C/°F
°C/°F
1°/0.1°
1°/0.1°
T1-T2
T1-T2
ON OFF
ON OFF
T1
T2
ºF
ºF
ºC
HOLD
MAX
MIN
T1
T1
T2
T1-T2
AUTO-OFF
ST4
T1 T2
OFFSET
T2
T2
T1
T1
HOLD
HOLD
MIN/MAX
MIN/MAX
°C/°F
°C/°F
1°/0.1°
1°/0.1°
T1-T2
T1-T2
ON OFF
ON OFF
T1
T2
ºF
ºF
ºC
HOLD
MAX
MIN
T1
T1
T2
T1-T2
AUTO-OFF
ST4
T1 T2
OFFSET
T2
T2
T1
T1
HOLD
HOLD
MIN/MAX
MIN/MAX
°C/°F
°C/°F
1°/0.1°
1°/0.1°
T1-T2
T1-T2
ON OFF
ON OFF
T1
T2
ºF
ºF
ºC
HOLD
MAX
MIN
T1
T1
T2
T1-T2
AUTO-OFF
ST4
T1 T2
OFFSET
T2
T2
T1
T1
HOLD
HOLD
MIN/MAX
MIN/MAX
°C/°F
°C/°F
1°/0.1°
1°/0.1°
T1-T2
T1-T2
ON OFF
ON OFF
T1
T2
ºF
ºF
ºC
HOLD
MAX
MIN
T1
T1
T2
T1-T2
AUTO-OFF
T1 T2
OFFSET
T2T1
HOLD
MIN/MAX
°C/°F
1°/0.1°
T1-T2
ON OFF
ºF
T1
AUTO-OFF
ST4
T1 T2
OFFSET
T2
T2
T1
T1
HOLD
HOLD
MIN/MAX
MIN/MAX
°C/°F
°C/°F
1°/0.1°
1°/0.1°
T1-T2
T1-T2
ON OFF
ON OFF
T1
T2
ºF
ºF
ºC
HOLD
MAX
MIN
T1
T1
T2
T1-T2
AUTO-OFF
ST4
T1 T2
OFFSET
T2
T2
T1
T1
HOLD
HOLD
MIN/MAX
MIN/MAX
°C/°F
°C/°F
1°/0.1°
1°/0.1°
T1-T2
T1-T2
ON OFF
ON OFF
T1
T2
ºF
ºF
ºC
HOLD
MAX
MIN
T1
T1
T2
T1-T2
AUTO-OFF
ST4
T1 T2
OFFSET
T2
T2
T1
T1
HOLD
HOLD
MIN/MAX
MIN/MAX
°C/°F
°C/°F
1°/0.1°
1°/0.1°
T1-T2
T1-T2
ON OFF
ON OFF
T1
T2
ºF
ºF
ºC
HOLD
MAX
MIN
T1
T1
T2
T1-T2
AUTO-OFF
ST4
T1 T2
OFFSET
T2
T2
T1
T1
HOLD
HOLD
MIN/MAX
MIN/MAX
°C/°F
°C/°F
1°/0.1°
1°/0.1°
T1-T2
T1-T2
ON OFF
ON OFF
T1
T2
ºF
ºF
ºC
HOLD
MAX
MIN
T1
T1
T2
T1-T2
AUTO-OFF
ST4
T1 T2
OFFSET
T2
T2
T1
T1
HOLD
HOLD
MIN/MAX
MIN/MAX
°C/°F
°C/°F
1°/0.1°
1°/0.1°
T1-T2
T1-T2
ON OFF
ON OFF
T1
T2
ºF
ºF
ºC
HOLD
MAX
MIN
T1
T1
T2
T1-T2
AUTO-OFF
ST4
T1 T2
OFFSET
T2
T2
T1
T1
HOLD
HOLD
MIN/MAX
MIN/MAX
°C/°F
°C/°F
1°/0.1°
1°/0.1°
T1-T2
T1-T2
ON OFF
ON OFF
T1
T2
ºF
ºF
ºC
HOLD
MAX
MIN
T1
T1
T2
T1-T2
AUTO-OFF
ST4
T1 T2
OFFSET
T2
T2
T1
T1
HOLD
HOLD
MIN/MAX
MIN/MAX
°C/°F
°C/°F
1°/0.1°
1°/0.1°
T1-T2
T1-T2
ON OFF
ON OFF
T1
T2
ºF
ºF
ºC
HOLD
MAX
MIN
T1
T1
T2
T1-T2
AUTO-OFF
ST4
T1 T2
OFFSET
T2
T2
T1
T1
HOLD
HOLD
MIN/MAX
MIN/MAX
°C/°F
°C/°F
1°/0.1°
1°/0.1°
T1-T2
T1-T2
ON OFF
ON OFF
T1
T2
ºF
ºF
ºC
HOLD
MAX
MIN
T1
T1
T2
T1-T2
AUTO-OFF
ST4
T1 T2
OFFSET
T2
T2
T1
T1
HOLD
HOLD
MIN/MAX
MIN/MAX
°C/°F
°C/°F
1°/0.1°
1°/0.1°
T1-T2
T1-T2
ON OFF
ON OFF
T1
T2
ºF
ºF
ºC
HOLD
MAX
MIN
T1
T1
T2
T1-T2
AUTO-OFF
ST4
T1 T2
OFFSET
T2
T2
T1
T1
HOLD
HOLD
MIN/MAX
MIN/MAX
°C/°F
°C/°F
1°/0.1°
1°/0.1°
T1-T2
T1-T2
ON OFF
ON OFF
T1
T2
ºF
ºF
ºC
HOLD
MAX
MIN
T1
T1
T2
T1-T2
AUTO-OFF
ST4
T1 T2
OFFSET
T2
T2
T1
T1
HOLD
HOLD
MIN/MAX
MIN/MAX
°C/°F
°C/°F
1°/0.1°
1°/0.1°
T1-T2
T1-T2
ON OFF
ON OFF
T1
T2
ºF
ºF
ºC
HOLD
MAX
MIN
T1
T1
T2
T1-T2
AUTO-OFF
ST4
T1 T2
OFFSET
T2
T2
T1
T1
HOLD
HOLD
MIN/MAX
MIN/MAX
°C/°F
°C/°F
1°/0.1°
1°/0.1°
T1-T2
T1-T2
ON OFF
ON OFF
T1
T2
ºF
ºF
ºC
HOLD
MAX
MIN
T1
T1
T2
T1-T2
AUTO-OFF
ST4
T1 T2
OFFSET
T2
T2
T1
T1
HOLD
HOLD
MIN/MAX
MIN/MAX
°C/°F
°C/°F
1°/0.1°
1°/0.1°
T1-T2
T1-T2
ON OFF
ON OFF
T1
T2
ºF
ºF
ºC
HOLD
MAX
MIN
T1
T1
T2
T1-T2

Other manuals for Fieldpiece ST4

Question and Answer IconNeed help?

Do you have a question about the Fieldpiece ST4 and is the answer not in the manual?

Fieldpiece ST4 Specifications

General IconGeneral
BrandFieldpiece
ModelST4
CategoryThermometer
LanguageEnglish

Summary

Quick Start Guide

Product Certifications

Compliance Standards

Notes compliance with CE, RoHS, and WEEE environmental and safety standards.

Device Description and Features

Rugged Design

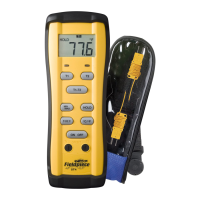
Highlights the rubber boot for drop protection and comfortable handling.

Dual Thermocouple Functionality

Describes using two Type K thermocouples for real-time difference calculation.

Device Indicators

LED Status

Red LED indicates a required thermocouple is not connected for the selected mode.

Display Icons

Explains icons for HOLD, MAX, MIN, T1, T2, T1-T2, °F, and °C measurement states.

Device Controls

Measurement Mode Selection

Buttons to select display modes for T1, T2, or T1-T2 thermocouple measurements.

Display and Function Controls

Buttons for HOLD function, temperature resolution, and power ON/OFF.

Calibration Adjustment Pots

Pots to adjust the calibration offset for T1 and T2 Type K jacks.

Maintenance and Calibration

Cleaning and Battery Replacement

Instructions for cleaning the exterior and replacing the 9V battery when the low battery icon appears.

Field Calibration Procedure

Steps for calibrating T1 and T2 using distilled ice water and offset pots for accuracy.

Technical Specifications

Operating Environment and Conditions

Details ambient conditions, humidity, and temperature ranges for operation and storage.

Measurement Accuracy and Resolution

Specifies accuracy for different temperature ranges and resolution settings.

Performance Metrics

Covers display type, measurement rate, battery type, and battery life.

Warranty and Service

Limited Warranty Information

Outlines the one-year warranty against defects and its exclusions.

Obtaining Service

Provides instructions on how to obtain service for the instrument.