The Fieldpiece Vacuum Pump with RunQuick™ Oil Change System is a device designed for evacuating (drying) refrigerant lines and is suitable for recovering refrigerant. It is available in various models including VP67EU, VP67UK, VP67AU, VP87EU, VP87UK230, VP87AU, VPX7EU, VPX7UK230, and VPX7AU. This manual is intended for qualified personnel trained in service and installation of A/C and/or refrigeration equipment.
Function Description
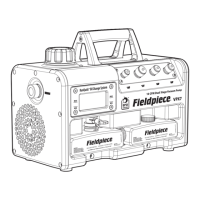
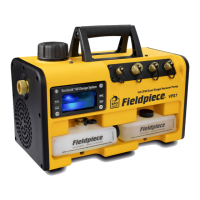
The primary function of the vacuum pump is to perform proper system evacuation prior to charging, which significantly increases the expected life and efficiency of the system. The Fieldpiece vacuum pumps provide a new view at system evacuation. Good oil is crucial for effective evacuation, and the device allows users to easily monitor the oil condition through a large oil tank window with a backlight. The oil backlight helps to see the condition of the oil and if the fill level is correct.
A key feature is the RunQuick™ oil change system, which allows for oil replacement in under 20 seconds without losing vacuum, even while the pump is running. This extra-wide base helps prevent tipping and spilling oil. The pump includes four inline ports in three different sizes to tidy hose routing and hose options. A power cord on the handle facilitates tangle-free storage, and the machine is designed for easy and well-protected transport.
The device supports various evacuation methods, including evacuation with a 4-port manifold, evacuation with a 3-port manifold, and direct evacuation. The RunQuick™ Oil Change System is designed to create a deep vacuum with fresh oil, especially at the end of the job, making the process quick and easy.
Important Technical Specifications
Flow Rate:
- 10CFM (VPX7, VPX7EU, VPX7UK230, VPX7AU)
- 8CFM (VP87, VP87EU, VP87UK230, VP87AU)
- 6CFM (VP67, VP67EU, VP67UK, VP67AU)
Oil Capacity: 8oz (237mL)
Oil Compatibility: Fieldpiece Vacuum Pump Oil (highly refined and optimized for proper sealing and lubrication). Fieldpiece part numbers: OIL8X3, OIL32, OIL128.
Oil Backlight: Blue LED
Oil Drain: Ball valve
Port Sizes:
- (1) 1/4"
- (2) 3/8"
- (1) 1/2"
Motor: 3/4 HP Brushless DC (VPX7/VP87), 1/2 HP AC (VP67)
RPM:
- 2500 (VPX7/VP87)
- 3440 (VP67 @ 60 Hz)
- 2866 (VP67 @ 50 Hz)
Power Source:
- 120/230 VAC selectable @ 50/60 Hz 1 phase (VP67UK, VP67EU, VP67AU)
- 230 VAC @ 50/60 Hz 1 phase (VPX7EU, VPX7AU, VPX7UK230, VP87EU, VP87AU, VP87UK230)
Nominal Current Draw:
- 2 AAC (VPX7EU, VPX7AU, VPX7UK230, VP87EU, VP87AU, VP87UK230, VP67 @ 230V)
- 5 AAC (VP67 @120V)
Nominal Power:
- 560 W (VPX7EU, VPX7AU, VPX7UK230, VP87EU, VP87AU, VP87UK230)
- 400 W (VP67)
Ultimate Vacuum at Input Ports: 15 microns
Dimensions: 7.9 inch x 11.7 inch x 16.0 inch (201 mm x 296 mm x 406 mm)
Weight Empty:
- 24 lb / 10.9 kg (VPX7)
- 27 lb / 12.3 kg (VP87)
- 29 lb / 13.2 kg (VP67)
Operating Environment:
- 30°F to 122°F (-1.1°C to 50°C) (VPX7/VP87)
- 30°F to 104°F (-1.1°C to 40°C) (VP67)
Hazardous Location: Class I, Division 2, Group D, T4
Certifications: WEEE, UL 1450, CSA 68, UL 121201, CSA 213, CE (VP67/VP87/VPX7), UKCA (UK models).
Usage Features
RunQuick™ Oil Change System: This system allows for quick and easy oil changes without interrupting the vacuum process.
- Easy View Window and Oil Backlight: Provides clear visibility of oil condition and level.
- Change Oil Quickly, Even with the Pump Running: Facilitates continuous operation.
- Extra Oil Bottle Storage: Conveniently stores additional oil.
- Elevated Oil Drain Ball Valve: Simplifies oil draining.
- Wide Mouth Fill Port: Makes refilling oil easy.
- Oil Bottle Cap Storage: Keeps the cap secure during oil changes.
- Precision Oil Circulator: Ensures efficient oil circulation.
4 Inline Ports: (1) 1/4", (2) 3/8", (1) 1/2" for flexible hose connections.
Two Stage Pump: Enhances vacuum performance.
Gas Ballast Valve Switch: Helps manage moisture in the system.
Oil Window LED Indicators: Provide visual cues about oil status.
Remote Exhaust Port: Allows for directing exhaust away from the work area.
Quiet Fan-Cooled Operation: Reduces noise and prevents overheating.
DC Motor (VPX7, VP87): Offers powerful and efficient performance.
Source Voltage Select Switch (VP67): Adapts to different power supplies.
Cord Storage Integrated into Rubber Handle: Ensures tidy storage and portability.
IEC Power Cord and Lock: Secure power connection.
EPO Coated Aluminum Pump (VPX7):
- Super Lightweight: Enhances portability.
- Enhanced Durability: Ensures long-lasting performance.
Evacuation with a 4 Port Manifold: This method is common for evacuation. It involves connecting the manifold to the system, ensuring the motor power switch is OFF, plugging into a matching power outlet, and opening the gas ballast valve. The process emphasizes monitoring the micron gauge and oil condition.
Evacuation with a 3 Port Manifold: Similar to the 4-port method, but uses a 3-port manifold.
Direct Evacuation: The fastest evacuation method, connecting directly to the system.
Dynamic Vacuum Measurement: During pull down, the system's vacuum level drops faster at the front of the system, near the vacuum pump. To ensure full system achieves the target micron level, place the vacuum gauge as far to the back of the system, away from the pump, as possible.
Remote Exhaust: The brass EXHAUST cap can be unscrewed to connect an obstruction-free garden hose, directing exhaust oil mist and vapor away from the building structure.
LED Indicators: Three colored LEDs indicate various states:
- Yellow Blink (Solid yellow LED on VP67): Gas ballast valve open.
- Yellow Blink + Red Blink (VPX7/VP87): Low voltage detected.
- Red Blink (VPX7/VP87): High voltage detected.
- Red Solid (VPX7/VP87): Internal fault detected.
Maintenance Features
General:
- Wipe with damp cloth to clean the exterior.
- Do not use solvents.
Storage:
- Empty or replace oil at the end of every job.
- Don't leave old oil in the machine.
- Store the pump and oil in dry clean areas for longest life.
- Oil can lose its sealing properties if left uncovered. Keep oil sealed until it's ready for use.
Vacuum Isolation Test:
- Perform this test to ensure your vacuum pump and your micron gauge are working properly.
- Connect your vacuum gauge directly to a port on your pump.
- Seal the 3 other ports.
- Ensure the gas ballast is closed.
- Switch your pump ON to create a vacuum at your gauge.
- If your gauge measures below 200 microns within 1 minute, your vacuum pump and micron gauge are working correctly.
- If your gauge does not reach 200 microns, there is a problem with your gauge, vacuum pump, or both.
Oil Window Cleaning:
- It's important to see the condition of your oil as well as the LED indicators located in the oil reservoir.
- The large oil drain ball valve will typically drain solids and sludge when changing the oil. When it becomes hard to see through the window, you can remove the oil window for easy cleaning.
- Ensure oil is drained from the reservoir.
- To reduce residual oil spillage, do not lay the pump on its side.
- While holding the black bezel (frame) in place, use a hex key (Allen wrench) to remove the 4 hex socket screws.
- While holding the glass oil window in place, remove the black bezel and notice the o-ring located behind the window.
- Slowly remove the glass oil window while making sure to locate and remove the o-ring seal.
- Wipe away any spilt oil, but leave a bit of oil on the o-ring to ensure a good seal.
- Clean the glass oil window and set aside to dry.
- If desired, you can use a light bristle brush clean out the oil reservoir itself, but performance is rarely affected by a dirty reservoir.
- Place the o-ring back into its groove.
- Place the glass oil window over o-ring and hold in place.
- Reinstall the bezel over the glass oil window using the 4 hex socket screws. To avoid breaking the window, start all 4 screws before hand-tightening any of them. Do not overtighten.
Troubleshooting:
- Appropriate vacuum is never reached: Check gas ballast, oil level, oil freshness, port caps, hose seals, vacuum rated hoses, vacuum rated tees, blockages, and system leaks.
- Vacuum rises when isolating the system: Check for a system leak, verify micron gauge is accurate, and ensure proper evacuation.
- Oil backlight does not turn on when plugged in: Ensure power cord and outlet are functional, and that source voltage matches the pump. If backlight does not shine and the pump turns on, the oil backlight LED module may need to be replaced.
- Pump makes excessive noise: The pump may be experiencing a high load, loose objects, vibrating case, motor bearings, motor mounts, oil level, or oil condition.
- Oil mist is coming out of the exhaust: Some slight oil mist is normal. For larger systems with long evacuation times, extended high pressure conditions can cause excessive misting.
- Motor does not start when switched ON: Check for slow startup in cold temperatures, contamination or low temperature oil, warm up the pump, and ensure proper voltage.
- Oil is leaking around base: Check the fill port and ensure no dripping through the internal housing. Wipe clean and make sure oil is not spilled when adding to the wide mouth oil fill port.