Model # FA-E01-14-50
Installaon and User Guide
FireAvert helps protect your home from the leading
cause of home res in the United States—unaended
cooking—by automacally disconnecng power to your
range or stove in the event that re or smoke are de-
tected. FireAvert acvates in response to the audible
signal of an exisng smoke detector—a patented synch-
ing feature syncs to the sound signature on your specic
smoke detector—ensuring maximum reliability and
minimizing false alarms. Plug and play installaon
means that FireAvert can be installed in less than 10
minutes in a few easy steps without tools or profession-
al assistance.
ATTENTION! TO ENSURE YOUR SAFETY WHILE IN-
STALLING AND USING THE FIREAVERT DEVICE, YOU
MUST READ AND FOLLOW ALL INSTURCTIONS OUT-
LINED IN THIS USER MANUAL
The FireAvert should be checked for proper funcon
every six months. Follow the same instrucons to check
the FireAvert as used in the inial vericaon test.
Please see Steps 5-7 in the installaon guide.
If the FireAvert unit enters protecon mode (in event of
a re / smoke) and disconnects power to the appliance,
follow the instrucons for reseng the unit found in
this manual. Do NOT aempt to reset it any other way.
If at any me the device comes out of sync with the
smoke detector, as indicated by a ashing RED LED Indi-
cator and a chirping noise, you must re-sync the unit as
described in this manual before further use. If this prob-
lem persists, disconnue use and contact customer ser-
vice.
In the event that a new smoke detector OR range/stove
is installed in the home, the FireAvert must be reset and
re-synched to the new smoke detector. See
Steps 4-7 in the Installaon Instrucons for details.
Approved Smoke Detectors
The FireAvert is designed to work with any modern RESI-
DENTIAL smoke detector typically found in retail stores.
You should always follow the proper installaon steps
and test for proper synching by running a user test with
any exisng or new smoke detector. If for any reason
your smoke detector does not sync with the FireAvert
please purchase a newer smoke detector at your local
hardware store.
Approved Extension Cable
If your FireAvert does not t and requires a pigtail ex-
tension cable you must use Model # PT-E01-14-50 avail-
able from our website. FireAvert is only authorized to be
used with this designated extension cable.
Contact Us
FireAvert, LLC
www.reavert.com
support@reavert.com
1.800.677.9870
224 S Main St. #529
Springville, UT 84663
General Warnings & Safety Instrucons
Read ALL instrucons BEFORE aempng to install
FireAvert. Failure to follow all instrucons and warn-
ings may result in damage to the FireAvert or your
appliances, and may cause loss of property, bodily
injury or death.
NEVER aempt to install a FireAvert that appears dam-
aged or broken. IF your FireAvert appears damaged or
broken, please contact customer service for assistance.
NEVER aempt to force the FireAvert plug or receptacle
connecons.
Never aempt to modify, alter, or adapt any part of the
FireAvert for use other than outlined in this User
Guide. This model of FIireAvert is designed for use with
NEMA 14-50 outlets and plugs ONLY.
DO NOT aempt to open the FireAvert, it contains no
user-serviceable components. Aempng to open or
disassemble the FireAvert voids the warranty and may
render the FireAvert inoperable.
DANGER! HIGH VOLTAGE When working with electrical
devices, basic precauons should always be followed to
prevent re, injury, or death.
DO NOT use FIREAVERT in excessively dusty, warm
(>90⁰F) or humid (>80%) environments. Dust buildup,
or excessive heat or humidity may cause malfuncon or
premature failure.
DO NOT aempt to install or remove the FireAvert unit
while the outlet is powered ON. You must switch OFF
the circuit breaker that powers the outlet before instal-
laon or removal of FireAvert.
DO NOT pinch or squeeze the FireAvert unit between
the stove and wall outlet aer installaon is complete.
DO NOT use the FireAvert without successfully pairing
it with your kitchen smoke detector and compleng a
vericaon test. Please see Step 1 in the Installaon
Guide for more details.
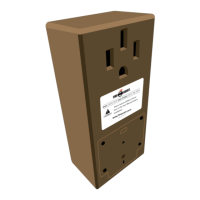
Orientaon
1
2
3
4
5
6
1. FireAvert Receptacle
2. Reset Buon
3. Buzzer (Chirping Sound)
4. LED Indicator
5. Microphone
6. FireAvert Plug—Male Blades
Warning!: The FireAvert is not intended to replace the
user’s own responsibility and good judgment in pre-
venng res. The FireAvert aids in prevenng acci-
dental unaended cooking res in the home kitchen.
FireAvert does NOT prevent rapidly combusng res
such as grease and oil res, rather it is most eecve
at prevenng cooking res where smoke is present for
several minutes before a re starts.
Warranty Informaon
We only make those warranes found in the limited
warranty found in this package.