1 2 3 4 5 6
Printed in Mexico
M08-0218-159023
K1
08 /17
USER’S MANUAL
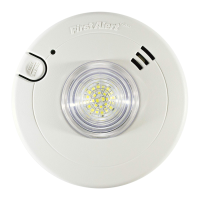
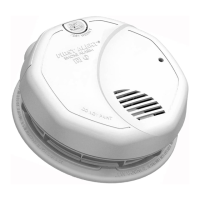
AC POWERED SLIM LINE SMOKE
& STROBE LIGHT COMBO ALARM
WITH SEALE D LITHIUM BATTERY BAC KUP
IMPORTANT! PLEA SE REA D
CAREFU LLY AND SAVE.
This use r’s manual c ontain s
important information about your
Smoke Ala rm’s opera tion. If you a re
installing this Smoke Alarm for use by
others, you must le ave this manual—
or a copy of it—with th e end user.
Printed in Mexico
M08-0218-159023
K1
08 /17
CONFORMS TO
UL STD 217 & UL ST D 1971
Model 7020BSL
US Patent 6, 377,182
Input: 120V AC ~, 60 Hz, 0.8A Al arm
© 2017 BRK Brands , Inc. All rights reserved. Distributed by BRK Brand s, Inc.
•
BRK Bran ds, Inc. is a
subsidiary of Newell Brands Inc. (N YSE:NWL)
•
First Al ert
®
is registered trademar k of The Fir st Aler t
Tru st
•
3901 Libe rty Street, Au rora, IL 60504-8122
•
Consumer Affa irs: (80 0) 323-9005
www.firstalert.com
•
www.brkelectronics.com
All Fir st Alert
®
and BRK
®
Smoke Alarms conform to regulatory requirements,
inclu ding U L217 and are designed t o detect par ticl es of combustion.
Smoke pa rti cles of vary ing nu mber a nd size a re pro duce d in all f ires.
Ionization technology is generally more sensitive than photoelectric technology at
detecti ng small p artic les, whi ch tend to be p roduced in greater amoun ts by flaming
fires, which con sume com bustible materi als rapidly and spread quickly. Sour ces of
these fires may inc lude pap er burning in a waste basket, or a greas e fire in the kitchen .
Photoelectric technology is generally more sensitive than ionization technology
at detect ing larg e parti cles, wh ich tend to b e produc ed in greater amounts
by smolde ring fir es, whic h may smolder for hours befo re bursting into fl ame.
Source s of these f ires may include ci garet tes burning in couches or be dding.
For max imum p rotec tion , use both types of Sm oke Ala rms on
each level and i n every bedroom of you r home.
INTRODUCTION
Thank you for choos ing Firs t Aler t
®
for your Sm oke Alarm and hear ing impa ired str obe
light needs. You have purchased a state of the a rt Smo ke and Stro be Light C ombo Alarm
designed to provide heari ng impaired individuals w ith a visual and aud ible warning of a fire.
When used with additional carbon monoxide or combination smoke & carbon monoxide
alarms i t will also provide hearing i mpaire d individuals with a visual a nd audib le warning
of a carbo n monoxid e danger. Ple ase take the time to rea d this manual and ma ke this
Smoke and S trobe Li ght Comb o Alarm a n integra l part of your family’s safet y plan.
Key Features:
Low Profile Design: Half the size of a stan dard ala rm
177 Candela L ED Light : Powerful 177 candela L ED strobe light provides
effective visual warnin g to awaken hearing impaired residen ts.
Strobe Signal Synchronization: Horn and LED syn cs with other 7020BSL family o f units.
Smart Interconnection: Helps redu ce unwante d alarm s
Batter y Backu p: 10 year sealed battery backup provides backup for the smoke
alarm du ring powe r outage s. (Note: will not power the strob e light).
Quick Mo unting Ac tivation : Twist/lock mounting bracket
automatically activates 10 year battery backup.
End of Life I ndicato r: Aler ts user when alar m requires repla cement
Integra ted Photoe lectri c Smoke Al arm and Str obe Lig ht: One dev ice includes both a photoel ectric
smoke ala rm and a str obe light. Requires only one elect rical box. Saves installat ion time.
Smart S trobe : Works with B RK smoke and CO alar ms. Sepa rate fla sh
patterns to distinguish between smoke/heat or CO danger.
1Hz Flash Rat e: 60 flashes per minute.
Two Latching Features: Alarm La tch - Visu ally ide ntifies initiating alar m even afte r alarm
conditi on is over. Low Bat tery L atch – Vis ually id entifi es which u nit is in low b atter y condition.
Two Silence Fe atures : Temporarily silence low battery chirps for up to eight hours
before re placin g unit or silence an u nwanted alarm for several minutes.
FIRE SAFETY TIPS
Follow safety rules and prevent hazardous s ituatio ns: 1) Use smok ing materials pr operly. Never
smoke in be d. 2) Keep matches or lighters away from chil dren; 3) Sto re flamm able materials i n
proper c ontain ers; 4) Kee p electr ical ap plianc es in good c onditi on and don’t overload electr ical
circuit s; 5) Keep stoves, barb ecue gr ills, fireplaces and chimneys gre ase- an d debris-free; 6)
Never leave a nything cooking on the stove u nattended; 7) Ke ep portable he aters an d open
flames , like candles, away fr om flamm able materials; 8) Don’t let r ubbish a ccumul ate.
Keep alar ms clea n, and test them week ly. Replac e alarms immediately if they are not wor king
proper ly. Smoke Ala rms that d o not work cannot alert you to a f ire. Keep a t least on e workin g
fire exti nguish er on ever y floor, and a n additi onal one in the kitch en. Have fire escap e ladder s
or other re liable m eans of escape fr om an uppe r floor in case sta irs are b locked.
BEFORE YOU INSTALL THIS SMOKE
AND STROBE LIGHT COMBO ALARM
Read “R ecomm ende d Locations for Smo ke Alar ms” and “Loca tion s to Avoid f or Smoke
Alarms” before beginni ng. Th is unit monit ors th e air, and w hen sm oke reaches it s sens ing
chamber, it ala rms. I t can gi ve you mor e time t o esca pe befo re fir e spre ads. T his un it can
ONLY give an early warning of developing fires if it is installed, maintained and located
where smoke ca n reac h it, an d wher e all re side nts ca n hear/se e it, as d escr ibed i n this
manual. Thi s unit w ill not s ense g as, heat, or f lame. I t cann ot prev ent or ex ting uish f ires .
UNDER STAND THE D IFFER ENT TY PE OF SMOKE AL ARMS
Batter y powere d or elec trical? Different Smoke Alarms provide different
types of protect ion. See “About Smoke A larms” f or detai ls.
KNOW WHERE TO INSTALL YOUR SMOKE ALARMS
Fire Safety Professionals recomm end at lea st one Smoke Alarm on every l evel of your home, in
every be droom, a nd in ever y bedro om hallway or separ ate sleeping are a. See “Recomme nded
Locations For Smo ke Alarm s” and “Locations To Avoid For Smoke Al arms” fo r details.
KNOW WHAT SMOKE AL ARMS CAN AND CAN’T DO
A Smoke Ala rm can he lp aler t you to fire, giving you p recious time to es cape. It can only so und
an alarm o nce smoke reache s the sens or. See “Limitation s of Smoke Alarms” fo r detail s.
CHECK YOUR LOCAL BUILDING CODES
This Smo ke Alarm is design ed to be use d in a typi cal sing le-family home. I t
alone wil l not meet r equire ments for boarding house s, apar tment buildings,
hotels or motels. Se e “Spec ial Comp liance C onside ration s” for details.
ELECTR ICAL SH OCK HA ZARD. Turn off t he powe r to the area where the Smoke
Alarm is inst alle d before removing it f rom th e moun ting b racket. Fail ure to t urn
off th e power f irst m ay result in se riou s electrical shoc k, inj ury or death.
• Installat ion of t his un it mus t confo rm to th e elec tric al codes in your area; A rti cles
210 and 30 0, 3(B ) of NFPA 70 (N EC), NFPA 72 , NFPA101; SBC (S BCCI); U BC
(ICBO) ; NBC (BOCA); OTFD C (CABO) a nd any ot her lo cal or building cod es tha t
may apply. Wiring and installation must be performed by a licensed electrician.
Failure to follow the se gui delines may r esult in inju ry or p rope rty d amag e.
• This un it mus t be powe red by a 24 -hour, 120VAC pure s ine wave 6 0Hz
circu it. Be sure t he circuit ca nnot b e turn ed off b y a switc h, dim mer, or
groun d faul t circuit int erru pter. Fai lure to conne ct this unit t o a 24-h our
circuit may prevent it from providing constant protection.
• This Al arm mu st have AC o r battery p ower to operate. If th e AC power f ails ,
battery ba ck-up wi ll allow the al arm to sound fo r at lea st 4 minutes. I f AC power
fails a nd the b attery is w eak, protec tion s houl d last fo r at lea st 7 days . If AC
power fa ils an d the ba tter y is dead or missing, t he ala rm can not operate .
• Never di scon nect t he powe r from an AC powered unit to stop a n unwan ted
alarm . Doin g so will d isab le the u nit an d remov e your pr otection. In the
case of a t rue un wante d alar m open a w indow o r fan th e smoke away
from the unit . The alarm wi ll res et auto mati call y when i t returns to no rmal
operation . Never r emove t he bat teri es from a battery op erat ed uni t to stop
an unwa nted al arm (caused b y cooki ng smoke, etc.) . Instead ope n a wind ow
or fan the smoke a way fro m the un it. Th e alar m will r eset au toma tically.
• Conne ct thi s unit O NLY to other compa tibl e unit s. See “ How To Inst all Th is Ala rm” for
details. Do n ot connect it t o any other ty pe of al arm or auxiliary d evice. Conn ecti ng
anyt hing e lse to this unit may da mage it or preve nt it fr om operati ng properly.
• This Alarm has a sealed lithium battery.
• Do not st and too close to the un it when the al arm is soundi ng. It is loud to wake you
in an eme rgen cy. Exp osure to the ho rn at cl ose ra nge may h arm you r hear ing. Do
not sta re dir ectl y into l ight so urce . Direct expo sure to light m ay harm eyesig ht.
• Do not pa int over t he unit. Pai nt may clog the openi ngs to t he sen sing
chambers and prevent the unit from operating properly.
HOW TO INSTALL THIS ALARM
This Ala rm is designed to be mounted o n any stan dard wir ing junction box up to a 4 -inch (10 cm)
size, on either the ce iling or wa ll (if all owed by local codes). R ead “Recommen ded Locations For
Smoke Ala rms” and “ Locati ons to Avoid Fo r Smoke Alarms” before you be gin installatio n.
Tools you wi ll need: Standard Flathead Screwdriver, Wire Strippers
Make sure the A larm is not rec eivi ng exces sivel y nois y power. Ex amples of noi sy
power co uld be m ajor applia nces o n the sa me cir cuit , power f rom a generator
or sola r power, li ght dimmer on t he same circ uit or m ounte d near f luor escen t
light ing. E xcess ively noisy p ower may cause d amag e to your A larm .
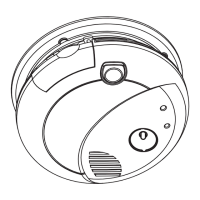
THE PARTS OF THIS SMOKE ALARM
The Mounting Bracket:
The mounting bracket installs onto th e juncti on box.
It has a vari ety of sc rew slots to f it most boxes.
The Powe r Conne ctor :
The power c onnector plugs i nto a power in put bloc k
on the Alarm. It supplies the u nit with AC power.
If you ne ed to rem ove the p ower co nnec tor, turn POWER
OFF fir st. In sert a f lat screwdriver bl ade bet ween the power
connec tor and the securi ty tab in side the power input block.
Gently pry back the tab and p ull the connector free.
The black wire is “hot.”
The white wire is neutral.
The oran ge wire is u sed for interconnect.
The Par ts of Th is Uni t
1. Mounting Bracket
2. Mounting Slots
3. Disable Switch
4. Hot (Black) AC Wire
5. Neutral (White) AC Wire
6. Interconnect (Orange) Wire
7. Quick-Connect Power Connector
8. Turn this way to remove from
bracket (Counterclockwise)
9. Turn this way to att ach to
bracket (Clockwise)
5
3
4
6
8
9
7
FOLLOW THESE INSTALL ATION STEPS
The basi c instal lation of t his Alar m is simil ar whether you want to i nstall o ne Alar m, or
interco nnect more than on e Alarm. If you are interconn ecting m ore than o ne Alar m, you MUST
read “Special Requirements For Interconnected Alarms” below before you begin installation.
ELECTR ICAL SH OCK HA ZARD. Turn off power to the area w here you will i nsta ll thi s
unit at t he circuit b reake r or fus e box befo re beg inni ng installation . Failu re to tu rn off
the power befo re ins tall atio n may res ult in s erious elec tric al sho ck, injury o r deat h.
1. Position the screw s lots on the m ounting bracket over the screws in the jun ction box .
Tighten s crews into screw hea d reces ses in mounting br acket. Do n ot over tigh ten.
2. Using wire nuts, connect the power connector to the household wiring.
STAND-ALONE ALARM ONLY:
• Connec t the white w ire on the power connector to the neutral wire in the junction box.
• Connec t the black wire on the p ower conn ector to th e hot wire in the junct ion box.
• Tuck the orang e wire ins ide the jun ction box. It is used for interconnec t only.
INTERCONNECTED UNITS ONLY:
Strip off ab out 1/2” (12 mm) of the p last ic coating on
the orange wire on the power c onne ctor.
• Connec t the white w ire on the power connector to the neutral wire in the junction box.
• Connec t the black wire on the p ower conn ector to th e hot wire in the junct ion box.
• Connec t the oran ge wire on the power co nnector to the inter connect
wire in the junction box. Repe at for eac h unit you ar e interco nnecting.
Never connect the h ot or neut ral wire s in the junction box to the orange
interco nnect wire. Never c ross hot a nd neutr al wires b etwee n Alarms.
3. Plug the power connec tor into the back of the A larm.
4. Position the base of th e Alarm ove r the moun ting bra cket and turn. The Al arm can b e
positioned over th e bracket every 90°. Turn the Alarm c lockw ise (righ t) until the unit lock s into
place. If thi s is the f irst t ime mo unti ng the a larm, an act ivati on chi rp will be heard.
5. Check all connections.
Improper wiring of the power c onnector or the wiring leading to the power connector
will caus e damage to the Alar m and may le ad to a non-functioning Alarm.
STAND-ALONE ALARM ONLY:
• If you are only installing one A larm, re store power to the junction box.
INTERCONNECTED ALARMS ONLY:
• If you are interconn ecting m ultiple A larms , repeat s teps 1-5 for e ach Ala rm in
the series. When you are finished, re store power to the junction box.
ELECTR ICAL SH OCK HA ZARD. Do not restore p ower un til al l Alar ms are
completely installed. Restoring power before installation is complete
may res ult in s eriou s elec tric al shock, injury o r deat h.
6. Make sure the A larm is r eceiving AC power. Unde r norma l operation,
the Gree n power indicator li ght will sh ine continuously.
7. If the Green power indic ator light does not light, TURN OFF POWER TO THE JUNCTION
BOX and rec heck all c onnec tions. If a ll conne ctions are corr ect and the Green p ower indi cator
still doe s not light when you re store the p ower, the unit should be replace d immedi ately.
8. Test each Alarm. Press and hold th e Test/Sil ence button unti l the unit alarms.
When test ing a seri es of inter connec ted units y ou must test e ach unit
indivi dually. Ma ke sure all u nits alar m when eac h one is test ed.
If any un it in th e seri es does not ala rm, TURN OFF POWER and recheck connections.
If it doe s not alarm when you restore p ower, rep lace it immediate ly.
SPECIAL REQUIREMENTS FOR INTERCONNECTED ALARMS
• Failure to mee t any of the above r equi reme nts co uld damage the unit s
and cause them to malfunction, removing your protection.
• AC and AC/DC Alarms can be inter conn ected. Unde r AC power, al l unit s will a larm
when on e sens es smoke. When p ower is i nter rupted, onl y the AC/ DC unit s in the series
will co ntin ue to send and receiv e signals. AC po wered A larm s will n ot oper ate.
Interco nnecte d units ca n provide earlie r warning of fire tha n stand-alone units, especially
if a fire starts in a r emote are a of the dwel ling. If any u nit in the series senses sm oke,
all units w ill alar m. To determin e which Al arm init iated an alarm, se e below:
• On Initiating Alarms Red LED flashes rapidly
• On All Oth er Alar ms Red LED i s Off
Interco nnect units within a single f amily re sidenc e only. Othe rwise all households will
experience unwanted alarms when yo u test any unit in the se ries. In terconnected u nits will
only work i f they are wi red to compatible u nits and a ll requirements are met. T his unit is
designed to be compatible with: First Alert
®
/ BRK
®
Models 912 0, 9120 B, SC 9120B, 7 010,
7010B, 7 010BS L, 70 20B, S C702 0B, SC7 010BV, SA5 20; B RK CO Alar m Model s CO5120B N,
CO5120P DBN, B RK Heat Al arm Mode ls HD613 5, HD 6135F B, BRK Au xiliar y Devic e
Models R M4, SL177. See ww w.brkele ctroni cs.com fo r most current interconn ect list.
Interconnected units must meet ALL of the following requirements:
• A maximum of 18 compatible unit s may be inte rconne cted (Ma ximum of 12 Smoke Alar ms).
• The same f use or circuit bre aker mus t power all intercon nected units.
• The total l ength of wire interconnec ting the units shou ld be les s than 1000 feet (300 meters).
This type of wire is c ommonl y available at Hardware and El ectrical Supply stores. The
interco nnect wire shoul d be #18 gauge or larger, rate d at least 300V. If an inte rconne ct
wire is not a lready p art of your household wiring, you will need to install one.
• All wiring must conform to all local el ectrical code s and Canadian Ele ctrical Code,
CSA 22.1, and/or your lo cal building code for further con nectio n requir ements .
Chapter 2 a nd/or your l ocal building co de for fur ther connection requirements.
5
3
4 4
5
A. Unswitch ed 120VAC 60 Hz sour ce
B. To additional units; Ma ximum = 18
total (Ma ximum 12 Smoke Alarm s)
1. Alarm 2. Ceiling or Wall 3. Powe r Connector
4. W ire Nut 5. Junction Box 6. Neutral Wire (Wht)
7. Interconnect
Wire (Orange)
8. Hot Wire (Blk)
REGULAR MAINTENANCE
This un it has b een de signed to be as m aintenance-fr ee as possibl e, but t here
are a few s imple things you mu st do to keep it working proper ly.
• Test it at leas t once a wee k.
• Clean the Alarm at l east once a month; gently vacuum the out side of the Alarm
using you r househ old vacuu m’s soft brush attachment. Test the Alarm. Never
use water, cle aners o r solvent s since th ey may dama ge the unit.
• If the Alarm becomes cont aminate d by excess ive dirt , dust and /or grime, and
cannot be cleane d to avoid unwa nted alarms, rep lace the unit immediately.
• Relocate the unit if it sounds freque nt unwante d alarms. See
“Locations To Avoid For Sm oke Alarms” for det ails.
• When the batter y back-up be comes weak, the A larm will “chirp” ab out once
a minute (th e low batte ry warning). This warning s hould la st 7 days, but you
should replace the unit immediately to continue your protection.
If the s trob e light l ens is l oose or b roken , the en tire u nit sh ould b e replaced
immed iate ly. Never remove t he strobe li ght lens for an y reaso n. Doi ng so
can permane ntly d amag e the un it and w ill voi d your wa rran ty.
Actual batter y service life de pends on the alarm and the env ironme nt in which it is installed.
WEEKLY TESTING
• NEVER use an open flame of an y kind to test th is uni t. You mig ht acci dent ally
damag e or set f ire to t he unit or to your home. T he built-in te st switch
accur atel y tests the un it’s operat ion as requir ed by UL STD 217.
• If the A larm ever fail s to test properly, re place it imme diat ely.
Produ cts un der warranty may b e returned to t he manufac ture r for
replaceme nt. Se e “Lim ited Wa rran ty” at the end of this manual.
It is imp ort ant to te st thi s unit every we ek to make sure i t is work ing properly. Usin g the
test bu tton i s the re comm ende d way to test this Alarm. Press a nd hold th e Test/Silence
button on the cover of t he unit until the ala rm sound s (the unit may continue to alar m for a
few secon ds afte r you relea se the button). If it do es not alarm, make sure the uni t is receiving
power and te st it again. If it stil l does not a larm, re place it i mmedia tely. During tes ting , you
will he ar a lou d, 3 beeps, pau se, 3 be eps and the st robe l ight wi ll beg in flashing.
When testing a series of interconne cted uni ts you must test each u nit
individ ually. Make sure all uni ts alarm when each one is tested.
Note: If you have interconnec ted this alarm with a BRK carb on monoxide alar m, when
you test tha t alarm yo u will hear a loud repeating horn pattern from t his alar m: 4 rapid
beeps, p ause, 4 ra pid beeps, pause. In addition, the strobe ligh t will fla sh approx imately
1 flash pe r secon d for four flashes , then 3 seconds of f. The pat tern is repeated.
If you have inte rconnected thi s alarm with a BRK combinati on smoke & ca rbon mo noxide al arm,
when you test that alarm you will hear a lou d continu ous bee ping sou nd and the s trobe lig ht
will flas h constant appr oximatel y 1 flash per second. Then yo u will hear a loud rep eating horn
patter n from this alarm: 4 rapid bee ps, paus e, 4 rapid b eeps, pause and the strobe l ight will f lash
approximately 1 fl ash per s econd fo r four fla shes, th en 3 seco nds off. The patte rn is repe ated.
DO NOT stand close to th e Alar m when t he hor n is sounding . Expo sure a t
close r ange m ay be harmful t o your he arin g. When testing, st ep away w hen
horn st art s soun ding.Do not look dir ectl y at or to uch th e lens while t he str obe
light i s flas hing. Doing s o can hu rt your eyes or burn you r fingers.
PROPER DISPOSAL OF UNIT
To Properly Dispose of Unit: Waste electri cal products should not be disposed
of with regular household waste. Please recycle where facilities exist. Check local
require ments fo r dispos al of Lith ium powered electronic devices. A larm sh ould be
disabled before dispos al. See “Pe rmane ntly Dis abling the Alarm” sectio n.
IF THIS SMOKE & STROBE LIGHT ALARM SOUNDS
RESPONDING TO AN ALARM
During a s moke incident at thi s alarm, you will hea r 3 beeps , pause, 3 b eeps and
the strob e light wil l flash constan t approxi mately 1 flash per s econd.
Note: If you have interc onne cted t his al arm with a BRK ca rbon m onoxi de ala rm or
combi nati on smoke & carbon monoxide al arm, i f ther e is a car bon mo noxid e incident
you will hear a lo ud rep eati ng horn pattern from this a larm : 4 rapi d beep s, pause, 4
rapid beeps, pause. In addition, the strobe light will intermittently flash approximately
1 flash per sec ond for four fl ashe s, the n 3 seconds of f. The pa tter n is rep eated.
If you hav e inter conn ecte d this a larm with a BRK smoke al arm, h eat alarm
or a comb inat ion sm oke & car bon mon oxide a larm , if the re is a sm oke
incid ent you w ill he ar a loud continuou s beep ing sound, pa use an d the
strobe light will flash consistently (approximately 1 flash per second).
• If the u nit alarms an d you are not tes ting t he uni t, it is w arni ng you of a
potentially dangerous situation that requires your immediate attention. NEVER
ignor e any alarm. Ig nori ng the a larm m ay resu lt in in jury or deat h.
• Never di scon nect t he AC powe r to quiet an unwanted a larm . Disconnecting the power
disables the Alarm so it ca nnot sense sm oke. Th is will r emove your pro tect ion. Instea d,
open a wi ndow or fan the smoke away from t he uni t. The A larm w ill re set automat ical ly.
• If the u nit alarms ge t ever yone ou t of the h ouse im medi atel y.
• ELECTR ICAL SH OCK HA ZARD : Atte mpti ng to dis conn ect th e power c onnector fr om
the un it when the power is on ma y resu lt in electrical shock, s erious inju ry or d eath .
When an interconnected sy stem of AC powe red units is in alarm, the ala rm indicator light on
the unit(s) that initi ated the alarm will b link rap idly. It will re main OFF o n any remaining uni ts.
If the unit a larms, g et everyone out of the dwellin g immedi ately.
If the unit a larms and you are ce rtain that the so urce of sm oke is not a fire—cooki ng
smoke or an ex treme ly dust y furnac e, for example—open a n earby wi ndow or doo r and
fan the smoke away from th e unit (Us e the Sile nce Featu re to silen ce the Alarm). This w ill
silence the alar m, and onc e the smoke clears th e unit will reset itself auto matica lly.
WHAT TO DO IN CASE OF FIRE
• Don’t pani c; stay cal m. Follow your family e scape p lan.
• Get out of th e house as quickly as possi ble. Don’t stop to get dr essed o r collec t anything.
• Feel doors with the back of your h and befo re openi ng them. If a d oor is cool, open it slowly.
Don’t open a hot door. Keep d oors an d windows c losed, u nless you must esc ape thro ugh them.
• Cover your nose and mo uth with a cloth (pre ferabl y damp). Take shor t, shallow breaths.
• Meet at your planned meeting place outside your home, and do a
head count to make sur e everybody got out safely.
• Call the Fire Depar tment a s soon as possibl e from out side. Give your addr ess, the n your nam e.
• Never go back inside a burning b uilding for any rea son.
• Contac t your Fire Department for i deas on making you r home safer.
Alarms have various limitations. See “Limitations of Smoke Alarms” for
details. Ba ttery Bac kup: Ba tter y provides ba ckup fo r the sm oke ala rm
during power o utag es. (Note: will not pow er the s trob e light).
UNDERSTANDING THE INDICATOR LIGHTS
AND ALARM HORN PATTERNS
AC Power Battery Power
Normal Standby
Operation
Constant Green LED
Flashin g Green L ED
approx. once/minute
Strobe Disable d **
Alarm Condition
Red LED Fla shes 3 Times
Initiating Alarm only *
Audible Alarm
(See patterns below)
Strobe Flashing
(See patterns below)
Red LED Fla shes with Horn
Initiating Alarm only *
Audible Alarm
(See patterns below)
Strobe Disable d **
Smoke Horn Pattern
Approxi mately 1 beep per second for 3 beeps,
then 1 sec ond off. Pa ttern is repeate d.
Smoke Strobe Pattern
Constant, approximately
1 flash pe r secon d.
Strobe Disable d **
CO Horn Patte rn 4 rapid be eps, the n 5 secon ds off. Pat tern is re peated.
CO Strobe Pattern
Approxi mately 1 flash
per second for 4 flashes,
then 3 sec onds of f.
Pattern is repeated.
Strobe Disable d **
Silence Mode
Red LED Continues A larm Co ndition Flash Pat tern
Initiating Alar m only *
Malfunction Signal Alarm “chirps” 3 times with 3 G reen LED flashe s.
End of Li fe Sig nal Al arm “chirps” 5 time s with 5 Gre en LED fla shes once per minute.
Latch ing En d of
Life Indicator
Green LE D flashi ng 2
seconds on, 2 seconds off.
No latching indicator ***
Latching Alarm Indicator
Horn off and Red LED
flashing 2 secon ds on,
2 second s off af ter loca l
alarm un less reset by
test/silence button.
No latching indicator ***
NOTE: When power is applied, unit(s) may alarm momentarily.
*When any Alarm in a n interc onnected series trigg ers an al arm, its R ed LED
will flas h. The Red LEDs will remain OFF on any rema ining alarms in the series.
This feature help s respon ders id entif y which unit(s) triggered the alarm.
**NOTE: The strobe ligh t will not op erate under battery power.
***NOTE: Latching feature will not operate under battery power.
USING THE S ILENCE FEATURES
The Sile nce Featu re is inten ded to temp orarily silence the hor n while you identif y and cor rect the
problem. Do not use the Silen ce Feature in emergency situation s. It will not extingu ish a fire.
The Sile nce Featu re can temporarily quiet a n unwanted a larm for several minutes. You ca n silenc e
this Alarm by pres sing the Test /Silen ce button on the alarm cover for at leas t 3-5 seconds.
After the Test/Silence but ton is rel eased, t he Red LED b links dur ing the silence mo de.
WHEN TH E SMOKE ALAR M IS SILE NCED. ..
The Smoke A larm will remain s ilent for up to 10 minutes , then return to norm al oper ation.
If the smoke h as not cle ared–or continues to increase–the device w ill go back i nto alarm.
To silence Alarms in an interconnected series: To silence an interconnected series of Smoke/
CO Alar ms, you must press the Test/S ilen ce but ton on t he ini tiat ing al arm (T he uni t with t he
flashing re d ligh t; the r ed light will b e off on all oth er Ala rms.). If you press the Test/S ilen ce
on any ot her Al arm, it will on ly sil ence t hat un it, no t the wh ole interco nnec ted series.
SILENCING THE LOW BATTERY WARNING
This Silence Feat ure can temporar ily quiet the low bat tery wa rning “ch irp”
for up to 8 hours if AC power i s present. Press the Test/Si lence bu tton
on the Alarm cover un til you hea r the acknowledge “chirp”.
Once the low batter y warning “chirp” silence feature is ac tivated, t he unit co ntinues to flash
the green light onc e a minute fo r 8 hours. After 8 ho urs, the l ow battery “chir p” will resume.
The Alarm will con tinue to op erate as long as AC powe r is supplied. Howeve r, replace
the un it as soo n as possible, to maintain prote ction in event of a power outage.
To deacti vate th is fea ture: Press t he Test/ Sile nce button again. T he uni t will go into Test Mode
and th e low bat ter y warning wil l resu me (LED f lash es and u nit sounds “c hirp” o nce a mi nute) .
LAT CHI N G F E ATUR E S
Alarm Latch is activated a fter an A larm is ex posed to a larm leve ls of smoke. This feat ure will on ly
work with AC p ower. After smoke levels drop below alarm levels, the Red LED will b egin to flash
once ever y few sec onds. It will continue to flas h or “latch” until you cl ear it by tes ting the alarm.
This feature help s emerge ncy responder s, investigators, or ser vice tec hnicia ns
identif y which u nit(s) in you r home were exposed to alarm levels of smo ke.
This can h elp investigator s pinpoint the source of smoke .
The Latc hing Ala rm Indic ator stay s ON until you clear it, so it can al ert you
to an alarm that occurred wh ile you were away from home, even though
smoke pre sent in the air has dropped be low alar m levels.
Low Battery Latch is activated wh en the Alarm is in the “low battery con dition”. Whe n
this occurs, the LED flashes Green On for 2 sec onds/O ff for 2 se conds. This feature is
designed to help you identif y which A larm ne eds to be re placed. Althou gh the Ala rm will
sound the l ow battery chir p approxi mately once ever y minute, sometime s during the initial
stages of “low battery”, the Alarm will c hirp in gr eater intervals than one minute, som etimes
up to severa l hours, until the batter y reache s a steady l ow battery level. T his innovative
feature e liminates the fru stration of waitin g for and/or identifying which unit i s chirpi ng.
“SMART INTERCONNECT” FEATURE
This Ala rm inclu des “Smart Interconnect” which enab les the Alarm to be in terconnected
with othe r First Alert
®
and BRK Sm oke, Heat, and “Sma rt Inte rconne ct” CO Alarms.
When smo ke is detec ted, all Al arms will sound th e smoke hor n pattern. When CO
is detected, “Sma rt Interconne ct” Ala rms will s ound the C O horn pat tern.
IF YOU SUSPECT A PROBLEM
Smoke Ala rms may no t operate proper ly because of dead or weak bat terie s, a build-up of dir t, dust
or greas e on the Smo ke Alarm c over, or insta llation in an impro per loc ation. Cl ean the Sm oke Alar m
as descr ibed in “Regula r Mainten ance,” then test the Sm oke Alar m again. If i t fails to test prope rly
when you us e the test button, or if the prob lem per sists, r eplace t he Smoke Alarm imm ediatel y.
• If you hear a “chi rp” approximatel y once a m inute, repl ace th e unit .
• If you experience frequent non-emergency alarms (like those
cause d by cook ing sm oke), tr y relo cati ng the A larm .
• If the alarm so unds w hen no s moke is visible, tr y clea ning
or relo cati ng the A larm . The cover may be d irt y.
• If the alarm does not sound during t esti ng, make sure it is
recei ving AC power fro m the househo ld cur rent .
Always disable the branch circ uit be fore servi cing an AC or AC/DC A larm. First, tur n off the
AC power at the circuit b reake r or fus e box. Nex t, re move th e batt ery f rom Alarms with bat tery
back-up . Finally, pre ss and h old th e test button for 5-10 sec onds t o disa ble th e bran ch circuit .
Do not tr y fixing the alarm yo urse lf – thi s will vo id your w arra nty!
If the Alarm is still n ot opera ting properly, and it is still under warr anty, plea se
see “How to O btain War ranty S ervice” in the Limited Warranty.
PERMANENTLY DISABLING THE ALARM
After 10 years of oper ation or l ow battery warning, permanently disab le the alarm by follow ing
the diagr am below. Insert tool into slot i n red disa ble switc h. Slide sw itch full y to the lef t.
ENABLED VIEW
DISABLED VIEW
ENABLED VIEW
ENABLED VIEW
DISABLED VIEW
ENABLED VIEW
Slide Switc h Left to Disa ble
ENABLED VIEW
DISABLED VIEW
ENABLED VIEW
Disabled View
Note: At end of life or low batter y indic ation (chirp): unit mu st be put into disab led mode
to disabl e remain ing store d energ y in batte ry. Unit wil l no longe r functi on once pu t into
this mode . Unit will r esist re -mounting. Onc e disabled, replace Ala rm immediately.
RECOMMENDED PLACEMENT
FOR HEARING IMPAIRED SMOKE ALAR MS
WITH INTEGRATED STROBE LIGHT
Smoke Ala rms with I ntegrated Strob e lights intended f or the hea ring impaired sh ould be lo cated in
the bedroom wher e a hearin g impaired pers on sleeps. Addit ional al arms should be located in any
room whe re a heari ng impaired per son may be present a nd need to b e notifi ed of a smoke d anger.
According to NFPA 72, for wal l mountin g, a 177 candela strobe li ght must b e used
in a sleep ing area w hen moun ting height of lens i s less than 24 inches (61 cm)
from the ceiling. A Smoke Alar m with an in tegrate d Strobe l ight must be place d
in accordance with the Smoke Alarm placement recommendations.
For Wall Mounting the alarm sho uld be bet ween 4 inches and 12 inches (100 mm an d 300
mm) from ce iling to avoi d the “dead a ir space”. For Ceiling Mounting the alarm sh ould
be place d at least 4 inches (100 m m) from wall o r corne r (see “Lo cations to Avoid for
Smoke Ala rms” bel ow). In addition, for wa ll or ceiling mounting, the un it must be l ocated
within 16 line ar feet (4.8 meters) f rom top of le ns to the pillow (see dia gram below).
RECOMMENDED PLACEMENT
STROBE LIGHT OUTPUT FOR WALL & CEILING MOUNTING
The inten sity of th e strobe l ight gradually lessens as the angl e increa ses. In ot her
words, the light is br ightes t directly in front of the strobe light and is progressive ly less
bright to e ither si de. The following illustrations show how the stro be light i s disper sed.
Use them to help you cho ose where to locate u nits for th e hearing impair ed.
Light Intensity
0
5-25
30-45
50
55
60
65
70
75
80
85
90
100
90
75
55
45
40
35
35
30
30
25
25
45 45
0
WALL
LIGHT
LIGHT
CEILING
FIGURE 1: Light Output
for Ceiling Mount
FIGURE 2: Light Output
PHOTOSENSITIVE EPILEPSY AND STROBE FLASH R ATES
Individuals who are susceptible to photosensitive epilepsy might have an increased
probability for seizures with multiple strobe lights flashing asynchronously. The frequency
or speed of fla shin g light that is most likely to cause se izur es vari es from person to per son.
Generally, flash ing lights mo st likely to trigger s eizures are betwe en the frequ ency o f 5
to 30 flashes p er sec ond (Hertz). This strobe ligh t flas hes at a bout 1 fl ash pe r seco nd.
RECOMMENDED LOCATIONS FOR SMOKE ALARMS
Installing Smoke Alarms in Single-Family Residences
The National Fire Protection Association ( NFPA), recommends o ne Smoke Alarm on eve ry floor, in
every sl eeping a rea, an d in every b edroom. In new con struction, the Smoke Alar ms must be AC
powered and interconnected. See “Agency Placement Recommendations” for details. For additional
coverage, it is recommended that you install a S moke Alarm in all rooms, halls, stora ge areas,
finished attic s, and basement s, where tempera tures no rmally r emain be tween 40° F (4° C) and 100° F
(38° C). Make sure no door or other obstruc tion could keep smoke from reaching the Smoke Ala rms.
More specifically, install Smoke Alarms:
• On every l evel of your h ome, including fi nished a ttics a nd basements.
• Inside eve ry bed room, es pecia lly if peo ple slee p with the door par tly or com pletely closed.
• In the hall n ear ever y sleep ing area . If your home has multiple sle eping areas, install a
unit in eac h. If a hall is more than 4 0 feet lon g (12 meters), ins tall a uni t at each en d.
• At the top of the f irst-to -second floor s tairway, and at the bot tom of the basemen t stair way.
Specif ic requi rement s for Smoke A larm in stallation var y from state to state and from re gion
to region. Check with your loc al Fire Departm ent for cu rrent re quirem ents in you r area. I t
is reco mmen ded AC or AC/ DC uni ts be interco nnec ted for added p rote ctio n.
AGENCY PLACEMENT RECOMMENDATIONS
NFPA 72 Cha pter 2 9
“For your in formation, the National Fire Alarm and Signaling Code, NFPA 72, reads as follows:”
29.5.1* Required Detection.
29 .5.1.1* Where required by other gove rning laws, codes, or stan dards fo r a specific type of
occupa ncy, approved single and multip le-st ation smoke alarm s shall be i nstall ed as foll ows:
(1) *In all sleeping rooms and guest rooms
(2) *Outside of each separa te dwellin g unit sle eping ar ea, with in 21 ft (6.4 m) of any
door to a sle eping ro om, with the distance meas ured alo ng a path of travel
(3) On every level of a dwe lling uni t, including basements
(4) On every level of a residential board and car e occupa ncy (small facility),
includi ng basements and excluding crawl spa ces and unfinish ed atti cs
(5) *In the living area(s) of a gues t suite
(6) In the living area(s) of a resid ential b oard and c are occupancy (small facility)
(Repri nted with p ermis sion fro m NFPA 72
®
, Nationa l Fire Ala rm and Signaling C ode Copy right © 2010
Nationa l Fire Prote ction A ssociation, Quincy, MA 02269. This rep rinted material i s not the complete
and official po sition of t he National Fire Protectio n Association, o n the refer enced s ubject w hich is
repres ented only by the sta ndard in i ts entirety), (National Fi re Alarm and Signaling Code
®
and NFPA
72
®
are registered tr adema rks of the Na tional Fire Protec tion Association, Inc., Quincy, MA 0226 9).
California State Fire Marshal (CSFM)
Early warning detection i s best achieved by the installation of fire detec tion equ ipment
in all room s and are as of the hou sehold as follows: A Smoke Ala rm installed in e ach
separa te sleeping area ( in the vicinity, but ou tside bedroom s), and Heat o r Smoke Alarms
in the living rooms, dining rooms, bed rooms, k itchen s, hallways, finis hed att ics, fur nace
rooms, closets, utility and storage rooms, basem ents, an d attached garages.
LOCATIONS TO AVOID FOR SMOKE ALARMS
For best perf orma nce, AVOI D inst alling Smoke A larm s in the se are as:
• Where combustion particles are produced. Combustion particles form when something
burns. A reas to avoid includ e poorly ventilated kitchens, gar ages, and furnace rooms . Keep
units at le ast 20 fee t (6 meter s) from the s ources o f combus tion par ticles (stove, furnace,
water heater, space heater) if po ssible. In areas w here a 20-foot dist ance is not possible – in
modular, mobile, or sm aller ho mes, for example – it is recom mended the Smoke Alarm be
placed as far from these fuel-burning sources as possible. The placement recommendations
are inten ded to keep these Alarms at a re asonable distance from a fuel-b urning s ource,
and thus re duce “unwanted” alarms. U nwanted alarms ca n occur if a Smoke Ala rm is
placed directl y next to a fue l-bur ning source. Ventil ate these a reas as m uch as possible.
• In air stre ams nea r kitchens. Air cu rrents c an draw co oking sm oke into
the sensing chamber of a Smoke Alarm near the ki tchen.
• In very da mp, humid o r steamy areas, or directly near bathrooms with showers. Keep
units at le ast 10 feet (3 m eters) away from showe rs, sau nas, dis hwasher s, etc.
• Where the temperatures are regula rly below 40° F (4° C) or above 100° F (38° C) in cluding
unheated buildings, outdoor rooms, porches, or unfinished attics or basements.
• In very du sty, dirty, or greasy a reas. D o not install a Smoke A larm dir ectly ove r the
stove or range. Clean a laundr y room unit frequently to kee p it free of dust or lin t.
• Near fre sh air vents, ceili ng fans, o r in very d raft y areas. D rafts can blow smoke
away from the unit, preventing it f rom reac hing sen sing cha mber.
• In insec t infeste d areas. Insect s can clog openings to the
sensing chambe r and cause unwante d alarms.
• Less tha n 12 inches (305 mm) away fro m fluore scent lights.
Electrical “noise” can in terfe re with the s ensor.
• In “dead air” space s. “Dead a ir” spaces may prevent smoke f rom reac hing the S moke Alarm.
AVOIDI NG DEAD AIR SPACES
“Dead ai r” space s may preve nt smoke fr om reach ing the Smoke Alarm . To
avoid dead air spaces, follow the installation recommendations below.
On ceilings, install Smoke Alarms as close to the cente r of the cei ling as po ssible. If this is
not possible, ins tall the S moke Alarm at leas t 4 inches (100 mm) from the wall or cor ner.
For wall m ount ing (if a llowed by bu ilding codes), the top edge of Sm oke
Alarms should be placed b etween 4 inches (100 m m) and 12 inche s (300
mm) from the wall/ceil ing line, b elow typ ical “dead air” spaces.
On a peaked, gabled, or cathedral ceiling, install the fir st Smoke A larm within 3 feet (0.9
meters) of the peak of t he ceiling, measured hor izontal ly. Additional Smoke A larms m ay be
require d depen ding on the length, a ngle, etc. o f the ceiling’s slope. R efer to CAN /ULC S55 3 and
the Natio nal Fire Code of Cana da for details on re quirements for sloped or p eaked ce ilings.
ABOUT SMOKE ALARMS IN GENER AL
Battery (DC) operated Smoke Alarms: Provide protecti on even whe n electricity fails, pr ovided
the batte ries ar e fresh and corre ctly ins talled. Units are easy to ins tall, and do not require
professional installation. They do not, however, provide interconnected functionality.
AC powered Smoke A larm s: Can be intercon nected so if one uni t sense s smoke,
all units a larm. They do not op erate if electri city fa ils. AC wit h bat tery (DC) bac k-
up: will operate if electricity fails, provided the batteries are f resh and correctly
installed. AC and AC/ DC units must be installe d by a qualif ied electrici an.
Wireless Interconnected Alarms: Offer the sam e interconnected funct ionality as with h ardwir ed
alarms , without wires. Units are easy to install and do not requir e profes sional i nstall ation. They
provide p rotecti on even whe n electricity fails, pr ovided the batteries are f resh and correctly inst alled.
Smoke Alarms f or Solar or Wind Energy users and batt ery ba ckup p ower sys tems:
AC powered S moke Alarms shou ld only be operate d with true or pure sine wave inver ters.
Operat ing this Smoke Alar m with mos t batter y-powered UPS (unin terrup tible powe r supply )
produc ts or squa re wave or “qua si sine wave” inverte rs will damag e the Alarm. If you are
not sure ab out your inverter o r UPS typ e, pleas e consul t with the manufacturer to ver ify.
Smoke Alarms f or the h eari ng impaired : Special purpose Smoke Alarms should
be insta lled for the hearing impaired. They i nclude a visual alarm and an audible
alarm ho rn, and me et the requireme nts of the A mericans With D isabilities Act. These
units can be interc onnected so if one unit senses smoke, all units a larm.
Smoke alarms a re not to be used with detect or guards unless the
combination has been evaluated and found suitable for that purpose.
All these Smoke Ala rms are d esigne d to provid e early wa rning of f ires if lo cated, in stalle d
and care d for as describe d in the use r’s manual, and if smo ke reache s the Alarm. If
you are uns ure which type of un it to install, refer to local bu ilding codes as th ey may
also req uire spe cific un its in new construction or in differ ent areas of the hom e.
SPECIAL COMPLIANCE CONSIDERATIONS
This Smoke Ala rm alo ne is not a s uita ble su bsti tute f or comp lete f ire de tect ion sys tems
in places housing many people—like apartment buildings, condominiums, hotels,
motels, dormitories, hospitals, long-term health care facilities, nursing homes, day care
facil itie s, or group hom es of any k ind—even if they were once sin gle-famil y home s. It is
not a sui tabl e subs titu te for co mple te fire detec tion s ystems in war ehouses, in dust rial
facilities, commercial buildings, and special-purpose non-residential buildings which
require special f ire de tect ion an d alarm syste ms. Depending on the buil ding c odes in your
area, t his Smoke Alarm may b e used to provi de add itional protect ion in t hese f acili ties .
FCC COMPLIANCE
This equipment has been te sted and f ound to com ply with the limits for a Class B d igital
device, pursuant to Part 15 of the FCC rules . These li mits are d esigne d to provid e reasonable
protection against harmful interference in a residential installation. This equipment generates,
uses and c an radia te radio frequency energ y and, if not install ed and us ed in accordanc e
with the instruct ions, may cause harmful interference to ra dio comm unications.
However, there i s no guarantee that the inter feren ce will not o ccur in a pa rticular installati on.
If this equ ipment d oes cause harmf ul inter ference to radio or television rece ption,
which can be determined by turning the e quipme nt off an d on, the us er is encourage d
to try to correct th e interference by one or mor e of the foll owing mea sures:
• Reorient or relocate the receiving antenna.
• Increase the separation betwee n the equi pment an d receiver.
• Connec t the equipment into an outlet on a circuit diffe rent fro m that of the r eceive r.
• Consult the dealer or an experienc ed radio or TV tec hnicia n for help.
Change s or modif ications to the pro duct, not expres sly appr oved by Firs t Aler t /
BRK Bran ds, Inc., could void th e user’s authorit y to opera te the equi pment.
This devi ce compl ies with Pa rt 15 of the FCC R ules. Op eration is subje ct to the fol lowing two
conditi ons: (1) this device may not c ause harmful interfer ence, an d (2) this device must accept
any interference received, including interference that may cause undesired operation.
GENERAL LIMITATIONS OF SMOKE ALARMS
Smoke Ala rms have pl ayed a key role in reducing death s result ing from home fire s worldwide.
However, like any wa rning device, Smo ke Alarm s can only work if they a re prope rly loc ated,
installed, and maintained, and if smoke reaches the A larms. They are no t foolproof.
Smoke alarms may not waken all individuals. Practic e the esca pe plan at least twice a year,
making sure that eve ryone i s involved – from kids to g randpa rents. A llow children to ma ster fire
escape plannin g and practice before hold ing a fire drill at nig ht when they are sleeping. If c hildren
or other s do not readily waken to t he sound of the smoke alarm, or if there are infants o r family
member s with mob ility li mitations, make s ure that someone i s assign ed to assist them in fire
drill and i n the event of an emerg ency. It is recommended that yo u hold a fir e drill whi le family
member s are sle eping in o rder to determine their res ponse to th e sound of the smoke alarm while
sleepi ng and to determine whether they may nee d assistance in the event of an emerge ncy.
Smoke Alarms c anno t work wi thou t power. Battery operated units cannot work if the batteries
are miss ing, disc onnec ted or dead, if the wro ng type of batter ies are us ed, or if th e batter ies are not
installed correctly. AC uni ts canno t work if the AC p ower is cut o ff for any r eason (open fuse o r circui t
breaker, fai lure along a power line or at a power station, electr ical fire that bur ns the electric al wires ,
etc.). If you are c oncer ned about the limitations of battery or AC powe r, install bo th type s of units.
Smoke Alarms c anno t detect fires if the smoke do es not reach th e Alar ms. Sm oke from fi res in
chimneys or walls, o n roofs, o r on the othe r side of cl osed doors may not r each the s ensing c hamber
and set of f the Alarm. That i s why one uni t should b e instal led insi de each bedroom o r sleepi ng area—
especially if be droom or sleepi ng area do ors are c losed at night—and in the h allway between th em.
Smoke Alarms m ay not detect f ire on a noth er floo r or are a of the d welli ng. For example,
a stand- alone un it on the se cond flo or may not detect smoke from a ba sement f ire until the fire
spreads. This may n ot give you enough tim e to escap e safely. That is why rec ommended minim um
protect ion is at le ast one un it in ever y sleep ing area , and ever y bedro om on ever y level of your
dwelling. Even with a un it on ever y floor, sta nd-alo ne units m ay not provide as much protect ion as
interco nnecte d units, e specially if the f ire starts in a remote area . Some safety experts re comme nd
installing inter connected AC powered units with bat tery ba ck-up (see “About Smoke A larms” ) or
professional fire detec tion systems, so if o ne unit se nses smoke, all uni ts alarm. Interconnecte d units
may provid e earlier warnin g than sta nd-alone units since all u nits ala rm when one detects smoke.
Smoke Alarms m ay not be heard . Thoug h the alar m horn in th is unit me ets or exce eds
current standa rds, it may not be hea rd if: 1) the unit is locate d outside a close d or
partially closed door, 2) residents recently consu med alcohol or drugs, 3) the A larm is
drowned o ut by noise from ster eo, TV, traf fic, air conditi oner or ot her appliances, 4)
reside nts are he aring im paired o r sound sl eeper s. Spec ial purpose units, like those with
visual and audibl e alarm s, should be insta lled for hearing i mpaire d reside nts.
Smoke Alarms m ay not have time to alar m before the f ire itself causes d amag e,
injur y, or death, si nce smoke from s ome fires may n ot reac h the unit imm edia tely.
Examples of this include persons smoking in bed, children playing with matches,
or fire s caus ed by vio lent ex plos ions result ing fr om escaping gas.
Smoke Alarms a re not foolpr oof. Like a ny elect ronic dev ice, Smo ke Alarm s are
made of components that can wear out or f ail at any ti me. You must tes t the unit
weekly to e nsure you r continued prote ction. S moke Ala rms cannot preven t or
extingu ish fire s. They ar e not a substitute for p roper ty or life insura nce.
Smoke Alarms h ave a lim ited life. The unit should be replaced immediate ly if it is not
operating properly. You should a lways replace a Smoke Alarm after 10 year s from date
of purchase. Write the purchase date on the space provided on back of unit.
LIMITED WARRANTY
BRK Bran ds, Inc., (“ BRK”) the maker of First Ale rt
®
brand and BRK
®
brand products,
warrants that for a p eriod of ten years f rom the date of purchase, this p roduct will
be free fr om defec ts in material and wo rkman ship. BRK , at its opt ion, will repair or
replace this prod uct or any c omponent of the pr oduct fo und to be defective du ring
the warra nty period. Replacement will be m ade with a new or remanufactu red product
or compo nent. If th e produc t is no longer availa ble, rep laceme nt may be made with
a similar p roduct of equal or greater value. This is your excl usive war ranty.
This warranty is valid for th e origin al retai l purcha ser from the date of initial
retail purchase and is not tr ansferable. Keep the original sa les receipt. Proof
of purcha se is required to obtain warranty perfor mance. B RK dealers, service
center s, or reta il stores s elling BRK produ cts do not h ave the righ t to alter,
modify or any way cha nge the terms and co nditions of this warranty.
This warranty does not cove r norma l wear of parts or da mage resulting f rom any of the
followin g: neglig ent use or m isuse of t he produ ct, use on i mprope r voltage or curre nt, use
contrary to the op eratin g instru ctions , disassembly, rep air or alteration by anyone oth er than
BRK or an au thorize d serv ice center. Further, the warrant y does no t cover Act s of God, such
as fire, flood, hur ricanes and tor nadoes o r any batteries th at are inc luded wi th this uni t.
BRK shall not be liab le for any in cident al or consequential dam ages caused by the
breach of any express or implied warr anty. Exce pt to the extent prohibited by ap plicable
law, any implied warra nty of me rchant abilit y or fitne ss for a particular purp ose is
limited in duratio n to the dura tion of the a bove warr anty. Some states, p rovince s or
jurisdictions do not allow t he exclusi on or limitation of i nciden tal or conseque ntial
damage s or limitations on h ow long an implied wa rrant y lasts, so the above limitati ons
or exclusi on may not ap ply to you. This warranty gives you specific le gal righ ts, and
you may also have other r ights that vary from state to s tate or province to pr ovince.
How to Obtain Warranty Ser vice
Serv ice: If servi ce is required, do not return t he produ ct to your re tailer. In or der to obtain
warranty ser vice, contact the Consum er Affa irs Division at 1-8 00-3 23-90 05. To assis t us in
serving you, please have the model number and date of purchase available when calling.
For Warranty Service return to: BRK Brands, Inc., 1301 Joe Bat tle, El Pas o, TX 7993 6
Battery: BRK Bra nds, Inc. m ake no warr anty, expr ess or imp lied, wr itten or oral, inc luding
that of mer chanta bility or fitness for any pa rticular pur pose with respect to batte ry.
Visit www.firstalert.com or www.brkelectronics.com for more information.