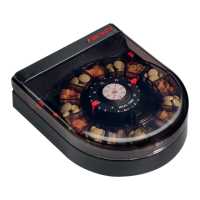
1 2 3 4
I
MPORTANT:
In humid conditions use pellet food and
c
onnect airline to prevent food
c
logging.
Test feeder in desired location over 14
days before unsupervised use.
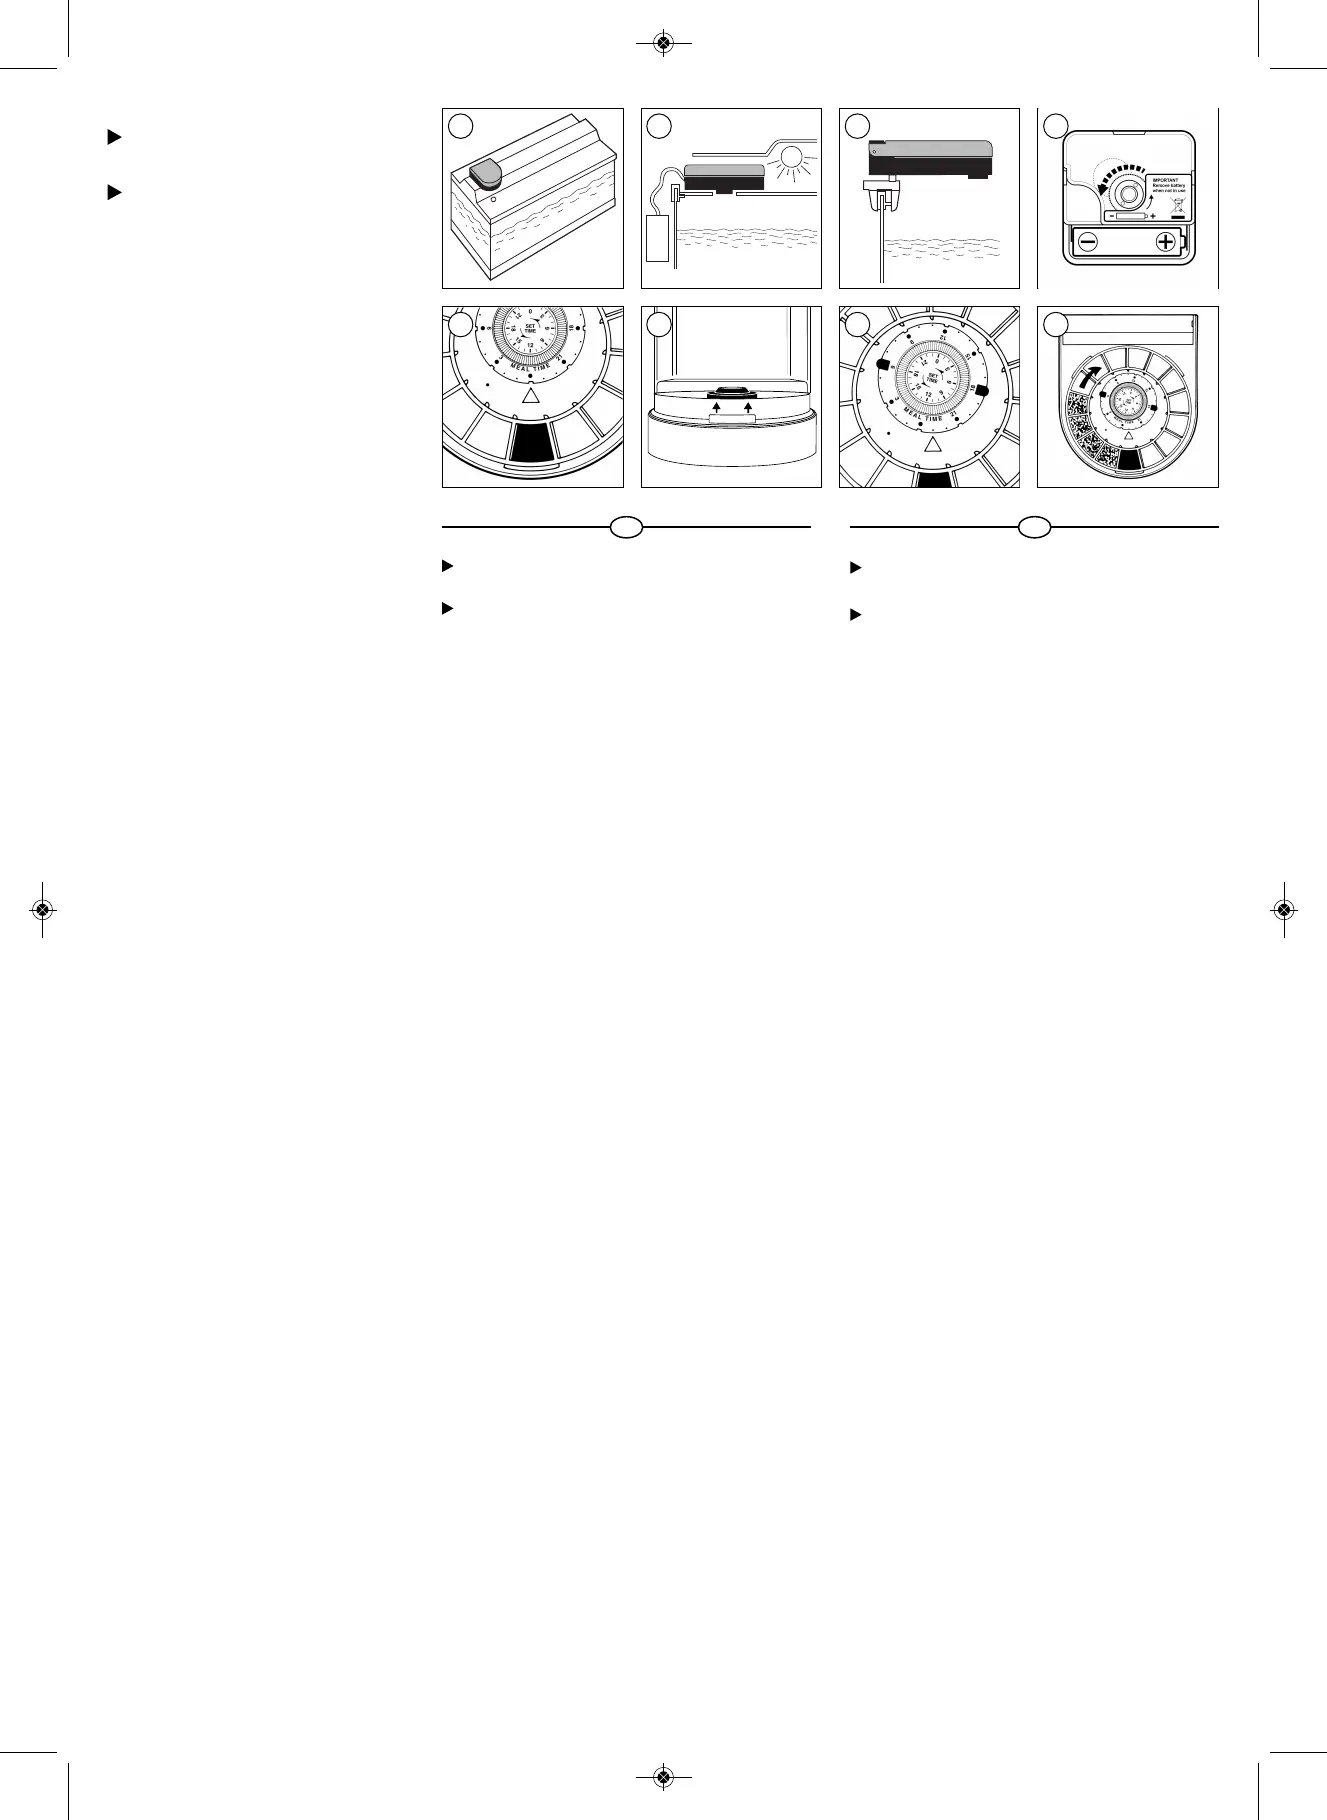
1
. Positioning of feeder
Your F14 feeder should normally be
positioned on the aquarium hood with its food
e
xit spout positioned over the feeding hole
p
rovided in the aquarium hood. If your
a
quarium is not provided with such a hole you
w
ill need to cut a hole diameter 30mm (1
1
/
4
’
’).
(Fig. 1.)
I
t is not normally recommended that the
f
eeder be installed on the condensation tray
(
fitted on some aquariums under the lighting
hood), as excessive moisture in this area can
cause food clogging. However, such
i
nstallation may be satisfactory if an air pump
i
s connected to the small connector marked
“
AIR” under the feeder, as this will normally
p
revent the ingress of moist air. (Fig. 2.)
On aquariums without a hood the feeder
s
hould normally be mounted on the two tank
c
lamps supplied after pulling out the two rear
r
ubber feet. Screw the clamps to the top edge
o
f the aquarium in the required position so
that the feeder may be placed on this
mounting. Check security of clamps before
use. (Fig. 3.)
T
he F14 feeder is not designed for use
o
utside on fishponds.
2
. Operation
a. Turn upside down, remove timer cover,
insert AA battery and check gear rotates
as shown by dotted arrow in Fig. 4.
Replace timer cover.
b. Place unit in required position and lift the
lid. Align hole in the rotor with the food exit
s
pout. (Fig. 5.) Ensure the rotor is the
correct way up as indicated in Fig 6.
c. Insert mealtime pegs in the required
locations in the timer knob (Fig. 7). (Note:
4 mealtime pegs are supplied, but extras
are available.) Set the time on the inner
dial by rotating the timer knob anti-
clockwise until the current time lines up
with the indicator arrow. (In Fig. 7 the
current time is 11am and the fish will be
fed at 6pm today and daily thereafter at
6am and 6pm.) The food is dispensed
gradually over a period of approximately 2
hours, as this is better for the fish.
d. Fill the required number of compartments
in the rotor, starting clockwise from the
food exit spout for the first meal. Close the
lid. (Fig.8.)
e. Remove battery after use.
3. If you experience problems with food
clogging
Problems of food clogging or not falling out
may occasionally be experienced where
condensation occurs inside the feeder. Some
foods are more likely to clog. (If clogging
occurs, try pellet food). The clogging may be
due to the spray produced by an air pump. If
so, try moving the airstone to a location
remote from the feeding hole, and/or
reducing the air flow rate. You may also try
raising the feeder 25-50mm (1’’-2’’) above the
feeding hole, and leaving the lid of the feeder
open. In extreme cases, it is possible to
connect an air pump to the small connector
marked “AIR” under the feeder, thus
pressurising the feeder and preventing the
ingress of moist air.
4. Cleaning
We recommend that you remove the rotor
after 14 days’ continuous use and dust off any
remaining food fragments from underneath
the rotor and from its seating face on the
body.
5. Batteries
We recommend an alkaline battery size ‘AA’.
This battery should last 12 months in
continuous use. Always remove battery
after use.
5 6 7 8
W
ICHTIG:
Unter feuchten Bedingungen empfiehlt es sich, Pelletfutter
z
u verwenden und die Luftleitung anzuschließen, um ein
Z
usammenballen des Futters zu verhindern.
Testen Sie den Futterautomaten zunächst 14 Tage lang am
gewünschten Einsatzort, bevor Sie ihn unbeaufsichtigt
einsetzen.
1. Platzierung und Befestigung des Futterautomaten
Normalerweise wird der Futterautomat F14 auf der Abdeckung des
A
quariums angebracht, wobei die Futterausgabetülle über dem
F
ütterungsloch der Aquariumsabdeckung angeordnet wird. Wenn
d
ie Abdeckung keine entsprechende Öffnung aufweist, muss ein
Loch mit einem Durchmesser von 30mm ausgeschnitten werden
(Abb. 1).
Es ist in den meisten Fällen nicht ratsam, den Futterautomaten auf
der Kondensationswanne (bei manchen Aquarien unter der
Beleuchtungsabdeckung angeordnet) anzubringen, da es in dieser
P
osition durch übermäßige Feuchtigkeit zum Zusammenballen von
F
utter kommen kann. Eine derartige Anordnung kann jedoch eine
befriedigende Lösung sein, wenn eine Luftpumpe an das mit „AIR“
m
arkierte kleine Anschlussstück unten am Futterautomaten
angeschlossen wird, womit normalerweise ein Eindringen von
feuchter Luft verhindert wird (Abb. 2).
Bei Aquarien ohne Abdeckung wird der Futterautomat
n
ormalerweise mit den zwei mitgelieferten Beckenklemmen
befestigt, wobei vorher die beiden hinteren Gummifüße
abgenommen werden müssen. Die Klemmen am oberen Rand des
A
quariums in der gewünschten Position festschrauben. Der
Futterautomat wird dann auf diese Befestigung aufgesetzt. Vor dem
Gebrauch die Klemmen auf festen Sitz überprüfen (Abb. 3).
Der Futterautomat F14 eignet sich nicht zum Einsatz im Freien für
F
ischteiche.
2
. Betrieb
a. Umdrehen, die Timer-Abdeckung abnehmen, die AA-Batterie
einlegen und prüfen, dass sich das Rädchen so dreht, wie es der
gestrichelte Pfeil in Abb. 4 anzeigt. Die Timer-Abdeckung wieder
aufsetzen.
b. Das Gerät in die gewünschte Position bringen und den Deckel
öffnen. Das Loch im Rotor mit der Futterausgabetülle ausrichten
(Abb. 5). Sicherstellen, dass der Rotor in der richtigen Position
nach oben weist (siehe Abb. 6).
c. Fütterungszeitstifte an den gewünschten Positionen in die
Zeitgeberscheibe einstecken (Abb. 7). (Hinweis: 4
Fütterungszeitstifte sind mitgeliefert, doch sind zusätzliche Stifte
verfügbar.) Die Zeit auf der Innenscheibe einstellen. Dies
geschieht durch Drehen der Zeitgeberscheibe gegen den
Uhrzeigersinn, bis die aktuelle Uhrzeit mit der Position des
Anzeigepfeils übereinstimmt. (In Abb. 7 ist die aktuelle Uhrzeit
11.00 Uhr, wobei die Fische am selben Tag um 18.00 Uhr und
danach täglich um 6.00 Uhr und 18.00 Uhr gefüttert werden.)
Das Futter wird über einen Zeitraum von zirka 2 Stunden
allmählich ausgegeben, da dies besser für die Fische ist.
d. Die gewünschte Zahl von Futterkammern im Rotor befüllen,
wobei mit der ersten Ausgabetülle im Uhrzeigersinn begonnen
wird. Den Deckel schließen (Abb. 8).
e. Nach dem Gebrauch die Batterie herausnehmen.
3. Probleme damit, dass sich Futter zusammenballt
Es kann in gewissen Fällen vorkommen, dass sich durch
Kondensation im Innern des Geräts Futter zusammenballt bzw.
nicht richtig aus der Tülle fällt. Manche Arten von Futter neigen zum
Zusammenballen. (Wenn es zu solchen Zusammenballungen
kommt, Fischfutter in Pellet-Form verwenden.) Zusammen-
ballungen bzw. Verstopfungen können jedoch auch auf
Sprühwasser von einer Luftpumpe zurückzuführen sein. Sollte dies
der Fall sein, den Strömerstein in größerer Entfernung von der
Futteröffnung platzieren und/oder den durchfließenden Luftstrom
reduzieren. Eine weitere Möglichkeit besteht darin, den
Futterautomaten 25 bis 50mm über der Futteröffnung anzubringen
und den Gerätedeckel offen zu lassen. In extremen Fällen kann
eine Luftpumpe an das mit „AIR“ markierte kleine Anschlussstück
unten am Gerät angeschlossen werden, wodurch es unter Druck
gesetzt und damit ein Eindringen von feuchter Luft verhindert wird.
4. Reinigung
Es empfiehlt sich, den Rotor nach zweiwöchigem
ununterbrochenem Gebrauch abzunehmen und von seiner
Unterseite und seinem Gehäusesitz alle verbliebenen
Futterrückstände zu entfernen.
5. Batterien
Wir empfehlen die Verwendung von Alkaline-Batterien vom Typ AA.
Bei ständigem Gebrauch beträgt die Lebensdauer einer derartigen
Batterie zirka 12 Monate. Nach dem Gebrauch die Batterie immer
herausnehmen.
I
MPORTANT:
Dans des conditions humides, utilisez des aliments
g
ranulés et raccordez la conduite d’air pour empêcher
q
ue la nourriture s’agglutine.
Testez le nourrisseur à l'endroit désiré pendant 14 jours
avant de l'utiliser sans surveillance.
1. Où placer le F14
L
e nourrisseur F14 se place en général sur le couvercle de
l'aquarium, le bec verseur étant placé juste au-dessus de l'orifice
du couvercle prévu pour la nourriture. Si le couvercle de votre
aquarium ne comporte pas un tel orifice, vous devrez y percer
u
n trou de 30mm de diamètre. (fig. 1.)
I
l n'est pas normalement recommandé d'installer le distributeur
s
ur le plateau à condensation (présent dans certains aquariums
sous la hotte lumineuse), car un excès d'humidité à cet endroit
risque d'agglutiner la nourriture. Une telle installation peut
cependant être satisfaisante si une pompe à air est reliée à
l'embout marqué “AIR” sous le distributeur, car cela permettra
d'éviter la pénétration d'air humide. (fig. 2.)
S
ur les aquariums sans couvercle, le nourrisseur s'installera
n
ormalement sur les deux pinces fournies après avoir retiré les
d
eux pieds arrière en caoutchouc. Vissez les pinces sur le bord
s
upérieur de l'aquarium dans la position requise, de sorte à
p
ouvoir placer le nourrisseur sur cette fixation. Avant toute
utilisation, vérifiez que les pinces sont correctement serrées.
(fig. 3.)
Le F14 n'est pas conçu pour être utilisé en extérieur sur un
bassin.
2. Fonctionnement
a Retournez l’appareil, retirez le couvercle de la minuterie,
insérez une pile AA et vérifiez que le mécanisme tourne
comme indiqué par la flèche en pointillés de la fig. 4.
Remettez le couvercle de la minuterie en place.
b Replacez l'élément dans la position voulue et relevez le
couvercle. Alignez l'orifice du rotor et le bec verseur. (fig. 5.)
Veillez à ce que le rotor soit correctement orienté, comme
indiqué par la fig. 6.
c Insérez les marqueurs aux heures de repas désirées sur la
minuterie (fig. 7). (Remarque: 4 marqueurs sont fournis, mais
on peut s'en procurer davantage.) Réglez le cadran central
sur l’heure en faisant tourner le remontoir de la minuterie
dans le sens inverse des aiguilles d'une montre jusqu'à ce
que l'heure actuelle soit alignée sur la flèche. (Dans la fig. 7,
il est 11h du matin et les poissons seront nourris aujourd'hui
à 18h et tous les jours par la suite à 6h et à 18h). La nourriture
est dispensée progressivement sur une période d'environ
deux heures, car c'est ce qui convient le mieux aux poissons.
d Remplissez le rotor du nombre de repas voulus : commencez
au niveau du bec verseur et continuez dans le sens des
aiguilles d'une montre. Refermez le couvercle. (fig. 8.)
e. Retirez la pile après utilisation.
3. En cas de problème d’agglutinement de la nourriture
Des problèmes d'agglutinement ou de blocage de la nourriture
peuvent se produire en présence de condensation à l'intérieur
du nourrisseur. Certaines nourritures ont tendance à
s'agglutiner. (En cas d'agglutinement, essayez la nourriture en
pilules). L'agglutinement peut être dû à la pulvérisation d'eau par
la pompe à air. Si tel est le cas, essayez de déplacer la sortie
d'air pour l'éloigner de l'orifice d'alimentation et/ou de réduire le
débit d'air. Vous pouvez également essayer de soulever le
nourrisseur de 25 - 50mm au-dessus de l'orifice d'alimentation et
laisser son couvercle ouvert. Dans les cas extrêmes, il est
possible de connecter une pompe à air au petit embout marqué
“AIR” sous le nourrisseur, ce qui permet de le pressuriser et
d'éviter la pénétration d'air humide.
4. Nettoyage
Nous vous suggérons de démonter le rotor après 15 jours
d'usage continu pour nettoyer les particules de nourriture qui
pourraient adhérer au-dessous du rotor et sur la partie de la
coque sur laquelle ce dernier repose.
5. Piles
Il est recommandé d'utiliser une pile alcaline de type “AA”. Cette
batterie devrait donner une autonomie moyenne de 12 mois
d'usage continu. Retirez toujours la pile après utilisation.
D
F
0724-0715 instructions.qxp_Layout 1 31/01/2017 15:53 Page 2
 Loading...