Do you have a question about the Fisher Scientific 2100 and is the answer not in the manual?
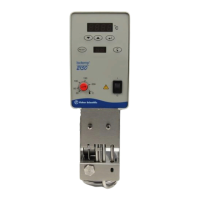
The Isotemp Immersion Circulator is a device designed to provide precise temperature control for various applications. It consists of a circulating pump, a heater, a temperature sensor, a controller, and a mounting device, making it a comprehensive solution for maintaining stable temperatures in a bath or system.
The primary function of the Isotemp Immersion Circulator is to accurately control and maintain the temperature of a fluid in a bath or external system. It achieves this by circulating a heat transfer fluid, which is heated or cooled to the desired setpoint. The device is available in two models, 2100 and 2150, offering both analog and digital control options, respectively. The 2100 model provides temperature control within a range of 25°C to 100°C with an analog controller, while the 2150 model extends the range to 25°C to 200°C with a digital controller, offering higher precision.
The circulator is designed for full-service operation, featuring an independent repair center with experienced engineers and technicians. It also offers custom engineering services to ensure the equipment meets specific operational requirements. The device supports critical and expedited services, is available in stock for ready-to-ship orders, and offers leasing, rentals, and demos. Furthermore, it provides ITAR-certified secure asset solutions.
Before operation, the unit requires proper installation and filling. It should be placed in an area free from high humidity, corrosive, or dusty atmospheres. The mounting bracket, supplied with the unit, needs to be attached to the rear of the unit and then secured to the tank. The tank must be filled with a suitable heat transfer fluid to ensure the pump assembly is submerged, with attention to the fluid minimum and maximum level marks on the unit. It is crucial never to run the unit in an empty tank. The recommended fluid viscosity for optimal temperature stability and pumping rates is 1.6 centipoise or less at 20°C; higher viscosity fluids may trigger the High Temperature Cutout (HTC). Flammable or corrosive fluids, as well as highly distilled and deionized water, should never be used as they can be aggressive and cause material corrosion.
For the 2100 model, starting the unit involves placing the I/O switch to the 'I' position, which illuminates the ON LED and the heating LED as needed. Temperature adjustment is done by turning a dial to the desired temperature and using a small screwdriver for fine-tuning with a thermometer.
For the 2150 model, after placing the I/O switch to 'I', the °C display will run a self-test. Pressing the start/reset button will then show the fluid temperature near the control sensor. To adjust the temperature setpoint, the menu select key is pressed until 'S' is displayed, and the value arrows are used to change the setpoint. The enter key accepts the new value, or the unit defaults to the old setpoint. The heating control indicator, a small circular display, lights up when heating is active, flashing during the control phase and staying constant during the heating-up phase.
The 2150 model also allows for the display of the software version by depressing and holding any key while turning the unit on. A correction factor (cS) can be entered to match the displayed temperature with an external measuring device, with a resolution of 0.01°C and a range of ±2.5°C. This is done by pressing the menu key until 'cS' is shown, adjusting the value with the value keys, and pressing enter. Additionally, a temperature limitation (H) can be set to avoid faults, especially when using fluids with specific flash points. This is configured by pressing the menu key until 'H' is shown, adjusting the value, and pressing enter.
Safety features include automatic thermally-triggered fuses located on the rear of the unit, which can be reset after waiting at least five seconds. All units are equipped with a High Temperature Cutout (HTC) that shuts down the unit if the temperature limit is exceeded. On 2100 units, a fault light illuminates, while on 2150 units, an alarm sounds, and a fault message is displayed. The HTC limit can be adjusted using a dial on the rear of the unit. In case of a fault, power should be removed, the fault condition corrected, and then the unit restarted.
Regular cleaning of the unit is recommended using a mild soapy solution and a soft, nonabrasive cloth. Steel wool should not be used as it is abrasive and can lead to rusting. To prevent algae growth, the use of Chloramine-T (1 gram per 3.5 liters) is recommended.
Troubleshooting steps are provided for common issues. If the unit does not start, checks should be made for fault conditions, fuses, correct voltage output, and line cord wiring. If there is no external circulation, obstructions in external system lines should be checked, and specifications reviewed regarding pump head limits. If the controller ceases operation, the fluid viscosity should be verified to be 1.6 centipoise or less.
For the 2150 model, in the event of a power failure, the start/reset key must be pressed after power is restored to restart the unit. The unit can also be configured for automatic reset by pressing the menu key and simultaneously switching on the unit until "88888" is displayed, then pressing the reset button. To activate automatic reset, press the menu key until "8 ON" is shown, then use the value keys until "8 OFF" is displayed, and press enter.
If the display cannot be altered due to microprocessor freezing, the unit should be switched off at the mains switch. To clear this problem, both value keys should be depressed while switching the unit on, then press the reset button when "88888" is displayed. This resets the microprocessor to its basic default settings, requiring all other parameters to be reentered.
Fault displays provide specific messages for various conditions: "AL °C" for excess temperature, "AL-n" for low liquid level, "AL-P" for pump or motor overloading, "AL-F" for sensor breakage or short circuit, "AL-r" for undefined fault, and "8 Err" for range exceeded. Each fault has corresponding troubleshooting steps, such as topping off fluid, checking for blockages, or returning the unit for servicing. After a fault is eliminated, the °C display will show "°°° F" (or similar, with three preceding zeros) indicating the fault has been cleared, and the start/reset key must be pressed to restart the unit.
| Display | Digital |
|---|---|
| Control | Microprocessor |
| Control Type | Digital PID |
| Input Types | Temperature probe (thermistor) |
| Output Types | Relay for heater control |
| Communication | RS-232 |
| Power Supply | 120V or 240V, 50/60Hz (depending on model) |
| Operating Temperature | 15°C to 32°C |
| Dimensions | Varies depending on the specific configuration. Refer to the product manual for detailed dimensions. |