EasyManua.ls Logo

Fishman LOUDBOX PRO User Manual

Fishman LOUDBOX PRO
12 pages
To Next Page IconTo Next Page
Page #1 background imageLoading...
Page #1 background image
www.fishman.com
Save your original sales receipt. It is your proof of purchase if you require warranty service.
Fishman Acoustic Instrument Amplifiers ("Products") are warranted to the original consumer purchaser to be free of defects in
materials and workmanship under normal use and service for a period of one (1) year from the date of purchase, with the exception
of the speaker components, which are warranted for a period of ninety (90) days from the date of purchase. If the Product fails to
function properly due to defects in materials or workmanship during the applicable warranty period, Fishman Transducers Inc.
("Fishman"), at its option, will repair or replace the Product, with no charge for labor or materials. This warranty applies only if the
Product is sold and delivered within the U.S. by an authorized Fishman Dealer.
Warranty service and repairs for Fishman Acoustic Instrument Amplifiers are to be made only at an authorized Fishman Service
Center OR at the factory in Wilmington MA. Unauthorized repairs will void this warranty.
Note: For factory warranty service, the customer must prepay freight to Fishman.
EXCEPT AS SPECIFICALLY PROVIDED IN THIS DOCUMENT, THERE ARE NO OTHER WARRANTIES, EXPRESSED OR IMPLIED, INCLUDING, BUT NOT
LIMITED TO, IMPLIED WARRANTIES OF MERCHANTABILITY OR FITNESS FOR A PARTICULAR PURPOSE. IN NO EVENT SHALL FISHMAN BE LIABLE
FOR LOSS OF PROFITS OR INCIDENTAL, INDIRECT, SPECIAL, CONSEQUENTIAL OR OTHER SIMILAR DAMAGES ARISING OUT OF ANY BREACH OF
WARRANTY OR OTHER OBLIGATION CONTAINED IN THIS OWNERS' MANUAL. THE WARRANTY CONTAINED HEREIN SHALL NOT APPLY IF THE
SERIAL NUMBER IS DEFACED OR REMOVED OR THE PRODUCT HAS BEEN DAMAGED BY ALTERATION, MISUSE, ACCIDENT, NEGLECT OR USE WITH
UNAUTHORIZED ATTACHMENTS.
To obtain warranty service from an authorized Fishman Service Center:
1. The Fishman Dealer where you purchased your amplifier may also be authorized to perform warranty service and should be
your first point of contact. If the Fishman Dealer who sold the Product is authorized to service the amplifier, bring the defective
unit to the service center along with your original sales receipt. If you can't provide the original receipt, the authorized
Fishman Service Center may charge you for repairs.
If your local Fishman Dealer cannot service the amplifier, contact Fishman online via Service/Support at www.fishman.com and
we will recommend an authorized Fishman Service Center in your area. If there is no service center close to you, return the
amplifier to the factory as described below.
2. Make sure you can duplicate the problem for the Service Center. If you bring in the amplifier for warranty service and the
technician can't duplicate the problem, you may be charged a service fee.
3. Fishman Authorized Service Centers reserve the right to inspect the amplifier before beginning warranty service. Final
determination of warranty coverage lies solely with Fishman Transducers or its Authorized Service Centers.
4. Fishman assumes no responsibility for the quality or timeliness of repairs performed by Fishman Authorized Service Centers.
To obtain factory service:
Amplifiers repaired under warranty at the Fishman factory will be returned to the customer via UPS ground freight, prepaid by
Fishman to any location within the continental United States.
Important!
A Product that is returned to Fishman which is not covered by the terms of this warranty will be
repaired and returned C.O.D. with billing for labor, materials, return freight and insurance.
For factory service, you must deliver the amplifier prepaid freight to Fishman.
1. Contact Fishman Transducers Factory Service via Service and Support at www.fishman.com to obtain a Return Authorization
number (RA number). Products returned without an RA number will be refused.
2. Pack the amplifier in its original shipping carton. If you do not have the carton, request one from us when you get your RA
number. Include your shipping address (no P.O. boxes or route numbers). Also include a copy of your sales receipt and a note
that explains how to duplicate the problem. If we cannot duplicate the problem at the Factory or verify the original purchase
date, we may, at our option, charge for parts/labor and return shipping.
3. Ship the amplifier freight prepaid to:
Fishman Transducers Service Department
340 Fordham Road, Wilmington, MA 01887 USA
513-000-019 • Rev A • 6-10-04
Owner’s Manual
Limited Warranty
Question and Answer IconNeed help?

Do you have a question about the Fishman LOUDBOX PRO and is the answer not in the manual?

Fishman LOUDBOX PRO Specifications

General IconGeneral
Power Output120 Watts
Number of Channels2
Power SourceAC
TypeAcoustic Amplifier
Speakers1" Tweeter
Inputs1 x 1/4" Aux
Outputs1 x XLR DI
EQ3-band EQ per channel
EffectsReverb

Summary

Safety and Warnings

Electrical Safety Warnings

Highlights risks of electric shock and advises against opening the unit.

General Safety Precautions

Lists essential user safety instructions for operation and environment.

Equipment and Usage Guidelines

Covers proper use of accessories, carts, and unplugging during storms.

Hearing Protection Advisory

Warns about prolonged exposure to high sound pressure levels.

Getting Started

Initial Setup and Power

Guides on connecting the power cord and plugging into an outlet.

Connecting and Setting Up Channels

Details connecting instruments and setting initial gain levels.

Product Description

System Architecture

Details the tri-amped, 3-way speaker system and power distribution.

Component Design and Sound

Explains driver choices for optimal acoustic reproduction and clarity.

Key Features Overview

Lists EQ, feedback control, reverb, and connectivity options.

Front Panel - Channel 1

Input and Clip LED

Describes the input range and the clip indicator function for Channel 1.

Gain Control

Explains how to set the input signal level and use the clip LED.

Tone Controls

Details EQ adjustments (Low, Mid, High, Brilliance) for shaping the sound.

Anti-Feedback and Phase Controls

Explains how to manage acoustic feedback using dedicated controls.

Acoustic Feedback Management

Understanding Feedback Issues

Explains causes of low and high-frequency feedback on instruments.

Feedback Control Techniques

Details using Anti-Feedback and Phase controls to eliminate feedback.

Channel 2 Controls

XLR Input and Phantom Power

Covers the balanced microphone input and 48V phantom power.

1/4" Input and Clip Monitoring

Describes the instrument input and clip LED for Channel 2.

Channel 2 Controls Deep Dive

Gain and Tone Shaping

Details gain setting and EQ (Low, Mid, High, Brilliance) for Channel 2.

Reverb and Low Cut Features

Explains reverb program selection and the low cut switch function.

Auxiliary Input

Connecting External Sources

Describes using the Aux Input for external audio and setting Aux Level.

System Controls and Rear Panel

Master Volume and Mute Function

Controls for overall output level and muting channels.

AC Power and Fuse Information

Details power connection and fuse replacement procedures.

Effects Loop Connections

Describes how to integrate external effects processors via send/return jacks.

XLR Output Options

Explains balanced output for mixers and pre/post EQ selection.

Kickstand Usage

Kickstand Operation

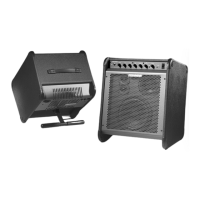
How to use the kickstand to angle the amplifier for optimal listening.

Angle Selection Guidelines

Recommendations for choosing kickstand angles based on listening distance.

Kickstand Safety Warning

Important safety note about using the kickstand on solid, level ground.

Performance Specifications

Power and SPL Ratings

Details cumulative power, amplifier ratings, and SPL @ 1 Meter.

Input and Output Impedances

Technical specifications for various inputs, outputs, and levels.

Tone Controls and Effects Specs

Specifications for EQ, reverb, effects send/return, and anti-feedback.

Speaker System and Dimensions

Details speaker components, crossover, dimensions, and weight.

Block Diagram Overview

Channel 1 Signal Path

Illustrates the signal flow from the Channel 1 input through processing.

Channel 2 Signal Path

Illustrates the signal flow from the Channel 2 inputs through processing.

Speaker Crossover and Amplification

Shows how the signal is split to different speaker components.

Limited Warranty Information

Warranty Service Procedures

Details how to obtain service from authorized dealers or the factory.

Factory Service Requirements

Specific steps for returning the unit for factory repair and obtaining an RA number.

Related product manuals