EasyManua.ls Logo

Fishman NASHVILLE Series User Manual

Fishman NASHVILLE Series
3 pages
To Next Page IconTo Next Page
Page #1 background imageLoading...
Page #1 background image
www.fishman.com
www.shman.com
Read Me First!
If you are unfamiliar with these products, please pay
close attention to the dimensional requirements for
installation. Failure to do so can result in permanent
damage to the pickup.
Installation of this product is a straightforward
procedure, but we recommend this job only if you
are an experienced repair technician.
M-300 and M-400
The Nashville Series at-top and two piece archtop
mandolin pickups feature a piezo-ceramic ele-
ment preinstalled in the bridge. Use your preferred
method for bridge tting.
For the at-top model (M-400), up to .050” may
be removed from either the top or bottom of the
bridge (Figure 1).
For the archtop model (M-300), be sure to observe
the “Do not modify” area of the bridge base
(Figure 2).
Special care must be taken not to damage the
pickup wire when tooling the bridge blank.
Installing The Jack
After tting the pickup, place the jack in a com-
fortable location (Figure 3) and tighten it with the
enclosed turnbuckle key (Figure 4). Be careful not to
scratch the side of your instrument.
NASHVILLE SERIES PICKUPS
INSTALLATION GUIDE
Figure 4.
Figure 3.
Do not modify
0.050”
0.050”
Figure 2. M-300
Figure 1. M-400
Do not modify
0.100”
0.180”
0.250”
Question and Answer IconNeed help?

Do you have a question about the Fishman NASHVILLE Series and is the answer not in the manual?

Fishman NASHVILLE Series Specifications

General IconGeneral
BrandFishman
ModelNASHVILLE Series
CategoryAccessories For Music Instruments
LanguageEnglish

Summary

Read Me First! Important Information

Nashville Series M-300 and M-400 Models

Flat-Top Model M-400 Bridge Fitting

Details on removing up to .050” from the M-400 flat-top bridge for proper fitting.

Archtone Model M-300 Bridge Fitting

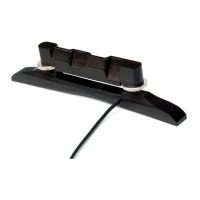
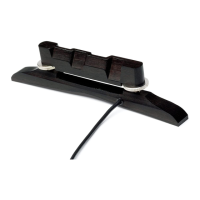
Instructions for the M-300 archtop, emphasizing the 'Do not modify' area of the bridge base.

Installing The Jack

Spider-Style Resophonic Pickup Installation

Saddle Fitting for Spider Bridges

Guidance on fitting spider-style pickup saddles for proper string spacing and playability.

Jack Installation Hole Drilling

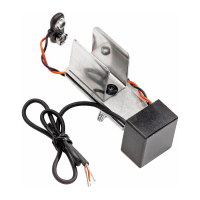
Procedures for drilling jack holes, specifying methods for metal and wooden body instruments.

Pickup Wiring and Jack Connection

Instructions for routing pickup wires and connecting them to the jack.

Jack Hardware Installation

Steps for installing the jack hardware in the chosen location.

Biscuit-Style Resophonic Pickup Preparation

Cone Preparation and Wire Hole Drilling

Steps for preparing the cone, including measuring and drilling a wire hole.

Biscuit Attachment to Cone

Instructions for attaching the biscuit to the cone using glue and a screw.

Solder Connections and Endpin Jack Reference

Details on soldering ground and signal wires, and referencing endpin jack installation.

Related product manuals