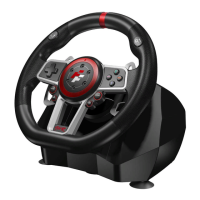
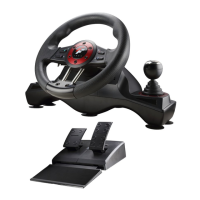
The Flash Fire Suzuka Wheel ES900R is a 6-in-1 wired steering wheel designed for an immersive racing experience across multiple platforms. It is compatible with PS3™, PS4™, PC, Xbox One™, Xbox 360™, and Switch™. The steering wheel features an ergonomic design, mimicking a real racing wheel to reduce fatigue during extended use and enhance the authenticity and enjoyment of game control.
Function Description:
The steering wheel includes built-in motors that provide various vibrating modes, synchronized with in-game situations (provided the game supports vibration). This enhances the tactile feedback and realism of the racing experience.
Key Components and Layout:
The device consists of three main parts: the steering wheel, a foldable 3-pedal unit, and a six-speed shifter.
Steering Wheel Layout:
- Integrated control buttons: General purpose buttons for in-game actions.
- Left paddle shifter: For gear changes or other assigned functions.
- Right paddle shifter: For gear changes or other assigned functions.
- L1 button: Corresponds to L1 on PlayStation, RB on Xbox One, 6 on PC (D-INPUT), and R on Switch.
- L2 button: Corresponds to L2 on PlayStation, LB on Xbox One, 5 on PC (D-INPUT), and L on Switch.
- D-pad: For directional input (Up, Down, Left, Right).
- ABXY buttons: Action buttons, mapping differently across platforms (e.g., X, O, Triangle, Square on PlayStation; A, B, X, Y on Xbox).
- Share button: For sharing content on PlayStation platforms, View on Xbox One, and - on Switch.
- Options button: For in-game options or menus, Menu on Xbox One, 10 on PC (D-INPUT), and + on Switch.
- Prog button: Used for programming custom button layouts and sensitivity settings.
- Home button: For accessing system menus or returning to the home screen.
- Rotation switch: Allows selection between 900 and 270 degrees of rotation for the steering wheel.
- R2 button: Corresponds to R2 on PlayStation, RB on Xbox One, 8 on PC (D-INPUT), and ZR on Switch.
- L2 button: Corresponds to L2 on PlayStation, LB on Xbox One, 7 on PC (D-INPUT), and ZL on Switch.
- Earphone port: For connecting a headset.
- Port of foot pedals: Connects the 3-pedal unit to the steering wheel.
- Guiding port: For connecting the original console controller for authentication.
- Port of shifter: Connects the six-speed shifter to the steering wheel.
- USB cable: Main connection cable to the console or PC.
- Mounting clamps: For securing the steering wheel to a desk or racing stand.
Shifter Layout:
- MODE switch: For selecting between 1-6 + R and 7-12 + R gear positions (PC mode only).
- HAND-BRAKE switch: Activates or deactivates the handbrake function.
3-Pedal Unit:
The foldable 3-pedal unit includes a clutch, brake, and gas pedal. The left pedal functions as the clutch, the middle as the brake, and the right as the gas. The clutch function is supported in compatible games. If a game does not support the clutch, only gas and brake functions will be available.
The steering wheel offers extensive programming capabilities to customize button functions and sensitivity.
- Programmable buttons: Include □/1/X/Y, ○/3/B/A, Δ/4/Y/X, X/2/A/B, L1/5/LB/L, L2/7/LT/ZL, R1/6/RB/R, R2/8/RT/ZR.
- Defined programming buttons: Left bumper, right bumper, HAND-BRAKE, clutch accelerator, and brake.
Programming Features:
- Program Design Configuration: Press "PROG" once (red LED flashes quickly), press the desired button once (red LED flashes slowly), then press "PROG" again (red LED lights up) to complete the programming.
- Cleanup Programming: Follow the program design configuration steps, but press the defined programming button once again after it flashes slowly to clear the programming step.
- Program Design Full Deletion: Press "PROG" once (red LED flashes quickly), then press and hold OPTIONS/10/MENU/+ buttons for 4 seconds until the red LED lights up. All custom button functions and sensitivity settings will be reset to High.
- Program Exit: Press "PROG" once (red LED flashes quickly), then press "PROG" again to exit programming without saving changes. If no further action, programming exits automatically after 10 seconds.
Sensitivity Configuration:
- Press "PROG" once (red LED flashes quickly).
- Use the D-pad (left/right for Middle, upper for High, lower for Low) to adjust sensitivity. The red LED will light up upon successful setting.
- Press and hold OPTIONS/10/MENU/+ buttons for 4 seconds to reset sensitivity to High and delete custom button functions.
Maximum Effective Angle Setting (900° Gear Position):
- Set the gear position switch to "900°".
- Press "PROG" once (red LED flashes quickly).
- Rotate the steering wheel more than 60° from the center to either left or right and hold it.
- Press "OPTIONS/10/MENU/+" buttons once until the LED lights up. This sets the current position as the MAX effective angle.
- To remove angle configuration:
- Press "PROG" once (red LED flashes quickly), then press and hold PTIONS/10/MENU/+ for 4 seconds.
- Alternatively, press "PROG" once (red LED flashes quickly), rotate the wheel to the MAX angle (900°), then press OPTIONS/10/MENU/+ again.
Usage Features:
Connection and Installation:
- PlayStation 3™: Connect pedals and shifter to the steering wheel. Insert the steering wheel's main USB cable into the PS3™. The LED indicator will light up, and PS3™ will assign a channel.
- PlayStation 4™:
- Controller Mode (without Six-speed shifter): For games like "PS4 Need for Speed" series.
- Wheel Mode (with Six-speed shifter): Does not support vibration.
- Connect pedals and shifter to the steering wheel. Connect the original PS4™ controller via USB cable to the steering wheel's guiding port (PS4™ controller must be off during guiding). Insert the steering wheel's main USB cable into the PS4™. The steering wheel LED will light up. Press the HOME button after successful guiding (PS4™ controller LED will also light up).
- Xbox 360™: Connect pedals and shifter. Connect the original Xbox 360™ controller via USB cable to the steering wheel's guiding port (Xbox 360™ controller must be off). Insert the steering wheel's main USB cable into the Xbox 360™. Steering wheel and Xbox 360™ controller LEDs will light up after successful guiding.
- Xbox One™:
- Steering Wheel Mode (with Six-speed shifter): No vibration or headset functions.
- Connect pedals and shifter. Connect the original Xbox One™ controller via USB cable to the steering wheel's guiding port (Xbox One™ controller must be off). Insert the steering wheel's main USB cable into the Xbox One™. Steering wheel and Xbox One™ controller LEDs will light up after successful guiding.
- PC Mode:
- Steering Wheel Mode (with Six-speed shifter): When connected with the shifter, it operates in "Steering Wheel" mode.
- Gamepad Mode (without Six-speed shifter):
- X-INPUT (Default): Red LED lights up. Press and hold HOME for 3 seconds to switch to D-INPUT (red LED blinks 3 times then lights up). Press and hold HOME for 3 seconds again to return to X-INPUT.
- D-INPUT: For Windows Vista/7/8/10. Insert the driver disc, run SETUP twice, and follow instructions to install the driver.
- Nintendo Switch™: Connect pedals to the steering wheel. Connect the steering wheel to the Switch™ via USB or Type-C cable. The wheel LED indicator will light up upon successful connection. Press "SHARE/9/VIEW/-" and "OPTIONS/10/MENU/+" for screenshots.
Product Testing (PC):
- Access Control Panel → Equipment & Printer → Right Click Equipment → Controller Settings → Property.
- Test buttons and axes separately.
- Calibrate the axis.
- Test vibration function through axes or pedals.
Unload Drive (PC):
- Go to Control Panel → App & Function.
- Find the drive name in "Unload or Change App" menu, click "Delete", and follow prompts.
Maintenance Features:
Troubleshooting:
- LED indicator not lighting up: Re-insert the steering wheel or check if the guide controller is functioning normally.
- Steering wheel unresponsive/screen not reacting: The device may have crashed. Reboot the device and re-insert the steering wheel.
- Improper operation: Re-insert the steering wheel.
- Connection failure: Ensure the guide controller is turned off when connecting to prevent conflicts.
- Incorrect button configurations: Use "Cleanup Programming" or "Program Design Full Deletion" to reset settings.
- Incorrect direction button or pedal settings (Calibration):
- Switch steering wheel to 270 degrees.
- Press L1+L2+R1+R2 simultaneously (LED flashes once per second).
- Rotate left to max position (LED flashes twice per second).
- Rotate right to max position (LED flashes three times per second).
- Step right pedal to max position (LED flashes four times per second).
- Step middle pedal to max position (LED flashes five times per second).
- Step left pedal to max position (LED flash slows down). Press OPTIONS once to complete correction.
Environmental Compliance:
The device is RoHS compliant, indicated by the "RoHS COMPLIANT" symbol. It also features symbols for WEEE (Waste Electrical and Electronic Equipment) and proper disposal, encouraging environmentally responsible recycling.