This expansion tank and the entire system must be checked annually by a qualified professional.
Visually examine the tank and its connection to the system piping looking for any signs of water leakage or corrosion on the
exterior of the tank or the connection.
If this expansion tank shows any visible signs of leaking, corrosion or rusting, the tank must be replaced
immediately to avoid personal injury or property damage. Do not adjust the tank air pressure if there
are any signs of corrosion on the tank. Failure to follow these instructions may result in serious injury or death and or
property damage.
D I ME N S I ON S & C A P A C I T I E S
Rev. 6.18
Visually inspect the product for any signs of damage that may have occurred during transportation. If the tank is dented, bent
or scratched, return the product to the original purchase point for replacement.
This expansion tank is shipped from the factory with a pre-charge of 12 psi. Any adjustments to the factory pre-charge
must be done prior to initial tank installation and with 0 psi pressure on the system. DO NOT ADJUST THE PRE-CHARGE
OF THE EXPANSION TANK WITH THE SYSTEM UNDER PRESSURE!
The expansion tank should be pre-charged to match the boiler fill valve setting.
failure to properly adjust the pre-charge will shorten the life expectancy of the product.
Remove the protective cap from the air valve.
Check the tank pre-charge pressure using a standard tire pressure gauge.
If required add air to the tank using a manual bicycle tire pump until the proper pre-charge pressure is reached.
Replace the protective cap on the air valve.
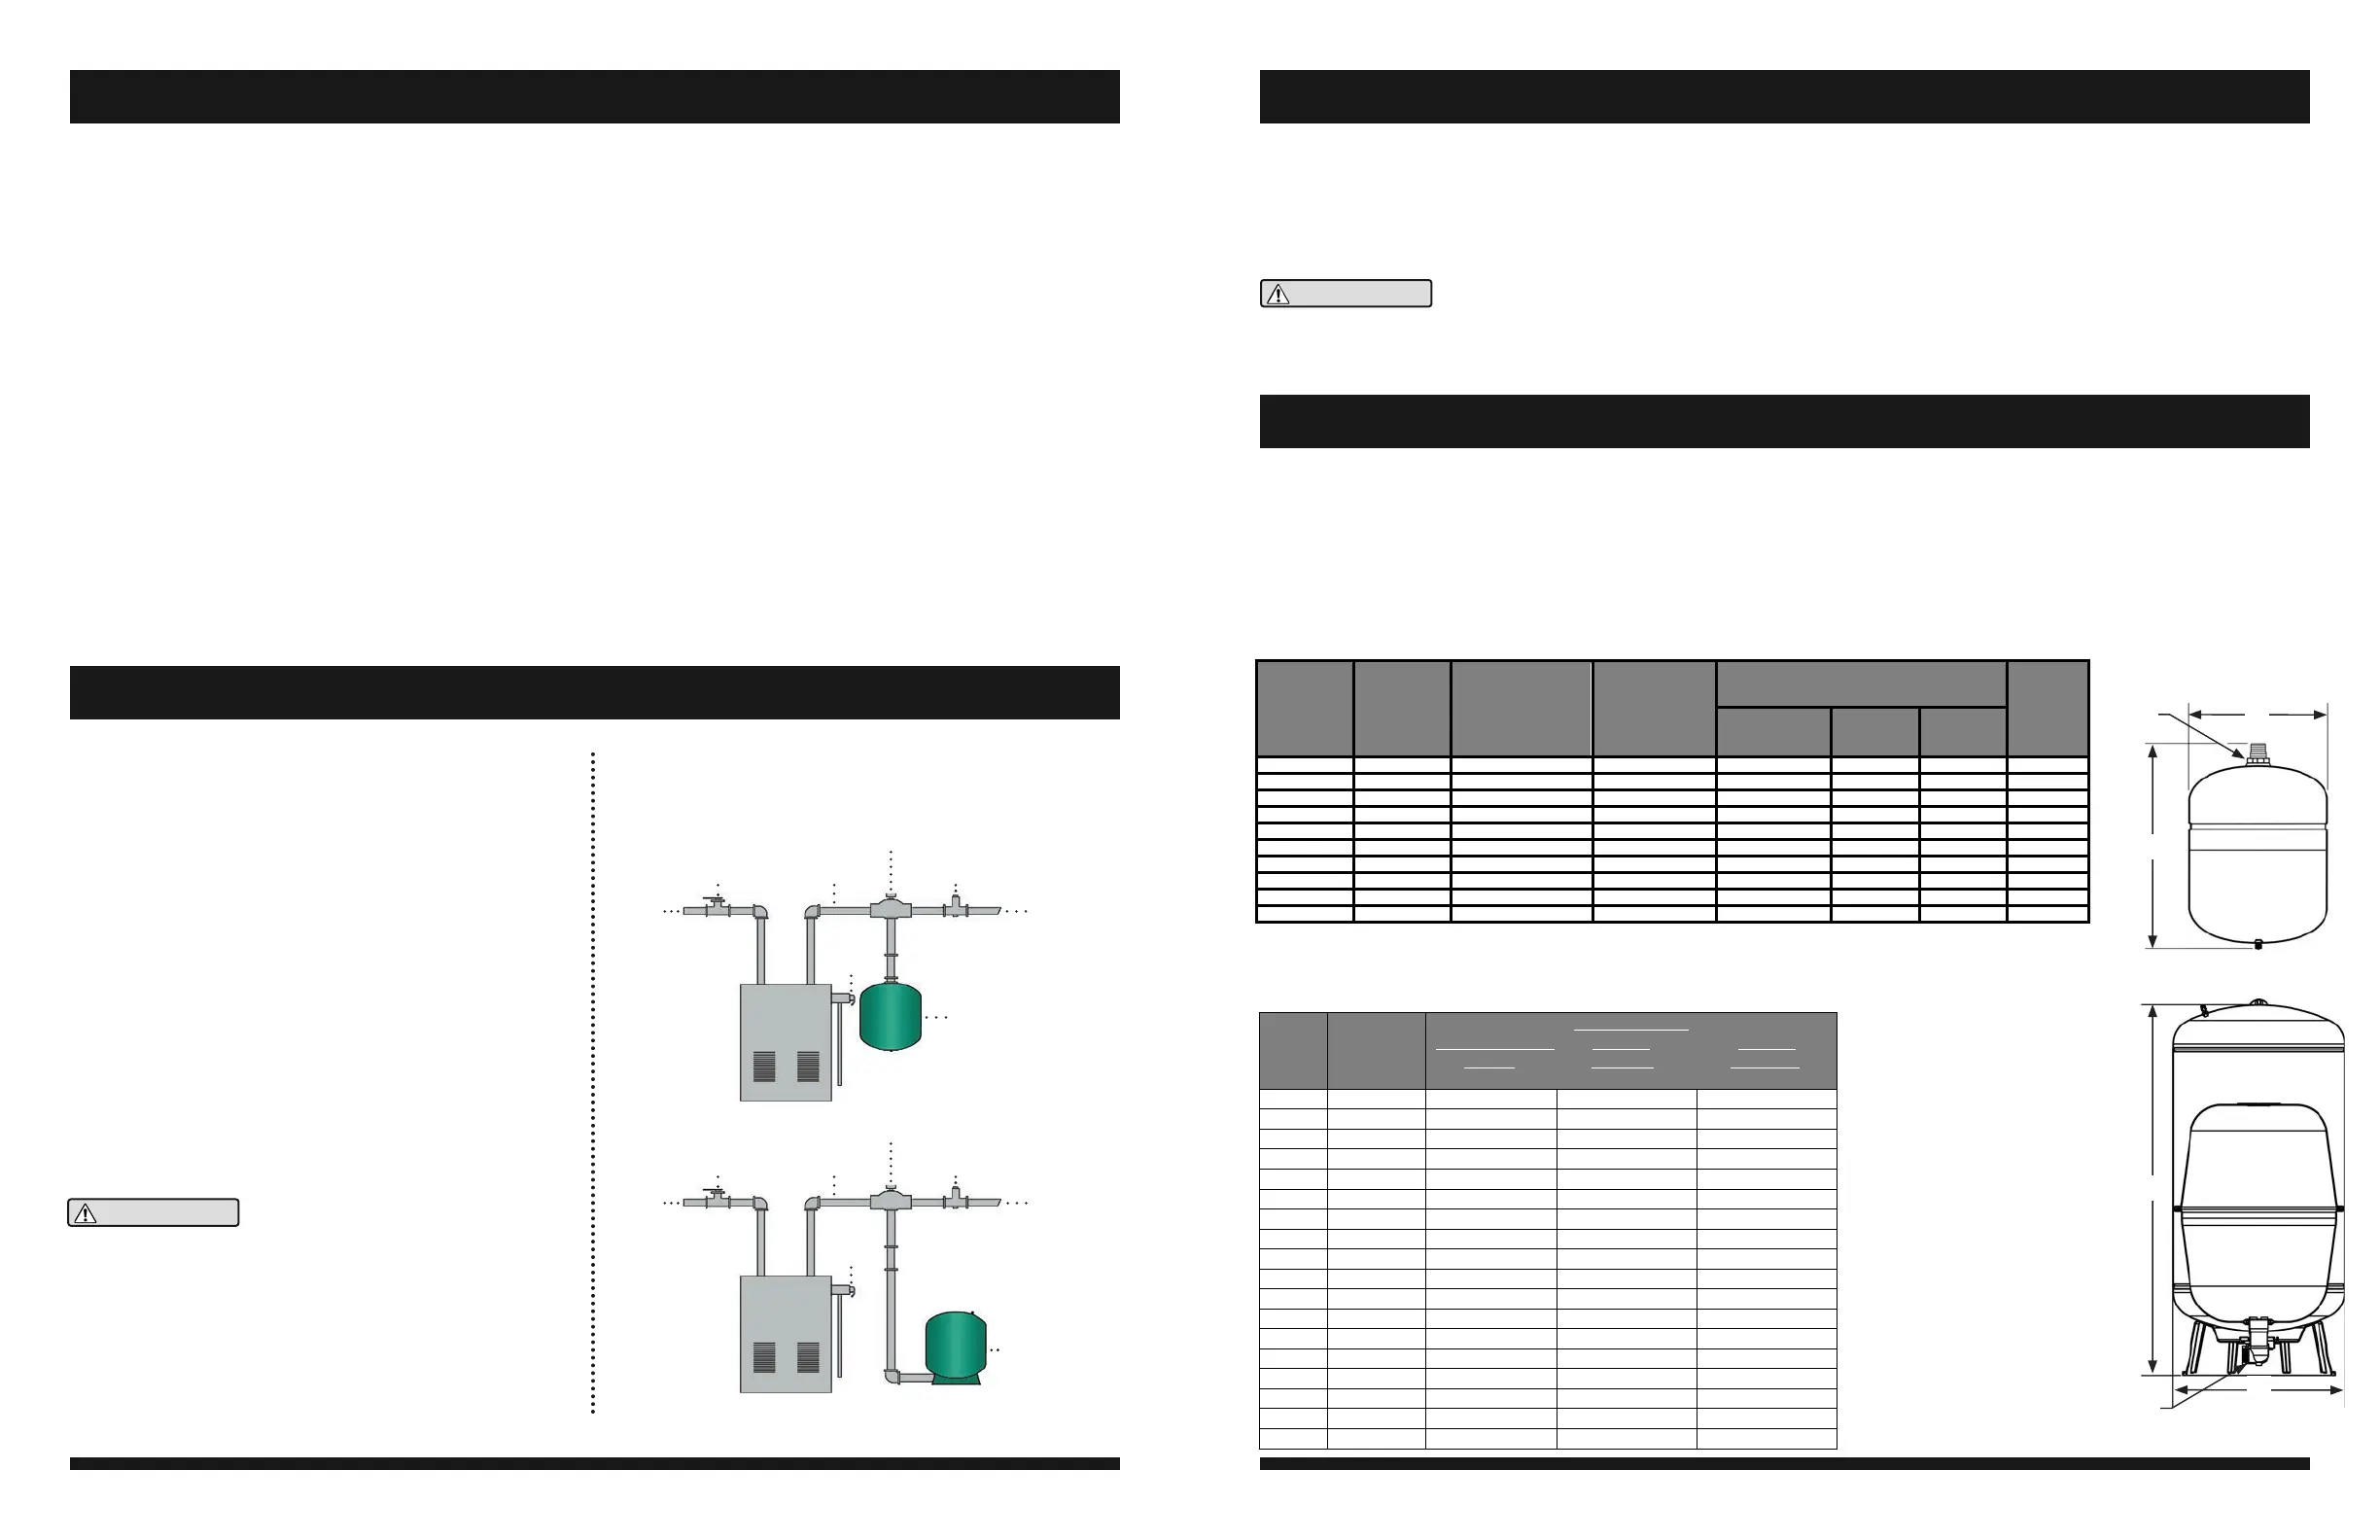
TYPICAL INSTALLATIONS
P.O.
Inlet
To
System
In Line
Expansion
Pressure
Relief
Valve
Auto Fill
Valve
Air
Separator
Flow
Check
Air
Vent
P.O.
Vertical
Floor
Mount
Expansion
Tank
Inlet
To
System
Pressure
Relief
Valve
Auto Fill
Valve
Air
Separator
Flow
Check
Air
Vent
S XHT
SERIES
HTX
SERIES
MATERIALS OF CONSTRUCTION
Tank: 16-gauge, cold rolled steel
Finish: Appliance quality paint for corrosion resistance
Water Chamber SXHT: Top diaphragm is 100 % butyl rubber, lower
water chamber is copolymer polypropylene
Diaphragm Material HTX: 100% butyl rubber
Connection: Welded steel
Testing: High pressure, seam weld, helium, final pre-charge check
Air Valve: Brass valve with o-ring seal
Warranty: 5 years
Boiler
Output
1000’s
BTUH
Copper
Baseboard
& Radiant
Type of Radiation
Convectors & Unit Cast Iron Cast Iron
Heaters Radiators Baseboard
25 HTX 15 HTX 15 HTX 15 HTX 15
50 HTX 15 HTX 30 HTX 30 HTX 30
75 HTX 30 HTX 30 HTX 60 HTX 60
100 HTX 30 HTX 30 HTX 60 HTX 60
125 HTX 30 HTX 60 HTX 60 HTX 60
150 HTX 30 HTX 60 HTX 90 HTX 90
175 HTX 60 HTX 60 HTX 90 HTX 90
200 HTX 60 HTX 60 HTX 90 HTX 90
250 SXHT 30 SXHT 30 SXHT 40 SXHT 30
300 SXHT 30 SXHT 40 SXHT 40 SXHT 30
350 SXHT 30 SXHT 40 SXHT 60 SXHT 40
400 SXHT 30 SXHT 60 SXHT 90 SXHT 40
500 SXHT 40 SXHT 60 SXHT 90 SXHT 40
600 SXHT 40 SXHT 90 SXHT 90 SXHT 60
700 SXHT 60 SXHT 90 SXHT 90 SXHT 60
800 SXHT 60 SXHT 110 SXHT 110 SXHT 90
900 SXHT 60 SXHT 110 SXHT 110 SXHT 90
1000 SXHT 90 SXHT 110 SXHT 110 SXHT 90
1. Drain boiler system or isolate the area where expansion
tank will be installed.
2. Install expansion tank on supply side of the boiler, on
the suction side of the circulator. Adequate thread sealant
(pipe dope) must be added to ensure a leak free
installation.
3. Connect system piping to discharge opening of the tank
using a tee, air scoop, or other suitable tapping in the
system.
4. Pressurize the system and check for leaks.
5. Restart the boiler system.
The tank (HTX) is designed to be supported by system piping. Make
sure that there is adequate means of supporting the system piping
and, if necessary, add strapping, brackets, or pipe hangars.
DO NOT INSTALL THIS EXPANSION TANK IN THE HORIZONTAL
POSITION.
Maximum working pressure 100 psig. Maximum working temperature, 240 F. Tank pre-charge 12 psig.
Note: HTX series expansion tanks ARE NOT suitable for potable water and are only to be used on closed systems.
Model
Capacity
(gallons)
Acceptance
Volume
(@12/30 PSIG)
Max.
Acceptance
Volume
Dimensions
(inches)
Weight
(lbs)
Connection
Size
(C)
Diameter
(B)
Height
(A)
HTX 15 2.1 .85 1.0 ½” MPT 8 11.6 6
HTX 30 4.8 1.9 2.4 ½” MPT 11 14.5 10
HTX 60 6.0 2.9 3.6 ½” MPT 11.4 17.6 11
HTX 90 15.0 6.0 6.0 ¾” MPT 16 20.8 28
SXHT 30 15.0 6.0 6.0 1” FPT 16 21.7 32
SXHT 40 20.0 8.0 8.0 1” FPT 16 28.8 39
SXHT 60 33.0 13.3 13.3 1” FPT 16 42.8 57
SXHT 90 44.0 17.7 17.7 1 ¼” FPT 21 36.2 72
SXHT 110 62.0 24.9 24.9 1 ¼” FPT 21 47.9 112
SXHT 160 81.0 32.6 32.6 1 ¼” FPT 21 62.0 123
QUICK SIZING CHART
HTX SERIESHTX SERIES
A
B
C
SXHT SERIES
A
B
C
 Loading...