Do you have a question about the Flipsky VX2 and is the answer not in the manual?
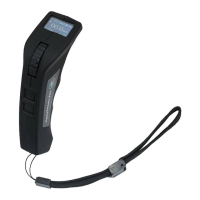
Illustrates and labels key components of the remote control and receiver, including buttons, ports, and indicators.
Details the content and layout of the remote's screen display, including speed, mileage, and current.
Instructions for turning the remote on and off, including power-off timeout.
Step-by-step guide on how to pair the remote control with the receiver for communication.
How to interpret indicators for successful connection between the remote and receiver.
Guidance on controlling acceleration, braking, and switching between speed modes (L, M, H).
Procedure for activating and exiting the cruise control mode on the electric skateboard.
Instructions for entering setting mode and adjusting various parameters like battery cells, pole pairs, and calibration.
The VX2 is a remote control device designed for electric skateboards, offering comprehensive control and monitoring capabilities. It is intended to enhance the user experience by providing intuitive operation and real-time feedback on the skateboard's status.
The primary function of the VX2 remote is to control the acceleration and braking of an electric skateboard. This is achieved through an integrated accelerate/brake gear, allowing users to smoothly increase or decrease speed. The remote also features a display screen that provides crucial information about the skateboard's performance and the remote's status. This includes the current speed (in km/h), mileage (in km), and current draw (in A), offering a clear overview of the ride.
Beyond basic control, the VX2 incorporates advanced functionalities such as speed mode switching. Users can select between Low, Medium, and High-speed modes to match their riding preference or environmental conditions. The remote defaults to High-speed mode upon powering on, ensuring immediate access to maximum performance. Another notable feature is the cruise control mode, which allows the user to maintain a desired speed without continuously holding the accelerate gear. This can be activated by pushing the accelerate gear to the desired speed and then briefly pressing the power button. Exiting cruise control is as simple as pressing any button on the remote.
The VX2 also facilitates parameter setting, enabling users to customize various aspects of their skateboard's operation. This includes setting battery cells, pole pairs, wheel type, motor pulley, wheel pulley, wheel diameter, and throttle calibration. These settings are crucial for optimizing the skateboard's performance and ensuring accurate data display on the remote. The remote's connection status with the receiver is clearly indicated, ensuring the user is aware of the operational readiness of their skateboard. A connecting symbol on the remote screen and a bright indicator on the receiver signify a successful connection, while a blinking LED on the receiver and no symbol on the remote indicate a disconnected state.
The VX2 remote is designed for ease of use, starting with its power management. To turn on the remote, the power on/off button needs to be pressed for 1 second, which will display "FLIPSKY" on the screen and cause the remote to vibrate. To shut down, the power button is pressed for 2 seconds, again accompanied by a vibration. An automatic power-off feature is included, where the remote will power off after 10 minutes of inactivity, except when in cruise control mode, conserving battery life.
Pairing the remote with the receiver is a straightforward process. The remote must first be put into parameter setting mode by pressing the Setting button for 3 seconds. Then, by briefly pressing the Setting button to navigate to "Pairing" and pressing it again until "Pairing" blinks, the remote enters pairing mode. Once the receiver is powered on, the remote and receiver will attempt to pair, with "Pairing succeed" displayed upon successful connection. If pairing fails, indicated by the receiver LED not lighting red within 10 seconds or blinking, and the screen continuing to blink without showing "Pairing succeed," the user is advised to re-power the receiver and retry the pairing steps.
Switching speed modes is intuitive; a quick press of the Setting button allows the user to cycle through Low, Medium, and High-speed modes, with "L," "M," or "H" displayed on the remote screen. The parameter setting menu is accessed by pressing the Setting button for 3 seconds. Within this menu, users can navigate options by briefly pressing the Setting button. To revise a parameter, the user selects the desired option and then presses the Setting button for 3 seconds until the item blinks. Adjustments are made by sliding the throttle pulley – accelerating to increase data and braking to reduce data. Once changes are confirmed, a brief press of the Power button saves the revision, and another brief press exits the setting menu. The remote also features a USB charging port for convenient recharging and a hang strap for portability.
While the manual primarily focuses on operational aspects, it implicitly suggests certain maintenance practices through its warnings and guidelines. The emphasis on proper operation and adherence to prescribed procedures indicates that careful handling is key to the device's longevity. The warning against unauthorized modification of the product underscores the importance of not tampering with the internal components, which could lead to damage or malfunction. The clear instructions for pairing and troubleshooting connection issues serve as a guide for resolving common operational problems, which can be considered a form of user-level maintenance. By following these steps, users can ensure the remote and receiver maintain a stable connection, preventing potential operational failures. The automatic power-off feature also contributes to maintenance by preserving the remote's battery, reducing the frequency of charging cycles and potentially extending battery life. The provision of a USB charging port simplifies the recharging process, making it easy for users to keep the device powered and ready for use. Overall, the manual promotes a user-centric approach to maintaining the device's functionality through correct usage and adherence to operational guidelines.
| Type | Remote Control |
|---|---|
| Display | LCD |
| Wireless Range | Up to 100 meters |
| Battery Voltage | 3.7V |
| Charging | USB |
| Battery Capacity | 500mAh |
| Range | 100 meters |
| RF Frequency | 2.4GHz |
| Charging Time | 2 hours |
| Transmission Distance | Up to 100 meters |
| Charging Port | Micro USB |
| Battery | Lithium battery |