Navigating the menu system
The figure above shows the two ways to navigate
the menu system in the camera:
• Using the touch screen LCD to navigate the menu
system (left).
• Using the navigation pad to navigate the menu
system (right).
Focusing the Image
• For far focus, rotate the focus ring clockwise (with
the touch-screen LCD facing toward you).
• For near focus, rotate the focus ring counter-
clockwise (with the touch-screen LCD facing
toward you).
Note Do not touch the lens surface when you adjust
the infrared camera focus manually.
Note It is very important to adjust the focus
correctly. Incorrect focus adjustment affects how the
image modes Thermal MSX, Thermal, and Picture-in-
picture work. It also affects the temperature
measurement.
Adjusting an infrared image
An infrared image can be adjusted automatically or
manually. When manual image adjust mode is
active, the status icon is displayed.
• In live mode, select Temperature scale from the
menu system to switch between automatic and
manual image adjust modes.
• In live mode, you can also select manual image
adjust mode by touching the minimum or
maximum temperature scale level on the screen.
There are two different manual image adjust modes.
Select the type of mode under Settings > Device
settings > Set up camera > Level span mode.
• Level / span: This mode allows you to manually
adjust the level and span of the temperature scale.
• Level / max / min: In this mode, you can manually
adjust the temperature scale minimum and
maximum limits, simultaneously or individually.
Manual adjustment in Level / span mode
1. Push the navigation pad to display the menu
system.
2. Use the navigation pad to go to Temperature
scale.
3. Push the navigation pad.
4. Select Manual and push the navigation pad.
5. Push the navigation pad up/down to
increase/decrease the level.
6. Push the navigation pad right/left to
increase/decrease the span.
Manual adjustment in Level / max / min mode
1. Push the navigation pad to display the menu
system.
2. Use the navigation pad to go to Temperature
scale.
3. Push the navigation pad.
4. Select Manual and push the navigation pad.
5. To simultaneously change the temperature scale
minimum and maximum limits, push the
navigation pad up/down.
6. To change the minimum limit or the maximum
limit, do the following:
• Push the navigation pad left/right to select
(highlight) the maximum or minimum
temperature.
• Push the navigation pad up/down to change the
value of the highlighted temperature.
Changing the temperature range
You must change the temperature range according
to the expected temperature of the object you are
inspecting.
1. Push the navigation pad to display the menu
system.
2. Use the navigation pad to go to Settings.
3. Push the navigation pad.
4. Select Device settings and push the navigation
pad.
5. Select Set up camera and push the navigation pad.
6. Select Camera temperature range and push the
navigation pad.
7. Select the appropriate temperature range and
push the navigation pad.
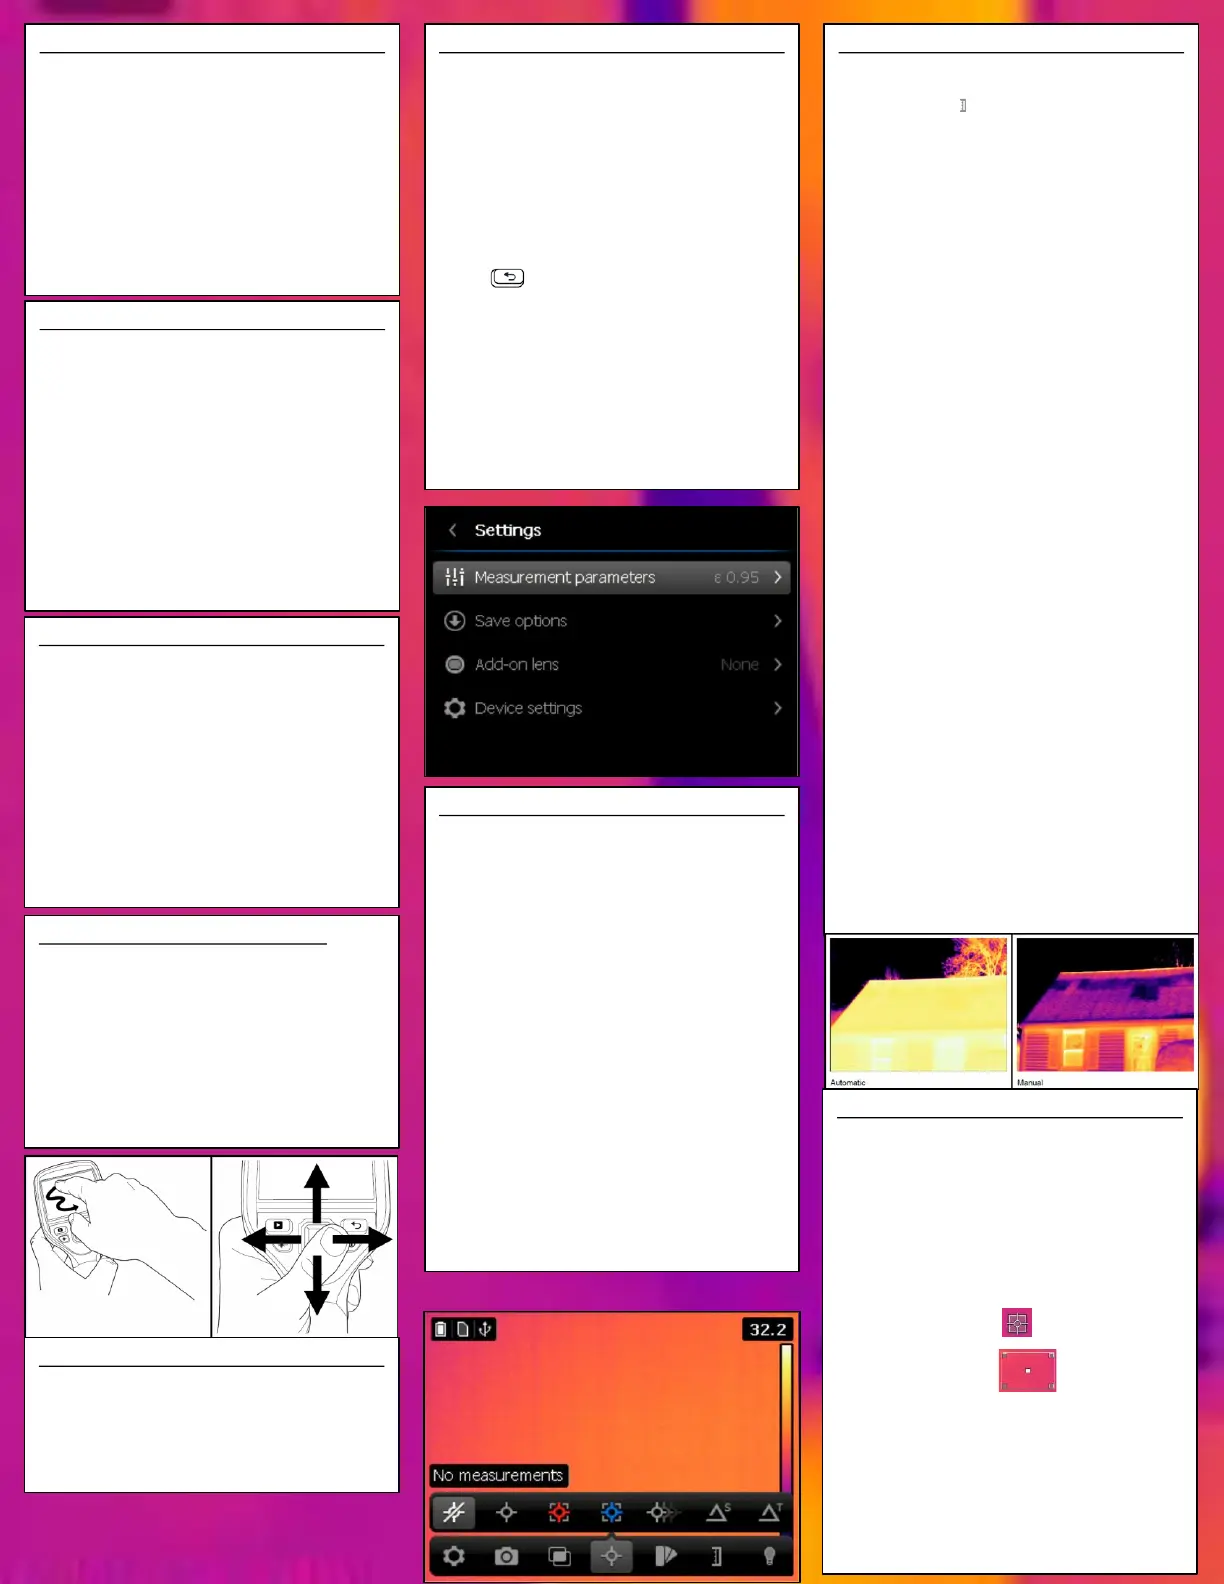
Changing the color palette
You can change the color palette that the camera
uses to display different temperatures. A different
palette can make it easier to analyze an image.
1. Push the navigation pad to display the menu
system.
2. Use the navigation pad to go to Color.
3. Push the navigation pad.
4. Use the navigation pad to select a different color
palette.
5. Push the navigation pad to confirm the choice.
Imaging Modes
1. Push the navigation pad to display the menu
system.
2. Use the navigation pad to go to Image modes.
3. Push the navigation pad.
4. Select one of the following image modes:
• Thermal MSX.
• Thermal
• Picture-in-picture.
• Digital camera.
Note The data for all image modes are saved when
saving an image. Therefore, if you open an image in,
e.g., FLIR Tools or in the image archive you can still
change the image mode.
Measurement Tools
To measure a temperature, you use one or more
measurement tools, e.g., a spotmeter or a box.
1. Push the navigation pad to display the menu
system.
2. Use the navigation pad to go to Measurement.
3. Push the navigation pad. This displays a
measurement toolbar.
4. On the toolbar, select one of the following and
push the navigation pad:
• No measurements: Clears all measurement
tools from the screen.
• Center spot: A centered spotmeter on the
screen.
• Hot spot: A moving spotmeter indicating the
hottest temperature within a box.
• Cold spot: A moving spotmeter indicating the
coldest temperature within a box.
• 3 spots: Three spots vertically centered.
• Hot spot - Spot: The temperature difference
between the hot spotmeter and the spotmeter.
• Hot spot - Temp: The temperature difference
between the hot spotmeter and a set
temperature.
Moving and resizing measurement tools
You can move and resize measurement tools in
various ways.
Note
• This procedure assumes that you have previously
laid out a measurement tool on the screen.
• You can also move and resize the measurement
tool by touching the screen.
1. To select the measurement tool, touch the tool on
the screen. The tool is now displayed with one or
more handles.
Spot measurement tool:
Area measurement tool:
2. Push the navigation pad. This displays a toolbar.
• Select Resize to change the size of the tool.
• Select Move to move the tool.
• Select Center to move the tool to the center of
the screen.
3. Push the navigation pad up/down and left/right to
resize or move the tool.
4. When completed, push the navigation pad and
select Done.
Setting Parameters
You can change a variety of settings in the camera.
You do this in the Settings dialog box.
1. Push the navigation pad to display the menu
system.
2. Use the navigation pad to go to Settings.
3. Push the navigation pad.
4. Select the setting you want to change. By selecting
some settings, additional dialog boxes are
displayed.
5. Use the navigation pad to navigate in menus or
change values.
6. Push to go back.
Measurement parameters
For accurate measurements, you must set the object
parameters. The camera can use these object
parameters.
• Emissivity
• Reflected temperature
• Distance
• Relative humidity
• Atmospheric temperature
• Window compensation

 Loading...