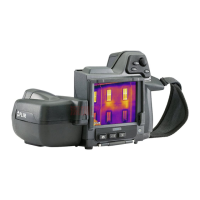
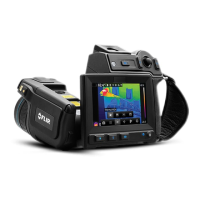
The figure above shows the two ways to navigate
the menu system in the camera:
• Using the index finger or a stylus pen specially
designed for capacitive touch usage to navigate the
menu system (left).
• Using the joystick to navigate the menu system
(right).
You can also use a combination of the two. In quick
start it is assumed that the joystick is used, but most
tasks can also be carried out using the index finger
or a stylus pen.
Navigating the Menu System
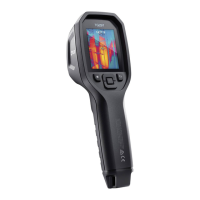
Turning on and turning off the camera
Push the button to turn on the camera.
• Push and hold the button for less than 5 seconds
to put the camera in standby mode. The camera
then automatically turns off after 6 hours.
• Push and hold the button for more than 10
seconds to turn off the camera.
Adjusting the infrared camera focus
To adjust the infrared camera focus, do one of the
following:
• Push the focus button left for far focus.
• Push the focus button right for near focus.
• Push the Autofocus/save button halfway down to
autofocus the camera.
Note: It is important that you hold the camera
steady while autofocusing.
Calibrating the touchscreen LCD
1. Push the joystick to display the menu system.
2. Use the joystick to go to (Settings).
3. Push the joystick to display the Settings menu.
4. Select Device settings and push the joystick.
5. Select Set up camera and push the joystick.
6. Select Calibrate touchscreen and push the
joystick.
7. Calibrate the touchscreen by tapping the five
crosshairs that appear on the screen using a stylus
pen specially designed for capacitive touch usage.
8. When completed, push the joystick.
Adjusting an Infrared Image
1. In live mode, push the button to enter manual
image adjust mode.
2. To change the temperature scale minimum and
maximum limits simultaneously, move the
joystick up/down.
3. To change the temperature scale minimum or
maximum limit, do the following:
• Move the joystick left/right to select (highlight) the
maximum or minimum temperature.
• Move the joystick up/down to change the value of
the highlighted temperature.
Changing the color palette
General
You can change the color palette that the camera
uses to display different temperatures. A different
palette can make it easier to analyze an image.
1. Push the joystick to display the menu system.
2. Use the joystick to go to (Color).
3. Push the joystick to display a submenu.
4. Use the joystick to select a different palette.
5. Push the joystick.
Image Mode
The camera captures both thermal and visual images
at the same time. By your choice of image mode, you
select which type of image to display on the screen.
The camera supports the following image modes:
• Thermal MSX (Multi Spectral Dynamic Imaging):
The camera displays infrared images where the
edges of the objects are enhanced with visual
image details.
• Thermal: A full infrared image is displayed.
• Picture in picture: An infrared image frame is
displayed on top of the visual image.
• Digital camera: The visual image captured by the
digital camera is displayed.
1. Push the joystick to display the menu system.
2. Use the joystick to go to (Image mode).
3. Push the joystick to display a submenu.
4. Use the joystick to go to one of the image modes:
• (Thermal MSX)
• (Thermal)
• (Picture in picture)
• (Digital camera)
5. Push the joystick confirm.
6. If Picture in picture mode is selected, you can at
this point move and resize the image frame using
the touch screen.
Measurement Tools
To measure a temperature, you can use one or more
measurement tools, e.g., a spotmeter or a box.
Adding/removing measurement tools
1. Push the joystick to display the menu system.
2. Use the joystick to go to (Measurement).
3. Push the joystick to display a submenu.
• Select (No measurements) to remove all tools.
• Select (Center spot) to add a center spot.
• Select (Hot spot) to add a hot spot detection within
a box area.
• Select (Cold spot) to add a cold spot detection
within a box area.
• 3. Push the joystick. This displays the measurement
tool or the group of preset tools on the screen.
Resizing or moving a measurement tool
You can resize and move a measurement tool.
Note
• This procedure assumes that you have previously
laid out a measurement tool or user preset on the
screen.
• You can also move and resize the measurement
tool by touching the screen.
1. To select the measurement tool, touch the tool on
the screen. The tool is now displayed with one or
more handles.
Spot measurement tool:
Area measurement tool:
2. Push the joystick—or touch and hold the tool. This
displays a context menu.
• Select ( Resize) to change the size of the tool.
• Select ( Move) to move the tool.
3. Move the joystick up/down and left/right to resize
or move the tool.
4. When completed, push the joystick and select
(Done).
Changing object parameters
For accurate measurements, you must set the object
parameters.
1. Push the joystick to display the menu system.
2. Use the joystick to go to (Measurement
parameters).
3. Push the joystick to display a submenu. Use the
joystick to select one or more of the global object
parameters.
• (External IR window compensation)
• (Object distance)
• (Atmospheric temperature)
• (Relative humidity)
• (Reflected temperature)
• (Emissivity)
4. Push the joystick to display a dialog box.
5. Use the joystick to change the parameter.
6. Push the joystick. This closes the dialog box.
Changing the temperature range
General
You must change the temperature range according
to the expected temperature of the object you are
inspecting.
1. Push the joystick to display the menu system.
2. Use the joystick to go to (Settings).
3. Push the joystick to display the Settings menu.
4. Select Device settings and push the joystick.
5. Select Set up camera and push the joystick.
6. Select Camera temperature range and push the
joystick.
7. Select the appropriate temperature range and
push the joystick.
 Loading...