© 2018 The Snell Group / 322 N. Main St. / Suite 8 / Barre, VT 05641 / 800.636.9820 / www.thesnellgroup.com
QuickStart Flir T530-T540
1. MEMORY: Insert SD memory card into the slot under the plastic cover on the bottom of the camera.
2. POWER: Insert a fully charged battery into the base of the imager, just below the hand grip. The battery life is indicated
in the swipe down menu of the imager. To display, place your nger at the top of the screen and swipe down.
3. START: Press the Power button until you hear an audible tone signaling camera startup.
• The LCD display will turn on and you will see the default start up screen (as above) showing a live infrared image.
• To turn the camera o, press the Power button until an audible tone signals it is powering down.
4. FOCUS: Focus is manual or automatic. The focus method is congured in the Settings Menu. Settings > Device
Settings > Focus. Select either Manual or Auto Focus > then select Contrast or Laser
• To manually focus, adjust the focusing ring either clockwise or counter clockwise to optimize image focus
• When autofocusing, the imager can either use Contrast (basing focus on maximizing image contrast) or
Laser (focus is based on laser distance measurement).
• To use the laser auto focus, depress the Laser/Autofocus button while the imager is pointed at the intended target.
Place the laser point on the object to be focused upon and release the Laser/Autofocus button.
NOTE: Some manual adjustment of the image focus may still be required after utilizing this method.
5. AUTO ADJUST (Level and Span): Auto Level and Span can be selected two ways.
If operating in Live Mode, depressing the soft button will select between Auto and Manual modes.
• When in Auto mode, image Level and Span will continuously adjust to account for the thermal content of the entire
eld of view.
• When in Manual mode, the image can be auto adjusted by touching the screen. Just touch it anywhere and it does
a one-time auto adjust.
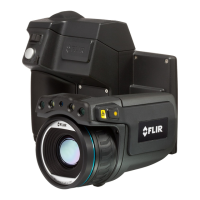
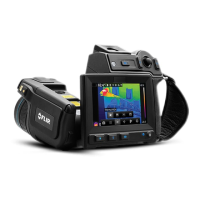
Focus Ring
Navigation
pad
Laser/Autofocus button
Save button
Infrared lens
Camera lamp
(left and right)
Digital camera
Five Soft buttons
(bottom of LCD)
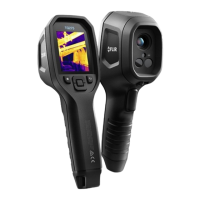
Work folder
Lamp
Continuous autofocus
Overlay
Temperature
scale
Power
Back button
Mic
Speaker
Image archive
Program
Laser receiver
Laser transmitter