EasyManua.ls Logo

FLORABEST HG00452 - User Manual

FLORABEST HG00452
34 pages
Print Icon
To Next Page IconTo Next Page
Loading...
IAN 273549
IAN 273548
Cantilever Parasol
Cantilever Parasol
Assembly and safety advice
Napernyő
Használati- és biztonsági utasítások
Lampový slunečník
Pokyny k montáži a bezpečnostní pokyny
Ampelschirm
Montage- und Sicherheitshinweise
Parasol przeciwsłoneczny
Wskazówki dotyczące montażu oraz
bezpieczeństwa
Senčnik
Navodila za montažo in varnost
Slnečník
Pokyny pre montáž a bezpečnosť
Question and Answer IconNeed help?

Do you have a question about the FLORABEST HG00452 and is the answer not in the manual?

Overview

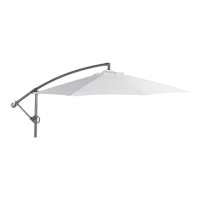
This document describes the Florabest Cantilever Parasol, a sun protection device designed for private outdoor use.

Function Description

The Cantilever Parasol is intended to provide sun protection in private outdoor areas. It is not designed for commercial use, nor should it be used as a climbing frame or toy. Any use other than described, or modifications to the product, are not permitted as they could lead to injury or damage. The manufacturer is not liable for damages resulting from improper use.

Important Technical Specifications

  • Dimensions:
    • Cantilever Parasol: approx. 300 x 258 cm (diameter x height)
    • Paving Stand: approx. 100 x 100 cm (length x width)
  • Assembly Requirements: Requires a working space of at least 16 m² in area and 4 m in diameter. Assistance from a second person is recommended for assembly.
  • Stability: The parasol must always be used in conjunction with 4 paving slabs, each approximately 50 x 50 x 5 cm (not included in the scope of delivery), placed correctly on the cross braces of the paving stand. Failure to do so could cause the parasol to tip over, leading to injury or property damage.
  • Materials: The packaging consists of environmentally friendly materials suitable for local recycling.

Usage Features

Assembly:

  1. Assembling the Paving Stand:
    • Place cross brace 2 onto cross brace 1 (see Figure B).
    • Screw the bottom pole section 3 to the connected cross braces using 4 screws (approx. M8 x 20 mm) and 5 washers (approx. ø 8 mm) (see Figure C).
    • Insert the top pole with attachments 6 into the bottom pole section 3 of the paving stand and screw both pole sections together using union nut 13 (see Figure D, step 1).
  2. Opening the Umbrella Top:
    • Push arm 7 upwards until it reaches stopper 18 (see Figure E, step 1). Secure support rod 16 by pushing plastic sleeve 17 downwards (see Figure E, step 2).
    • Push handle 12 upwards until it reaches stopper 10 (see Figure F, step 1). Secure handle 12 using locking knob 11. Tighten locking knob 11 clockwise until it stops (see Figure F, step 2).
    • Turn crank 14 clockwise until umbrella top 8 is fully open (see Figure G, step 1).
  3. Rotating the Umbrella Top:
    • Loosen the fastening of handle 12 by turning locking knob 11 counter-clockwise until handle 12 can move freely (see Figure G, step 2).
    • Rotate umbrella top 8 to the desired position (see Figure G, step 3).
    • Secure handle 12 using locking knob 11. Tighten locking knob 11 clockwise until it stops (see Figure G, step 4).
  4. Tilting the Umbrella Top:
    • Loosen the fastening of handle 12 by turning locking knob 11 counter-clockwise until handle 12 can move freely (see Figure H, step 1).
    • Push handle 12 downwards until the desired tilt angle is reached (see Figure H, step 2).
    • Secure handle 12 using locking knob 11. Tighten locking knob 11 clockwise until it stops (see Figure H, step 3).
  5. Closing the Umbrella Top and Moving the Cantilever Parasol:
    • Turn crank 14 counter-clockwise until umbrella top 8 is fully closed (see Figure I, step 1).
    • Push plastic sleeve 17 on support rod 16 upwards (see Figure J, step 1).
    • Pull arm 7 downwards by crank housing 15 (see Figure J, step 2).
    • Loosen the fastening of handle 12 by turning locking knob 11 counter-clockwise until handle 12 can move freely (see Figure K, step 1).
    • Push handle 12 downwards until it rests on union nut 13 (see Figure K, step 2).

Safety Advice:

  • Children: Never leave children unsupervised with packaging material or the product. Packaging material poses a risk of suffocation and strangulation. Keep children away from the product; it is not a toy. The product is not a climbing frame.
  • Assembly: Ensure all parts are undamaged and correctly assembled. Incorrect assembly or damaged parts can affect safety and function.
  • Tipping Hazard: Always ensure the product stands stably on a firm surface. The cantilever parasol must be used with 4 paving slabs (approx. 50 x 50 x 5 cm, not included).
  • Movement: Never move the cantilever parasol in the open state. Always fully close the umbrella top 8 and retract arm 7 completely first.
  • Fire Hazard: Do not place the product near open flames or radiant heaters.
  • Stability Check: Ensure the product is stable before use.
  • Opening/Closing: Before opening or closing, ensure no people are standing too close. Watch your fingers to avoid crushing injuries.
  • Secure Connection: Ensure the top pole with attachments 6 is firmly screwed to the lower pole section 3 on the paving stand.
  • Wind/Weather: Close the parasol if wind speed increases or squally showers approach. Do not use the product as protection against bad weather. Never leave an open parasol unattended in strong winds. Close the parasol in case of wind, snow, or rain.
  • Weight Limit: Do not hang any objects (e.g., clothing) from the product.

Maintenance Features

Cleaning and Care:

  • Clean the product with a slightly damp, lint-free cloth.
  • Store the product in a cool, dry place during winter. Avoid storing in heated rooms.

Disposal:

  • The packaging consists of environmentally friendly materials that can be disposed of at local recycling points.
  • Information on disposing of worn-out furniture can be obtained from your local municipality or city administration.

Warranty:

  • The device is manufactured according to strict quality guidelines and meticulously inspected before shipping.
  • You receive a 3-year warranty from the date of purchase. The warranty period begins on the purchase date. Please keep the original sales receipt as proof of purchase.
  • Within three years from the purchase date, if a material or manufacturing defect occurs, the product will be repaired or replaced free of charge, at the manufacturer's discretion.
  • The warranty is void if the product is damaged, improperly used, or maintained.
  • The warranty covers material and manufacturing defects. It does not cover parts subject to normal wear (e.g., batteries) or damage to fragile parts (e.g., switches, rechargeable batteries, or glass parts).

FLORABEST HG00452 Specifications

General IconGeneral
BrandFLORABEST
ModelHG00452
CategoryOutdoor Furnishing
LanguageEnglish

Related product manuals