LIFETIME WARRANTY
We oer free replacement on non-electronic parts and defective electronics,
and 50% credit for products or parts in any condition. If the tips in this guide
do not keep your podpoi working for years to come, please contact us at
returns@owtoys.com.
* Flowtoys reserves the right to refuse coverage to anyone abusing this warranty.
Please do not send us product without rst contacting us. It may be returned to sender.
Podpoi = a pair of podlights with owleashes. Each podlight has 10 adjustable modes,
a preset mode with 10 patterns, a nocturnal mode to optimize battery life, and a “favorites”
mode that recalls your last 10 saved patterns (mode+adjustment). Either the speed, color
palette, brightness or preset patterns can be selected or adjusted in each mode. It charges
in 1-2 hours from USB power and most modes last all night or longer!
Installing the leash:
Your podpoi should come fully assembled. If you need to re-install your leash:
• pull the hard tri-ring o the tip of the pod to access the capsule – do NOT remove capsule from pod
• pull the silicone O-ring o the end of the capsule
• thread the end of your owleash through the tri-ring, then through the O-ring, then through the
hole in the capsule shell
• tie the end of the owleash in an overhand knot, tighten and
cut o excess
• use a lighter to melt the end of the knot, then the side of the lighter
to press the melted end into the knot, so it cannot come undone
• pull the leash tight, close the capsule, and reinstall the O-ring
• install the tri-ring back on the tip of the pod (see instructions below)
Assembling the tri-ring back onto the pod:
The podlight is designed with 3 petals that are held rmly together with the tri-ring.
To install the tri-ring:
• thread the tri-ring onto the leash
• place the leash between 2 of the petal-tips and insert
them all together into the ring
• align the two petals on one side of the ring to make
room for the third, and align the tips of the ring with
the seams between the petals
• pinch the tip of the third petal from the sides and push it inside the ring with the
other two petal tips – this step may seem dicult, but continue to massage the 3rd tip
into the ring. Don’t worry, you can’t break anything!
• all three tips should align perfectly and require signicant force to remove
• there should be no visible gaps and the leash should come out through the hole in the middle
BUTTON INTERFACE
There is a single recessed button on the bottom of the podlight. To turn on, press the
button – it will enter the pattern it was most recently in.
Select a mode: Press the button briey (short press), the light will blink and enter the
next mode. The last mode is o.
Adjust a mode: Hold the button for over half a second (long press), let go when the
light ashes, before it turns o. The mode will now cycle through its adjustment range.
When you like what you see, press the button once (short press) to select the adjust-
ment. You may also leave the podlight in “adjust” for a constantly changing eect :)
Turn o: There are 2 ways to turn o the podlight:
1. Hold the button until it turns o – about 1.5 sec (long hold) – the podlight will
blink and fade out. This records the last pattern you were in, and the pod will return
to it when you turn it back on. There is also a “favorites” mode that allows you to
select from the last 10 patterns you recorded.
2. You may also cycle through the modes until it turns o. This will reset the light
to mode1, default adjustment. All modes start in the default adjustment when you
change modes.
Micro-USB charging jack:
max. power-draw: 500mA
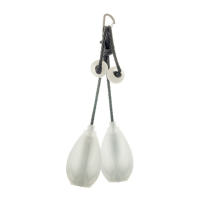
Flowleash: inverted ultra-slick owleash design
Length: 118mm | Diameter: 66mm | Weight: 128g | Battery: 3.7v, 750 mAh rechargeable Li-ion
Tri-ring: polycarbonate tri-petal ring
closes the top
Leash knot: a knot secures the leash
inside the pod/capsule
Pod: silicone outer shell
Capsule O-ring: thick silicone O-ring
seals the top of the capsule
Capsule: polycarbonate light-unit inside pod
Button: single recessed button
on bottom of pod
podpoi
TROUBLESHOOTING
1. The button is hard to press:
• is the c-ring installed properly on the capsule?
• is the capsule installed all the way into the pod?
• please refer to Assembly instructions above!
2. My pod does not charge or turn on, even when plugged in:
• check your power-source: try plugging in another pod or USB device to check the power source
• if you think your power source is good, but your pod still does not turn on, or blinks red when
unplugged and plugged in again, the battery may be deeply discharged. Leave it plugged in for
a few hours, and then unplug it and try again.
• if this doesn’t work, try a reset using the instructions that came with your podpoi (video instructions are
also available at youtube.com/owtoys - search for “podpoi reset”).
Find more podpoi instructional + troubleshooting videos at youtube.com/owtoys
Tip: To hang podpoi from your
belt, bag or hipsack, tie the leashes
together in a slip knot and clip a biner
through the loop! :)
Tip: Podpoi are not waterproof! But if you
drop them in water, it’s sometimes
possible to get them working again.
Open, rinse clean and dry ASAP! View a
video how-to at youtube.com/owtoys.
Capsule C-ring: polycarbonate C-ring
seals the bottom of the capsule and
secures it inside the pod