Do you have a question about the Fluid Management HARBIL 5G and is the answer not in the manual?
Information about important warning labels affixed to the mixer and symbols used in the manual for safe operation.
Explanation of the two main safety notices used in the manual: Warning and Caution, with examples.
Details that assist in efficiently using the mixer, saving time and energy.
Details on affixed labeling for safety and regulatory compliance information.
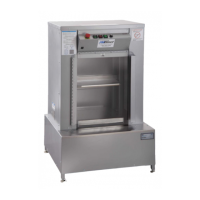
Overview of the Harbil 5G High Speed Paint Mixer's features and specifications.
Form to record model number, serial number, and service details for maintenance.
Form for ordering spare parts, including contact information and fields for item details.
Instructions for inspecting the shipping crate for damage and reporting it to the carrier.
Guidance to refer to affixed instructions for unpacking and setting up the mixer.
Importance of grounding the product for electrical safety and proper plug insertion.
Hazards related to improper grounding plug installation and modification.
Procedure to check and realign mixer struts if they are not seated properly.
Instructions for leveling the mixer using the adjustable feet to prevent damage during operation.
Steps to remove shipping materials from inside the mixer after powering on.
Identifies key components of the mixer, including control panel, safety switch, and adjustable feet.
Description of controls on the panel: EMERGENCY STOP, POWER, UP, START, and TIMER.
Information that the door can be reversed, with instructions located in the maintenance section.
Critical warnings including leveling, power shut-off before servicing, and non-explosion-proof nature.
Precautions regarding running without a container, mixing limits, and disc usage for different container types.
Illustrates proper placement of 1, 2, 3, and 4-gallon cans on the mixer table.
Diagram showing correct placement of foam or flake board discs for 5-gallon containers.
Describes the sequence of operations: pushing START, top plate movement, shaking, and raising the plate.
Steps to perform an operational test, including checking for vibrations and proper leveling.
Maintenance schedule for lubricating specific parts weekly, every 3 months, and every 6 months.
Table to record Super-Struts lubrication maintenance performed every three months.
Troubleshooting chart for issues when the paint mixer does not start, listing checks and actions.
Troubleshooting steps for when the top plate fails to move in a downward direction.
Troubleshooting guide for when the top plate does not move in an upward direction.
Steps to diagnose and fix issues where the paint mixer fails to shut off.
Solutions for when the shake motor has voltage and hums but does not run.
Troubleshooting steps for an excessive amount of vibration occurring during operation.
Diagnosing issues when the START light is on, but no operation occurs.
Troubleshooting when the START light is on, top plate clamps, but the mixer does not run.
Steps to resolve issues where the DC motor runs, but the top plate does not move.
Troubleshooting for when the mixer stops before completing the shake cycle.
Steps to address the mixer speeding up and slowing down, with a blinking START light.
Troubleshooting guide for when the mixer crushes or throws cans.
General advice on servicing, emphasizing reading instructions and contacting customer service if unsure.
Safety precautions for servicing, including electrical hazards and wearing safety glasses.
Step-by-step instructions for removing the exterior panels of the mixer.
Procedure for removing the shake frame, including disconnecting wires and removing tie wraps.
Instructions for following the cable to the strain relief and pulling it through the shake frame.
Steps to remove inner frame counterweight plates to access bearings and crankshaft.
Procedure to loosen crankshaft set screws, remove flange bearings, and pry them off.
Steps for testing the shake motor, including using a jumper cable and checking for proper operation.
Detailed steps for replacing the shake motor, including V-belt and pulley adjustments.
Procedure for changing the V-belt, involving loosening screws, sliding the motor, and adjusting tension.
Steps to unplug the mixer, remove control panel screws, and disconnect the circuit board connector.
Procedure for applying adhesive and attaching special rubber pads to the top plate.
Steps for drying the adhesive and testing the pads by placing cans and running the mixer briefly.
Procedure for adjusting or replacing the DC clamping motor, including alignment and coupling.
Procedure to adjust clamping force using a positioning spacer and gauge, referencing specific part numbers.
Detailed steps for positioning the gauge and spacer, setting the adjustment switch, and pressing START.
Steps to read the force gauge, adjust the switch based on limits, and reassemble.
Steps to reverse the front door, including relocating the stud and opening the door.
Procedure for mounting the door and adjusting the safety switch for proper operation.
Steps to remove external panels to gain access for replacing the Super-Struts.
Procedure to locate and begin removing the Super-Struts, working on one side at a time.
Detailed steps for removing strut pins and nuts using hex keys and vice grips.
Instructions for lifting the shake frame using a wooden board and placing support blocks.
Procedure for installing the rear strut components, including washers, grommets, and bushings.
Procedure for installing the front strut components and springs, and inserting strut pins.
Final steps for securing strut springs, tightening nuts, and screws to specified torque values.
| Brand | Fluid Management |
|---|---|
| Model | HARBIL 5G |
| Category | Mixer |
| Language | English |