TOOLS REQUIRED
CABINET ASSEMBLY INSTRUCTIONS Version 4
G
H
G
G
G
G
G
G
G
H
H
H
H
H
S
S
C
C
K
K
A
C
A
A
W
W
W
W
A
A
S
S
A
A
W
W
W
W
A
A
S
S
S
S
E
E
E
E
Q
Q
R
R
Important - Please read these instructions fully before starting assembly
Wichtig - Bitte lesen Sie diese Anleitung vollständig, bevor Sie mit der Montage beginnen
Important – Veuillez lire toutes les instructions ci-dessous avant de commencer l’assemblage
Importante - Por favor, lea estas instrucciones completamente antes de comenzar el montaje
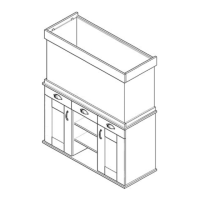
LAY PARTS ON A FLAT CLEAN SURFACE
- We recommend that you build your cabinet in its nal location which must be solid,
at and level. The aquarium can then be assembled on top.
LEGEN SIE DIE EINZELTEILE AUF EINEN EBENEN, SAUBEREN UNTERGRUND - Wir empfehlen Ihnen, Ihren Unterschrank zu
montieren und ihn an der gewünschten Stelle zu positionieren. Danach kann das Aquarium auf den Schrank aufgesetzt werden.
DÉPOSER LES PIÈCES SUR UNE SURFACE PLANE ET PROPRE - Il est recommandé de construire le support à l’endroit désiré
pour pouvoir assembler l’aquarium directement dessus ensuite.
COLOQUE LAS PIEZAS EN UNA SUPERFICIE PLANA Y LIMPIA - Recomendamos que primero monte y lo coloque la mesa en
la ubicación deseada, y luego podrá montar el acuario encima.
• Geben Sie einen KLEINEN
TROPFEN Leim in die
Dübellöcher der Platten (i), (iii)
& (iv), bevor Sie die Dübel (G)
einsetzen.
• Appliquer une TRÈS PETITE
GOUTTE de colle dans les trous
de chevilles des parois (i), (iii) et
(iv) avant d’y insérer les chevilles
(G).
• Aplique una PEQUEÑA GOTA
de pegamento en el oricio
para clavijas de los paneles (i),
(iii) y (iv) antes de introducir las
clavijas (G).
• Apply a VERY SMALL
drop of glue into the dowel
holes on panels (i), (iii) & (iv)
before inserting dowels (G).
INCLUDED
Glue - Leim -
Colle - Pegamento
Ax10 Bx2 Cx12 Dx10 Ex4 Fx4 Gx8 Hx5 Jx1 Kx2 Lx8 Mx8 Nx8 Ox2 Px4
Vx2Ux2Tx2Sx10Rx2Qx3
LARGE
FACE
66mm 34mm
13
14
• Attention! Fit the soft close hinge at the top
and standard hinge at the bottom. Knock in
hinges with a mallet then tighten the screws.
• Achtung! Montieren Sie das Soft-Close-
Scharnier oben und das Standard-Scharnier
unten. Scharniere mit einem Hammer
einklopfen und dann die Schrauben anziehen.
• Attention! Placer la charnière à
amortissement en haut et la charnière
standard au bas de la porte. Enfoncer les
charnières dans les portes à l’aide d’un maillet,
puis serrer les vis.
• ¡Atención! Coloque la bisagra de cierre
suave en la parte superior y la bisagra
estándar en la parte inferior. Golpee
suavemente las bisagras con un mazo hasta
que entren correctamente en el espacio
asignado y luego apriete los tornillos.
If the hinge plate becomes detached from the hinge you can reattach it as shown.
Wenn sich die Scharnierplatte vom Scharnier löst, können Sie sie wie abgebildet wieder anbringen.
Si la plaque de charnière se détache, la rattacher à la charnière en suivant les instructions suivantes.
Si la placa de la bisagra se separa de la bisagra, puede volver a colocarla según se muestra.
Click On:
soft close
Zusammendrücken: Soft Close Scharnier
Par Insertion: charnière avec amortisseur
Únalas Con Un Clic: bisagra de cierre suave
Slide On: standard close
Zusammenschieben: Standard Scharnier
Par Glissement: charnière standard
Deslícela: bisagra estándar
9
1
15
x2
12
x2
8
2
3
7
6
5
4
10
Wx8
Ø7mm
Ø9mm
Ø6mm Ø7mm
CUSTOMER SERVICE - KUNDENDIENST - SERVICE À LA CLIENTÈLE
FITTINGS - TEILE - PIÈCES - PIEZAS
PREPARATION - VORBEREITUNG - PRÉPARATION - PREPARACIÓN
PREPARATION - VORBEREITUNG - PRÉPARATION - PREPARACIÓN
1 2
BATCH NO: