Do you have a question about the Flymo Hover Vac 250 and is the answer not in the manual?
Register your product warranty online and visit the website for parts and enquiries.
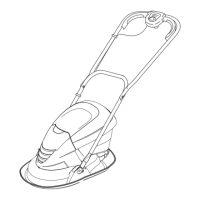
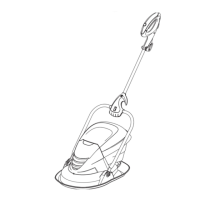
The upper section of the handle assembly.
Clip for securing the power cable to the handle.
Fastener used in handle assembly, if required.
Component for adjusting or securing the handle.
Component used with bolts for secure fastening.
Fastener used for assembly of the product.
The lower section of the handle assembly.
Pin used to secure handle components.
Tool for blade removal and cleaning.
Components used to adjust the cutting height.
The user manual for the product.
Label containing safety warnings.
Label with product specifications and ratings.
The mains power cable for UK models.
Housing for the start/stop controls.
Lever used to start and stop the lawnmower.
Container for collecting grass clippings.
General warning symbol indicating potential hazard.
Indicates the need to read the user instructions.
Symbol indicating the product should remain on the ground during use.
Warning to keep people and pets away during operation.
Warning about sharp blades and potential for injury.
Indicates power should be switched off and plug removed.
Symbol indicating a risk of electric shock.
Instruction to keep the power cable away from the blade.
Indicates compliance with applicable EC directives.
Indicates product is electrical waste and requires recycling.
Symbol representing the guaranteed sound power level.
Indicates the tool has double insulation for safety.
General rules for safe operation, including supervision and user responsibility.
Precautions regarding electricity, cables, plugs, and RCDs.
Guidelines for using extension cables, including cross-section requirements.
Steps to take before using the product, including footwear and checking for damage.
Instructions for operating the product safely and effectively.
Steps to attach the lower handles to the lawnmower body.
Steps to connect the upper handles to the lower handles.
Instructions for securing the power cable using clips.
How to adjust the cutting height for a lower cut using spacers.
How to adjust the cutting height for a higher cut by removing spacers.
Procedure for refitting the blade after adjusting cutting height.
Instructions for safely removing the blade and fan assembly.
Steps for correctly installing the blade and fan assembly.
Procedure to move the handle to the forward position.
Procedure to move the handle to the down position.
How to adjust the handle to the most comfortable operating position.
Step-by-step guide to starting the lawnmower, including safety features.
Instructions on how to safely stop the lawnmower.
Advice on mowing direction and grass cutting frequency.
Procedure for safely emptying the grass collection box.
Guidelines for cleaning the lawnmower, emphasizing avoiding water.
Tasks to perform at the end of the season, including checks and cleaning.
Recommendations for storing the lawnmower in a dry place.
Steps to diagnose and resolve issues when the product does not operate.
Troubleshooting steps for issues related to the product's flotation.
Tips for improving grass collection performance.
Diagnosis and resolution for excessive vibration during operation.
Recommendation for professional servicing at least once a year.
Key technical specifications for Hover Vac models.
Details of EU directives and harmonized standards the product complies with.
| Power | 1400 W |
|---|---|
| Cutting Width | 25 cm |
| Cutting Height Min-Max | 10-30 mm |
| Grass Box Capacity | 15 L |
| Cable Length | 10 m |
| Cutting Height | 10-30 mm |
| Grass Collection Capacity | 15 L |
| Power Source | Electric |