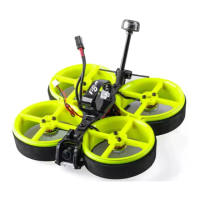
The Flywoo CineRace20 DJI HD V1.0 is a versatile drone designed for both racing and stable video shooting, offering an extended flight time. It features a unique double-duct design, distinguishing it from simple prop guards, and is inspired by the RaceWhoop concept from Free Zillion. This design allows it to fly with the agility of a racing drone while maintaining the stability of a Cinewhoop, ensuring jello-free video footage.
Function Description:
The CineRace20 is an all-round drone capable of high-performance racing and stable aerial videography. Its primary function is to provide pilots with a flexible and stable platform for capturing video without unwanted vibrations (jello effect) and to offer extended flight times. The drone is designed for personalization, allowing pilots to combine different color frames. It also integrates a Flywoo Bt-nano Bluetooth Module, enabling mobile devices to set flight controller parameters.
Important Technical Specifications:
General:
- Frame: CineRace20 Frame Kit
- Material: Injection molded ABS\PC for enhanced sturdiness and durability.
- Disassembly/Installation: Very easy, fixed by two aluminum columns.
- Flight Stability: High, with low noise.
- Propellers: No propellers in view, ensuring clean footage.
- Camera Output: Dedicated power cable output for SMO camera (adapter cable needed for GoPro 6/7/8).
- Bluetooth: Flywoo Bt-nano Bluetooth Module for mobile parameter settings.
Dimensions & Weight (CineRace20 DJI HD):
- Weight: 112g (without battery)
- Antenna Diameter: 4.2mm (e.g., Flywoo Circular Polarized Antenna)
- Camera Compatibility: Only suitable for 14x14 cameras.
- AIO Compatibility: Only suitable for 90°USB AIO (e.g., GOKU GN405S 20A/40A AIO).
- Mounting Holes: Standard 25.5x25.5mm square to center of holes.
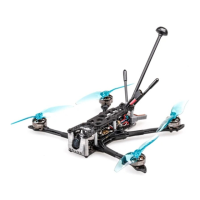
CineRace20 Analog Configuration (Grey):
- FC & ESC: GOKU 413SAIO 13A AIO
- Camera: Caddx Ant
- VTX: VTX625 450mw
- Antenna: Flywoo circular RHCP 5.8Ghz Antenna (UFL-Length: 115mm \ Tube 45mm)
- Motor: Nin V2 1203PRO 3400kv
- Propeller: Gemfan D51-5 blade
- Bluetooth Module: Not included
- Microphone Module: Not included
- Battery: Explorer 4S 300mah HV, Explorer 4S 900mah HV
- Flight Time (Without Caddx Peanut): 300mAh: 7mins, 900mAh: 15mins 30s
- Flight Time (With CaddxPeanut): 300mAh: 4mins 30s, 900mAh: 12mins
- Weight (Without Battery): 93.2g
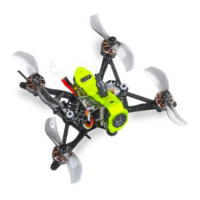
CineRace20 Analog Pro Configuration (Yellow):
- FC & ESC: GOKU 405S 20A AIO
- Camera: Caddx Baby Ratel V2
- VTX: HM850 850mw
- Antenna: Flywoo circular RHCP 5.8Ghz Antenna (UFL-Length: 115mm \ Tube 45mm)
- Motor: Nin V2 1203PRO 3400kv
- Propeller: Gemfan D51-5 blade
- Bluetooth Module: YES
- Microphone Module: YES
- Battery: Explorer 4S 300mah HV, Explorer 4S 900mah HV
- Flight Time (Without Caddx Peanut): 300mAh: 7mins, 900mAh: 15mins 30s
- Flight Time (With CaddxPeanut): 300mAh: 4mins 30s, 900mAh: 12mins
- Weight (Without Battery): 94.7g
CineRace20 Polar Nano Configuration (Black):
- FC & ESC: GOKU 405S 20A AIO
- Camera: Polar Nano
- VTX: Vista
- Antenna: Flywoo circular LHCP 5.8Ghz Antenna (UFL-Length: 115mm \ Tube 45mm)
- Motor: Nin V2 1203PRO 3400kv
- Propeller: Gemfan D51-5 blade
- Bluetooth Module: YES
- Microphone Module: Not included
- Battery: Explorer 4S 300mah HV, Explorer 4S 900mah HV
- Flight Time (Without Caddx Peanut): 300mAh: 6mins, 900mAh: 12mins 30s
- Flight Time (With CaddxPeanut): 300mAh: 3mins 30s, 900mAh: 10mins
- Weight (Without Battery): 111.7g
Highly Recommended Battery:
- Explorer 4S HV 300mAh Battery (for good flight time and flexibility)
- Explorer 4S HV 900mAh Battery (for super long flight time)
Package List:
- 1x Prebuilt and tested CineRace20 Quadcopter
- 4x D51-5 Props (Pairs)
- 2x Battery Strap
- 1x Hardware Set
Usage Features:
Personalization:
- Pilots can freely combine their favorite frame colors. Note that replacing ducts requires manual installation, as pre-built drone colors are fixed.
Receiver Binding:
- TBS NANO 915: Connect USB, wait for the receiver's green light to flash, then follow the binding procedure outlined in the provided video tutorial.
- ELRS 2.4G RX: Supply power to the EL24E/EL24P RX. Wait for the LED to turn off, then immediately turn off the power. Repeat this process. On the third power-up, the LED will double-flash, indicating binding mode. Insert the 2.4G ELRS TX into the radio transmitter, select External RF mode to CRSF protocol, find the ELRS menu (after copying the ELRS.LUA file to the SD-Card tools), enter ELRS, and press [Bind]. The RX module's LED will become solid upon successful binding.
- LED Status Meanings: Solid LED: successful bind/connection; Double-flash: bind mode; Slow flash: no signal; Fast flash: WIFI hotspot mode (for firmware upgrade via web browser at 10.0.0.1, password: expresslrs).
- R9MM FCC ACCESS OTA: For ACCESS protocol remote controls, follow the provided YouTube link for registration and binding.
- R9MM ACCST Protocol: Copy specific firmware files (FW-R9MM-ACCST_v20190201 and FW-R9M-ACCST-20190117) to the SD card's firmware directory. Insert the R9M TX module and flash the necessary firmware. To write firmware to the R9MM receiver, remove it and connect it to the S.PORT port.
- Binding R9MM TX and RX (ACCST):
- Press and hold the RX's bind button. Power on, and the red and green lights will be on.
- After R9MM selects binding, the RX red light flashes, then exits.
- Power on the RX again; a green light indicates successful binding.
- XM+ Receiver:
- Press the XM+ receiver button. Power on, and the red and green lights will be on.
- The remote control enters binding mode, and the green light flashes to indicate successful binding. Turn off and restart.
Mode Setting:
- Set the ARM switch and flight mode switch. AUX+ corresponds to the remote control switch, and the yellow area indicates activation.
Motor Test:
- Unload the propellers. Test the rotation direction of the motors one by one on the safety switch.
VISTA Activation and Binding:
- For convenience, VISTA is activated by default at the factory and updated to the latest firmware version. The BNF version can be used directly without further updates. A YouTube tutorial is provided for assistance.
Bluetooth Function:
- The drone supports Bluetooth connectivity via the Speedy Bee app for configuration and parameter adjustments.
Maintenance Features:
Flight Firmware Upgrade and Default CLI Write:
- Activate DFU Mode: In Betaflight Configurator, navigate to the "Setup" tab and click "Activate Boot Loader / DFU."
- Enter DFU Mode: The BF Configurator should display "DFU" mode. If not, the driver might be missing and can be installed using the ImpulseRC Driver Fixer software.
- Load Firmware: Load the local HEX firmware file and wait for the flashing to complete. A green progress bar indicates completion, and DFU will become a COM port.
- Write CLI Commands: After connecting, if the interface is blank, write the CLI commands. The factory CLI link is provided:
https://flywoo.net/pages/manual.
- Save and Restart: If the command does not restart the FC, type "SAVE" and press Enter to save, which will restart the FC.
- Return to Normal: All FC functions should return to normal after the upgrade and CLI write.