EasyManua.ls Logo

Focal Point Bi-Flame User Manual

Default Icon
20 pages
To Next Page IconTo Next Page
Page #1 background imageLoading...
Page #1 background image
INSTALLATION & USER INSTRUCTIONS
All instructions must be handed to the user for
safekeeping.
MULTIFLUE/CONVECTOR INSET GAS FIRE
Please note : Except where otherwise stated, all rights, including
copyright in the text, images and layout of this booklet is owned by
Focal Point Fires plc. You are not permitted to copy or adapt any of
the content without the prior written permission of Focal Point Fires
plc.
1
Revision D - 03/13
© 2013 Focal Point Fires plc.
GB IE
BS 7977-1 : 2009
BS EN 509 : 2000
KM579168
Focal Point Fires plc.
Christchurch, Dorset BH23 2BT
Tel: 01202 499330
Fax: 01202 499326
www.focalpointfires.co.uk
e : sales@focalpointfires.co.uk
IN THE UK ALWAYS USE A GAS SAFE REGISTERED ENGINEER TO INSTALL, REPAIR OR SERVICE THIS APPLIANCE
Questions or problems with your appliance?
Don’t take it back to the store
just give us a call on 01202 588601 we’re here to help
lines open between 9am and 5pm, Monday to Friday
MODELS COVERED BY THESE INSTRUCTIONS
BLENHEIM MULTIFLUE **
LULWORTH MULTIFLUE† †
EXCELSIOR MULTIFLUE*
VOGUE *
AURA MULTIFLUE*
FINSBURY MULTIFLUE*
*
SOHO MULTIFLUE
BI-FLAME*
HORIZON MULIFLUE
LANGHAM MULTIFLUE † †
* AVAILABLE WITH MANUAL CONTROL ONLY
AVAILABLE WITH MANUAL OR SLIDE CONTROL
† † AVAILABLE WITH MANUAL OR REMOTE CONTROL
** AVAILABLE WITH MANUAL, SLIDE CONTROL OR REMOTE CONTROL
MODEL SHOWN: BLENHEIM MULTIFLUE
Question and Answer IconNeed help?

Do you have a question about the Focal Point Bi-Flame and is the answer not in the manual?

Focal Point Bi-Flame Specifications

General IconGeneral
BrandFocal Point
ModelBi-Flame
CategoryHeater
LanguageEnglish

Summary

Models Covered by These Instructions

3 Year Guarantee

1.0 Important Notes

2.0 Appliance Data

3.0 Installation Requirements

4.0 Site Requirements

4.1 Debris Collection Space

Details the required space for collecting debris behind the appliance.

5.0 Ventilation

6.0 Pre-Fabricated Flue Boxes

7.0 Unpacking the Appliance

7.1 Component Checklist

Lists all components included with the appliance for verification.

8.0 Preparing the Appliance

Spigot Restrictor

Instructions for attaching the spigot restrictor for specific flue types.

Supply Pipe Entry

Guidance on routing and sealing the gas supply pipe entry point.

Sealing Strips

Application of self-adhesive sealing strips to the fireframe for a continuous seal.

Slide Control Models

Specific steps for fitting the control knob and marking sticker on slide control models.

9.0 Preparing the Opening

Cable Fixing

Steps for securing the fire using the cable fixing kit.

Screw Fixing

Guidance on marking and drilling for screw fixing methods.

Gas Supply

Instructions for routing the concealed gas supply.

10.0 Gas Supply Routing

11.0 Installation by Cable Fixing Kit

12.0 Fitting the Burner

Manual and Remote control models

Securing the burner tray with screws for manual and remote models.

Slide control models

Securing the burner tray with screws for slide control models.

13.0 Gas Connection

14.0 Fuel Bed Layout

15.0 Fitting the Firefront/Frame

One-piece frame models

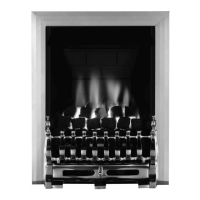
Attaching the one-piece decorative frame using magnets.

Three-piece frame models

Fitting the clip-on frame pieces for three-piece frame models.

Cast frame models

Mounting the cast frame using brackets and magnets.

16.0 Testing and Commissioning

16.1 Operating the Fire - Manual Control Models

Step-by-step guide for operating the fire with manual controls.

16.2 Operating the Fire - Remote Control Models

Instructions for operating the fire using the remote control system.

16.3 Operating the Fire - Slide Control Models

Procedure for operating the fire using slide controls.

16.4 Spark Gap

Specifies the correct spark gap for optimal ignition.

16.5 Operating Pressure

Details on checking and setting the operating gas pressure.

16.6 Flue Spillage Monitoring System

Information on the ODS safety device and flue spillage detection.

16.7 Testing for Spillage

16.8 Briefing the Customer

17.0 Servicing

17.1 Cleaning the Ceramics

Instructions for safely cleaning the ceramic fuel bed components.

17.2 Removing the Burner

Step-by-step guide for removing the burner assembly.

17.3 Dismantling the Burner

Procedure for taking apart the burner assembly.

17.4 Pilot Assembly

Guidance on removing and cleaning the pilot assembly.

17.5 Removing the Firebox

Steps for safely removing the firebox from the opening.

17.6 Replacing the Batteries (Remote Control Versions)

Instructions for replacing batteries in remote control handsets and appliances.

17.7 Replacing the Batteries (Slide Control Versions)

Instructions for replacing batteries in slide control appliances.

18.0 Troubleshooting Guide

1.0 Important Notes (User Instructions)

2.0 Clearances to Combustibles

3.0 Fire Guards

4.0 Ventilation

5.0 Operating the Fire - Manual Control Models

5.1 Operating the Fire - Remote Control Models

5.2 Operating the Fire - Slide Control Models

6.0 Flue Spillage Monitoring System

7.0 Fuel Bed Layout - Ripped Coal Effect

7.1 Fuel Bed Layout - Pebble Effect

7.2 Fuel Bed Layout - Rounded Coal Effect

8.0 Servicing

9.0 Cleaning

10.0 Replacing the Batteries (Remote Control Versions)

10.1 Replacing the Batteries (Slide Control Versions)

11.0 List of Replacement Parts

12.0 Installation Details

13.0 Service History

14.0 Guarantee - Terms and Conditions

Related product manuals