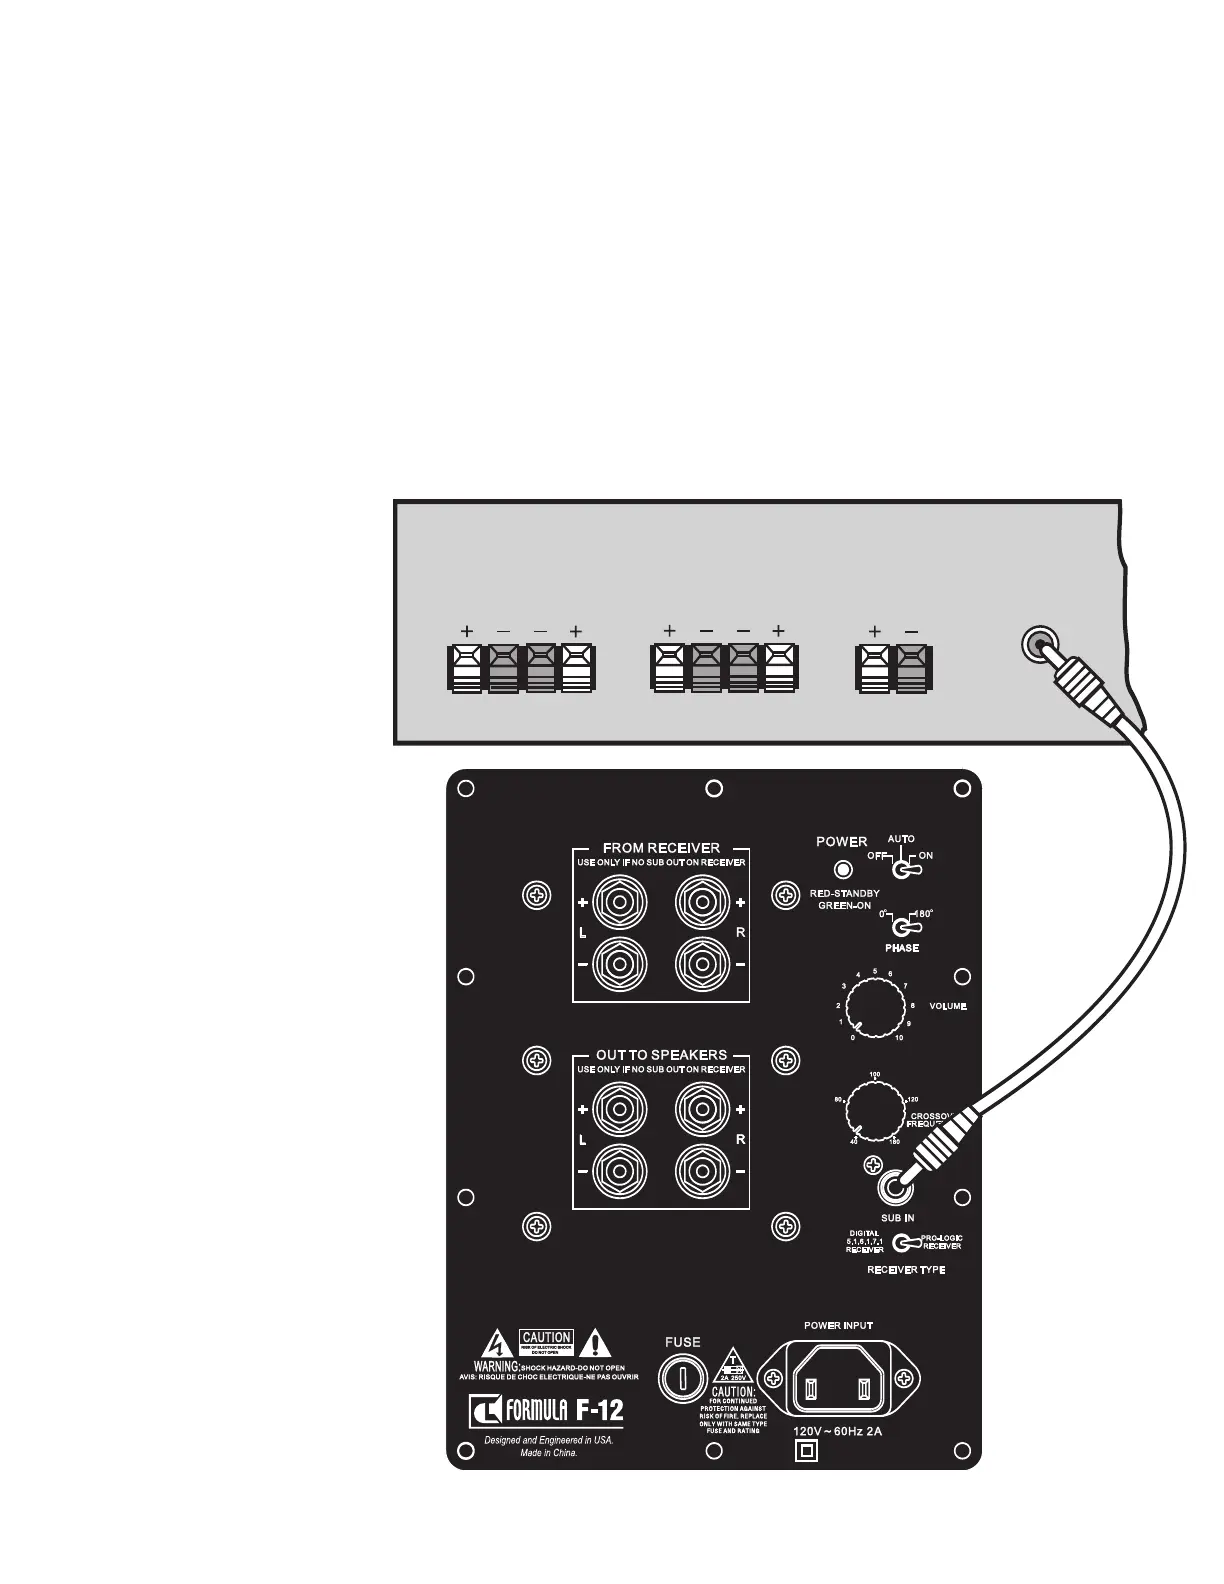
NOTE: SEE
ITEM 5 AT LEFT
FOR PROPER
RECEIVER TYPE
SWITCH SETTING
F-12 connection
FRONT
SPEAKERS
RIGHT LEFT
REAR
SPEAKERS
RIGHT LEFT
CENTER
SPEAKERS
RIGHT LEFT
SUBWOOFER
OR LFE
OUT
Method A: Line level
hookup steps for receivers
with subwoofer connections
See Drawing 3 below
Note: This connection method is only
for receivers that have a subwoofer or
LFE output. If your receiver does not
have a subwoofer or LFE connection as
shown in Drawing 3, use
Method B:
Amplifier wiring hookup steps for
receivers or surround sound receivers
with NO sub output jack
. You will need
one line level RCA
to
RCA connector cable
long enough to reach from your receiver
to your subwoofer location. This should
be available from your B
.
I
.
C/Formula
dealer or from radio supply stores.
o 1. IMPORT
ANT
: Make sure that ALL
stereo system components including
the subwoofer are turned OFF before
proceeding.
o 2. Locate the subwoofer or LFE output
connector
on the rear of your receiver
and connect one end of the RCA line level
cord to it.
o 3. Route the line cord to the subwoofer
location (trying to minimize
areas where it
may be stepped on) and connect the other
end directly to the SUB IN.
o 4. Connect your main (and surround
speakers if applicable) to the receiver
according to the receiver’
s owner’s manual.
o 5. Set the RECEIVER TYPE toggle
switch to the type of receiver you have.
Note: If you are using a Dolby Digital
type receiver, the subwoofer crossover
control does not work. Y
ou must set
the crossover frequency in your
receiver (check your receiver’s
owner’s manual).
o 6. You are now ready to put your
subwoofer into use.
DRAWING 3 - Hookup for Surround Sound Receiver
with Subwoofer Output
5
SUBWOOFER
CONNECTION
Connecting the
F-12 to a wall plug
The subwoofer draws a moderately high
amount of current. We do not recommend
plugging it into a “convenience” outlet
(switched or unswitched) that is often
found on the back of receivers and other
stereo components.
Instead, connect the F-12 to its own AC
outlet ONLY. See items 8 and 9 in the Safety
Instructions.
Converting Subwoofer to 220-240 Volt Operation
Remove amplifier from subwoofer cabinet. Take out all the screws around the perimeter
of the control plate. Lift out the amplifier, reaching into the cabinet to remove the wire clip
leads from the woofer input terminals.
Locate the power supply voltage-setting connectors. They’re on the PC board that’s
attached between the aluminum heat sinks. At one end of the board the red and black AC
power lines are attached. On that end, on the lower right-hand corner, you’ll see two small
jumper connectors.
Move the connectors. There are four pairs of pins onto which the jumpers can be placed.
For 120-volt operation the jumpers are placed on the two outer pairs of pins. To set up the
amplifier for 220-240 volt input, pull the jumpers straight up off the outer pin pairs and place
them on the inner pairs of pins. (Sometimes the jumpers are held in place with hard yellow
gunk. If they are, carefully cut through the gunk with an X-ACTO knife to free the jumpers.)
Replace the amplifier into cabinet. Reattach the wires to the woofer input terminals.
Orient the amplifier control plate as it was originally, drop it in position, and replace the
screws around the perimeter.
 Loading...