EasyManua.ls Logo

Fox digital Micron MX Receiver - User Manual

Fox digital Micron MX Receiver
2 pages
Print Icon
To Next Page IconTo Next Page
Loading...
ENGLISH
www.foxint.com
• Low Battery Drain
• I-Com®
• Digital Circuitry
• Weatherproof Sealed Case
• Easy Micron Registration
• Multicoulour LED’s
STEP 1.
Turn o unit prior to tting or
replacing batteries.
STEP 3.
Lift the up the battery cover
from the bottom corners to remove.
STEP 5.
For best weatherproong, ensure
battery cover has a good seal by rmly
pushing lip into the top edge of the case
and pivoting it into position.
STEP 2. Using a cross head
screwdriver unscrew the two
battery cover screws.
STEP 4.
Take care removing the batteries.
Insert new batteries and ensure
correct polarity.
STEP 6.
Re-t cover and screws.
DO NOT over tighten the battery compartment screws,
excessive force will damage the screw threads.
MICRON USER GUIDE
Lanyard
Connection
Power and
Volume Control
LED
Light Pipes
High Quality
Cone Speaker
Micron
Registration Button
FEATURES
FITTING THE BATTERIES
Battery Cover
Question and Answer IconNeed help?

Do you have a question about the Fox digital Micron MX Receiver and is the answer not in the manual?

Summary

MX Receiver Features

Fitting the Batteries

Prepare Unit and Remove Cover

Turn off the unit, unscrew the battery cover using a cross-head screwdriver, and lift it from the bottom corners.

Install New Batteries

Carefully remove old batteries, insert new ones, and ensure correct polarity for optimal performance.

Seal and Secure Battery Compartment

Ensure a proper seal by seating the cover lip, then refit the cover and screws. Avoid overtightening to prevent damage.

Receiver Operation and Controls

On;Off and Volume Adjustment

Activate the unit with a click, cycle LEDs, adjust volume clockwise, and deactivate by turning counter-clockwise to OFF.

Registration Mode Procedure

Register bite alarms by switching them OFF, then ON the receiver, pressing the button, and switching alarms on in order.

Performance and Warnings

Achieving Best Performance

Keep the receiver high, maintain line-of-sight with the transmitter, avoid mobile phones, and ensure good batteries.

Low Battery and General Warnings

Low battery indicated by cyan LEDs. Avoid triggering LEDs/speakers near eyes, keep away from children, and do not drop unit.

Drying Out After Use

After exposure to heavy rain, allow the weatherproof unit to dry indoors thoroughly.

Battery Requirements and Warranty

Battery Specifications

Requires 3 x LR6 AA 1.5V Alkaline batteries. Do not mix old/new or different battery types. Not recommended to use rechargeables.

Product Registration and Warranty

Register your warranty online via the Fox website using product code, date, and place of purchase.

Overview

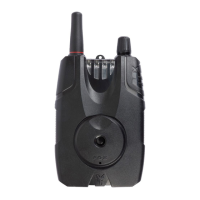
The Fox Micron MX Receiver is a digital radio receiver designed to work with Fox Micron bite alarms, providing anglers with remote notification of bites. It features a weatherproof sealed case and digital circuitry for reliable performance in various conditions.

Function Description

The primary function of the MX Receiver is to receive signals from paired Fox Micron bite alarms, indicating a bite event. When a bite alarm is triggered, the receiver provides visual and audible alerts. It includes a multicolour LED system that cycles through colours briefly upon activation and can display specific colours for different alarms. The unit also features an I-Com® system for enhanced communication.

Important Technical Specifications

  • Power Source: 3 x LR6 AA 1.5V Alkaline batteries.
  • Operating Frequency: 433.92MHz.
  • ERP (Effective Radiated Power): -8 dBm max.
  • Rating: 4.5V.
  • Compliance: Directive 2014/53/EU (CEI190 type radio equipment).
  • Patents: EP1059029.

Usage Features

Activation and Volume Control: To activate the unit, rotate the Power and Volume Control dial clockwise until a click is heard. The LEDs will cycle colours briefly. Rotating the dial further clockwise increases the speaker volume. To deactivate, rotate the dial fully counter-clockwise to the 'OFF' position.

Registration Mode: Before initial use, bite alarms must be registered with the receiver.

  1. Switch the MX Receiver "ON."
  2. Press the Micron Registration Button on the back of the receiver with a small pointed object until the leftmost LED flashes. Release the button.
  3. Switch on each Micron bite alarm in the desired order of appearance on the receiver.
  4. Press the registration button again or switch the unit off to complete the process. The registration process can be repeated to change the order of Microns or add new ones. It's important to note that the registration process can be disrupted by other radio signals, such as wireless routers, if attempted in close proximity.

Best Performance Guidelines: To maximize operating range and reliability:

  • Keep the MX Receiver as high above ground as possible; if worn on the body, it should be on the outside of clothing.
  • Maintain a direct "line-of-sight" between the receiver and transmitters, avoiding obstructions like trees or buildings, which can cause signal loss or "dead spots."
  • Avoid keeping the MX Receiver in the same pocket as a mobile phone or other electronic devices.
  • Ensure both the receiver and alarms have good batteries. These guidelines become less critical at closer working ranges. The system is designed for long operating range to maximize reliability at close range, not to encourage unattended rods.

Low Battery Warning: When the MX Receiver's batteries are low, the LEDs will flash cyan (blue-green) periodically. Batteries should be replaced promptly. The receiver will also indicate low battery warnings for paired MX Alarms by changing the corresponding Micron LED colour to cyan (blue-green).

Safety Warnings:

  • Do not trigger the LED or speaker in close proximity to human or animal eyes and ears.
  • Store the equipment out of reach of children and infants.
  • Avoid dropping or subjecting the Micron to severe impacts.

Maintenance Features

Battery Installation and Replacement:

  1. Turn off the unit before fitting or replacing batteries.
  2. Unscrew the two battery cover screws using a cross-head screwdriver.
  3. Lift the battery cover from the bottom corners to remove it.
  4. Carefully remove old batteries. Insert new LR6 AA 1.5V Alkaline batteries, ensuring correct polarity.
  5. For best weatherproofing, ensure the battery cover has a good seal by firmly pushing its lip into the top edge of the case and pivoting it into position.
  6. Re-fit the cover and screws.
  • Caution: Do not overtighten battery compartment screws, as excessive force can damage the screw threads.
  • Battery Recommendations: Use good quality alkaline batteries for maximum battery life. Do not mix old and new batteries, do not mix different battery types, and rechargeable batteries are not recommended. Remove batteries during long periods of non-use to reduce the risk of leakage.

Drying Out After Heavy Rain: The MX Receiver is designed to be weatherproof. However, if exposed to heavy rain, it is important to allow the unit to dry out properly by bringing it indoors and allowing it to dry fully.

  • Caution: Never place batteries in a hot environment (e.g., on a radiator).

Warranty & Product Registration: Users can register a warranty for this product online at the Fox website. This requires creating an account, providing the product code, date, and place of purchase. After registration, a Customer Reference code will be provided for viewing warranty details.

Fox digital Micron MX Receiver Specifications

General IconGeneral
BrandFox
Modeldigital Micron MX Receiver
CategoryReceiver
LanguageEnglish

Related product manuals