37
This machine is delivered almost completely assembled. Before use you must assemble the following pieces:
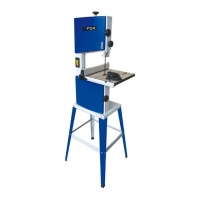
1. bandsaw’s base (L) Fig. 1
2. pusher’s hanger (B) Fig. 3
3. handle for the adjustment of the belt tensioning (B) Fig. 1
4. workbench (G) Fig. 1
5. rip fence’s rail (I) Fig. 1
6. fence’s rail (A) Fig. 8
7. goniometer (C) Fig. 9
8. connection for the dust collection device (A) Fig. 10
ASSEMBLY OF THE BASE
Your bandsaw is provided with a basement (L) Fig. 1. Assemble it by using the 8 bolts, 8 washers and 8 nuts
included in the package (A) Fig. 2 and place the base of the bandsaw on it. Then fix the base of the bandsaw on
the basement by using the corresponding 8 bolts, 8 washers and 8 nuts (B) Fig. 2. Lastly tighten all firmly.
ASSEMBLY OF PUSHER’S HANGER
To better organise your working area, you can hang the pusher (A) Fig. 3 on the frame when you do not use it.
In order to do this, place the hanger (B) of the pusher on the upper left side of the frame as illustrated in Fig. 3.
ASSEMBLY OF SAW BLADE’S TENSIONING KNOB
Place the knob (A) on the protruding thread of the upper side of the bandsaw as illustrated in Fig. 4, tighten it and
fix it with the nut.
ASSEMBLY OF THE WORKBENCH
• Tighten the slot screw (A) Fig. 5 on the workbench in order that the head of the screw can function as a stop
on the frame. After adjusting it, tighten the nut (B).
• Put the bearing of the aluminium workbench on the housing ( C ) Fig. 6, put the special bolt in the groove and
fix it on the other side with the lever ( A ) Fig. 7, while trying to keep the supporting structure horizontal.
• Assemble the workbench on the supporting device (C) and fix it with the 4 bolts (D) included in the package,
then tighten them with the plane wrench as illustrated in Fig. 6.
You must carry out two adjustments on the workbench:
1. Sideways, in order that the saw blade is placed exactly in the centre of the hole of the workbench.
2. Horizontally, in order that the saw blade is orthogonal to the workbench.
Cuttings are perfectly perpendicular if the surface of the workbench is perpendicular to the blade. To obtain this
adjustment, observe the following instructions:
Side adjustment of the workbench
• Loosen the 4 locking screws of the support of the workbench.
• Place the workbench in order that the blade is in the middle of the profile of the workbench’s support.
• Tighten the lock screws.
BANDSAW ASSEMBLY