Do you have a question about the Fox F28-186A and is the answer not in the manual?
Information on disposal of electrical and electronic waste according to EU directives.
Explanation of symbols used in the manual and on the machine for safe operation.
Guidance on proper earthing for electrical safety and shock prevention.
Lists all components provided with the bandsaw in the package.
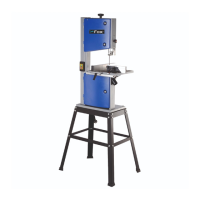
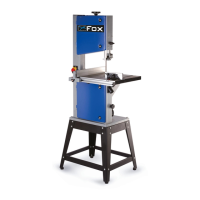
Procedures for securing the bandsaw to a surface or assembling it on its legs.
Steps for assembling and horizontally adjusting the workbench using Fig. 2.
Instructions for fixing the fence's rail onto the workbench as shown in Fig. 3.
How to adjust the upper blade guide and protection height using Fig. 6.
Explanation of the lower blade protection's function and its proper use.
How to start and stop the bandsaw using the green and red buttons shown in Fig. 7.
Detailed steps for safely removing and installing a new saw blade using Figs. 11-12.
Troubleshooting steps if the engine fails to start or operate.
Solutions for when the saw blade moves away from the cutting line.
Reasons for saw blade breakage, including tension and forcing issues.
This document is an instruction manual for a FOX model F28-186A bandsaw. It provides comprehensive information on safety, assembly, operation, maintenance, and troubleshooting for the device.
The FOX F28-186A is a vertical bandsaw designed for cross-cutting and trimming plastics and wood. It is equipped with an electric engine and a saw blade that moves on flywheels. The machine includes various safety features such as blade protections, flywheel doors, and an ON/OFF switch with a minimum voltage relay to prevent accidental starts after power interruptions. It also features a dust collection coupling for connecting an external dust collector, which is recommended for wood processing to manage sawdust and shavings.
The bandsaw offers several adjustable features to optimize its use for different tasks:
Regular maintenance is essential for the bandsaw's performance and safety:
The manual emphasizes the importance of reading and understanding all safety instructions, wearing personal protective equipment (goggles, dust mask, ear protection, gloves), and disconnecting the machine from power before any adjustments or maintenance. It also highlights the dangers of certain wood dusts and recommends using an efficient dust collection device and working outdoors when possible.