Do you have a question about the Foxtel Business iQ and is the answer not in the manual?
The BiQ SBB is a 4k/HD hybrid satellite & terrestrial SBB with Wi-Fi capability designed for the commercial market.
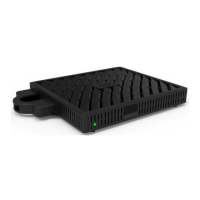
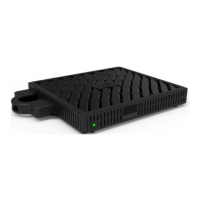
The physical outlook of SBB can be seen in Figure 1.
The list of accessories that are included in the SBB product packaging are as follows:
GENERAL Hardware platform Chipset RAM Memory Flash Memory Mass Storage for DVR-Lite eMMC
Example: BFTV A 9 09 12345 Where: BFTV = account code A = Advanced 09 = Two-digit week number
Please review the following key safety instructions before handling and operating the SBB.
The property where the SBBs will be installed must be built out in the BiQ back-office system and made active by Foxtel.
Foxtel will not allow any SBB on to the BiQ service unless the boxes are preloaded into the BiQ server's inventory.
SBBs shall typically be installed on-site with original factory firmware and then either upgraded to the most current version remotely.
The required length of cables for the installation should be checked prior to installation. If longer than the standard lengths supplied.
The following tools are required to install a SBB: USB memory stick with latest SBB firmware downloaded.
Stage 1 (Figure 4) Gather the set-back-box, the large mounting bracket, spacers, washers and screws.
Stage 2 (Figure 5) Gather 2 long screws, 2 spacers and 2 washers from the mounting kit.
Stage 1 (Figure 6) Gather the set-back-box, both mounting brackets, mounting cylinders, washers and screws.
Stage 1 (Figure 8) Whether mounting to a small or larger TV, gather 2 more long screws, 2 spacers and 4 washers.
It is important to understand the satellite and terrestrial setup at the property as well as the wiring in the property prior to installation.
Connect the SBB in the order listed below, as illustrated in Figure 10.
When the SBB boots the splash screen in Figure 12 is displayed.
Spare SBBs at a property are assigned to room 0. They are moved from the spare inventory to the desired room using the room assignment screen.
Once a SBB is assigned to a room (as per 7.2.1) a SBB in the 'Room' or 'Public Viewing' area should boot to the Welcome screen.
Figure 18 illustrates how the SBB enters and exits standby low-power mode.
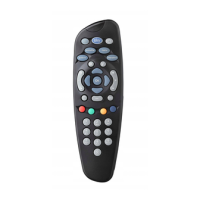
For the BiQ remote control unit (see Figure 19) to control the Power, Mute and Volume on the TV, it must be programmed.
Remove battery cover by squeezing the bottom case with your thumb where the arrow points below and then slide the cover.
Table 1 list the special key sequences to access hidden features, which are available for troubleshooting and/or configuring the SBB.
Refer to Table 1 for remote control key sequence to enter the main menu for the hidden set-up screens in Figure 20.
Where Ethernet is not available for BiQ deployments the Wi-Fi interface on the SBB must be enabled in the Home Network screen.
After switching internet connectivity to Wi-Fi as per section 10.2.1, the Wi-Fi interface is configured via the Wi-Fi setup screen.
Confirm what SSID (network name) and password is to be used by Foxtel at the property, plus the security used.
The video resolution screen highlights the video resolution that is currently set. By default EDID is the HDMI data exchange.
Follow the steps below to set-up or reconfigure the SBBs integrated Wi-Fi access point and embedded Google Chromecast.
To move a SBB from one room to another follow same steps as for the Room Assignment Screen in section 7.2.1.
Refer to Table 1 for remote control key sequence to enter the main menu for the hidden set-up screens in Figure 20.
Each Set-Back-Box requires an Internet connection to access Foxtel's back-office system for tuning and configuration meta-data.
The recommended guidelines for a property's network configuration to accommodate BiQ are outlined below. However, network configurations can vary.
All SBB communications are outgoing on port 80, 443, 8443 or 22 which are required to be left open in the property's firewall.
The boot time for the SBB may vary depending upon the available Ethernet or Wi-Fi internet bandwidth speed.
DVB-T/DVB-T2 COFDM terrestrial channels are supported. DTT channels shall be in the form of an SPTS or MPTS.
| Brand | Foxtel |
|---|---|
| Model | Business iQ |
| Category | Set-top boxes |
| Language | English |