Do you have a question about the Framery Q Maggie and is the answer not in the manual?
Instructions for filling out and sending the warranty checklist for product validation.
Introduction to the installation manual and its purpose.
Details on product information validity at the time of delivery and publication.
Guidelines regarding document copying, presentation, and modification rights.
Overview of the information provided within the installation instructions.
Specifies the product's intended application for short-term indoor commercial use.
Prohibits any use or maintenance not explicitly allowed in the instructions.
Defines the recommended temperature and humidity ranges for product operation.
Explains hazard, mandatory, and prohibited action symbols used in the manual.
Outlines key safety risks associated with installation, maintenance, and use.
Details safety precautions for installing, maintaining, and disassembling the product.
Provides guidelines for safe electrical connections and operation.
Information and warnings related to fire hazards and prevention.
Instructions and warnings for the safe and proper use of the product.
Safety precautions and instructions for moving the product using optional casters.
Lists essential tools and accessories required for installation and maintenance.
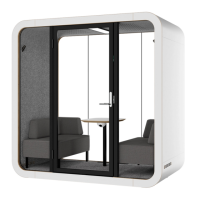
Displays the key physical dimensions of the product for planning purposes.
Specifies the minimum required space around the pod for installation.
Details the necessary space for proper product functionality and air circulation.
Step-by-step guide for attaching optional casters to the floor modules.
Instructions for preparing the acoustic panel for installation.
Procedures for joining the floor modules together securely.
Steps to ensure the floor modules are level using adjustment screws.
Instructions for removing the protective cover panels from the wall modules.
Guide for attaching the wall modules to the assembled floor base.
Steps for joining the roof modules together before mounting.
Instructions for lifting and securing the assembled roof onto the walls.
Guide for attaching the front frame sections to the pod structure.
Steps for installing the optional control panel and associated wiring.
Procedures for fitting the front glass panels into the frames.
Instructions for attaching the top and bottom frame elements.
Guide for mounting the optional bracket for a booking system.
Steps for attaching the rear frame sections to the pod.
Guide for securing the lower frame at the back of the pod.
Procedures for fitting the rear glass panels into the frame.
Instructions for attaching the upper frame at the rear of the pod.
Instructions for applying seals to the back and front glass edges.
Steps for attaching the cover plates to the roof section.
Steps for attaching the cover plates to the floor section.
Guide for fitting the cover panels onto the wall modules.
Guide for routing and connecting the power cord from the floor.
Guide for routing and connecting the power cord from the ceiling.
Steps for installing the optional network cable.
Instructions for installing the main power supply unit and converter.
Guide for installing the protective board over the floor wiring.
Steps for mounting the central control unit and connecting wires.
Guide for installing the motion sensor and internal lighting.
Steps for assembling the table structure and legs.
Instructions for attaching the table top to its base.
Guide for installing the optional LAN data connection module.
Steps for installing the internal power outlet.
Instructions for fitting the carpet and securing the floor grid.
Steps for fitting the threshold at the bottom of the doorway.
Guide for routing the control panel cord and installing the ceiling threshold.
Instructions for attaching the door to the frame using hinges.
Steps for fitting the internal and external door handles.
Guide for installing the optional smart lock mechanism and components.
Procedures for adjusting the strike plate for proper door latching.
Steps to verify the correct operation of the door lock mechanism.
Instructions for mounting the coat hooks on the interior walls.
Steps for attaching seat legs and placing the seat into the pod.
Guide for fitting the cover panel onto the roof.
Steps for attaching the lower body covers to the pod base.
Instructions for fitting the curved and straight roof body covers.
Guide for attaching the body covers to the side walls of the pod.
Final cleaning of glass surfaces and connecting the main power cord.
Final step to fill out and submit the warranty checklist.
Steps to lift the pod onto casters and adjust leveling screws.
Instructions and safety tips for carefully pushing the pod to its destination.
Procedures for leveling the pod using adjustment screws after relocation.
Final installation of floor components and seating.
| Lighting | LED lighting |
|---|---|
| Door type | Sliding door |
| Warranty | 2 years |
| Material | Steel |
| Power supply | 110-240 V / 50-60 Hz |
| Ventilation | Mechanical ventilation |
| Occupancy | 1 person |
| Color options | Various |