9
REMOVING THE INNER GLASS PANE
The oven door has two panes:
• 1 glass outer
• 1 glass inner
To clean all panes from both sides, the
inner pane must be removed as speci ed
below:
1. Open the door
• Open the door to the end (Figure 20)
• Completely open the A arm on the left and right hinges (Figure 21).
• Close the door slowly (Figure 22) until the left and right hinge arms A lock
on the B part of the door (Figure 22).
2. Remove the inner pane:
• Pull the glass inner pane slowly (Figure 23).
• Clean the glass with appropriate cleaning agent. Dry throughout and place
on a soft surface.
Now you can clean the inner side of the outer glass as well.
GB
MAINTENANCE
MAINTENANCE
PLACING THE OVEN DOOR BACK
• Hold the door fast (Figure 17).
• Place the hinge latches in the
gaps and make sure that the gap
is tted into place as in gure 18.
• Open the door to the end.
• As seen in Figure 19, completely
close the «A» arms on the left and
right side.
• Close the door and make sure it tted into place.
• REMOVING AND REINSTALLING THE INNER DOOR PANE FOR CLEANING
If you want to clean the inner glass of the door, closely follow the precautions and
instructions.
Replacing the glass pane and the door wrongfully causes the oven to be damaged
and voids the warranty.
IMPORTANT!
• Oven door is heavy, take care.When in doubt, do not try to remove the door.
• Make sure the oven and all its parts are cooled down. Do not attempt to
replace the parts of a hot oven.
• Exercise maximum caution when working with the glass pane. Ensure the
glass edges to not crash into any surface. Glass might break.
• Do not use hard abrasive cleaning agents or sharp-edged metal scratchers
to clean the control panel - as they may scratch the surface and cause the
glass to break.
• Do not use the oven if you see any damage (crack or break) on the glass
pane. Call Authorized Service or Customer Services.
• Make sure you replaced the glass pane correctly. Do not use the oven when
glass pane is not correctly placed.
• Do not force the glass pane if you are having di culty removing or replacing
it. Call Authorized Service or Customer Service for help.
Note: The visits made for use or maintenance of the oven are not covered
under warranty.
Fig. 17
Fig. 18 Fig. 19
Fig. 20
Fig. 21 Fig. 22 Fig. 23
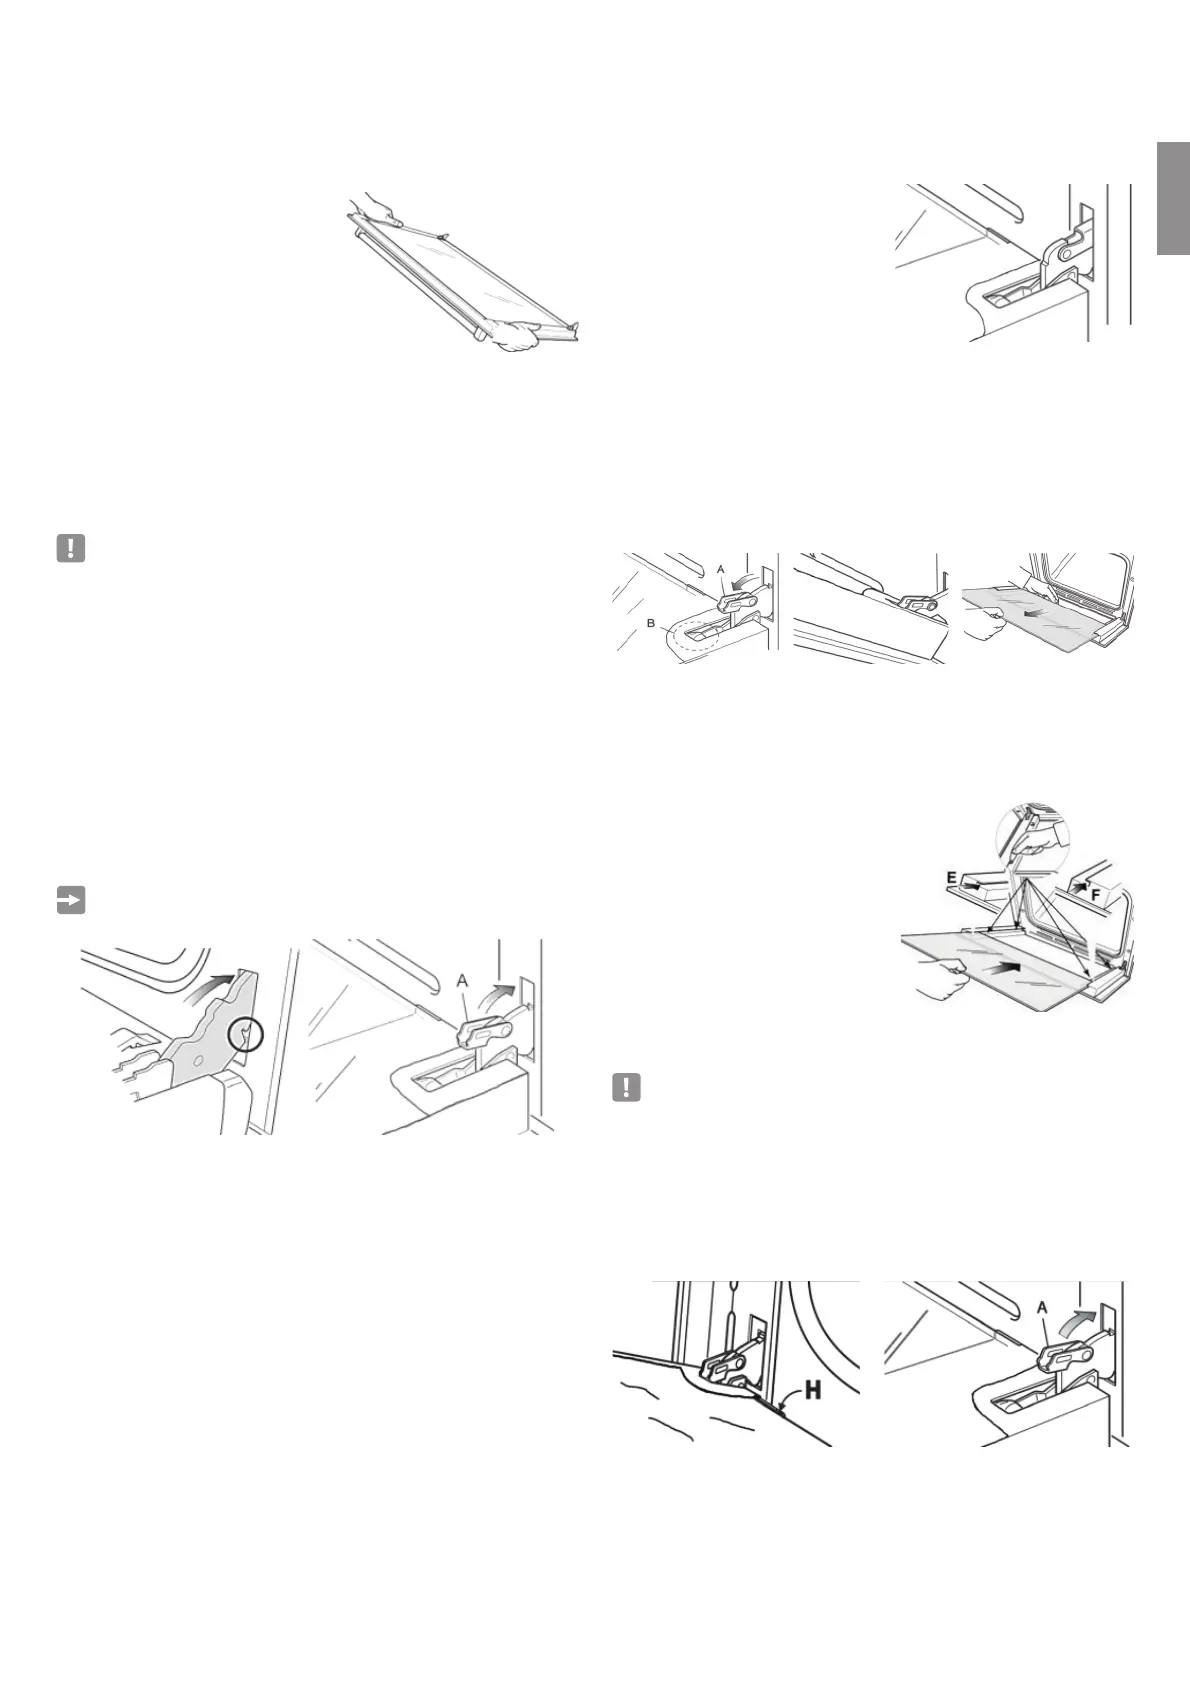
• REPLACING THE INNER GLASS PANE AFTER CLEANING
When replacing the inner glass pane:
• make sure you replaced the pane correctly as shown. Pane must be in the
position speci ed below to t in the door and to ensure oven’s safe and
correct operation.
• Ensure that glass edges do not
crash into an object or surface.
• Do not try to force the pane into
place.
If you’re having di culty replacing the pane,
remove it and start over. Otherwise call
Customer Service.
To install the inner glass pane:
1. Make sure the door is open
2. Replacing the inner glass pane:
• Ensure that four rubber seats are in place (Figure 25).
IMPORTANT: When reinstalling the glass, we recommend that you hold
the four rubber seat D in place to prevent the rubber seals from breaking
or sliding o .
• - Make sure you hold the pane correctly. You should be able to read the texts
on it when it’s facing you.
• - Fit the pane into the left E and right F guide rails (Figure 25) and slide up to
the holders H (Figure 26).
• - Open the oven door completely and close the arms A on the left and right
hinges, and open the door (Figure 27).
Fig. 25
Fig. 26 Fig. 27
 Loading...