EasyManua.ls Logo

FROGBRO LD006A - User Manual

FROGBRO LD006A
8 pages
Print Icon
To Next Page IconTo Next Page
Loading...
Instructions
8 watt
Cordless Rechargeable
Soldering Iron
Part No.LD006A
Question and Answer IconNeed help?

Do you have a question about the FROGBRO LD006A and is the answer not in the manual?

Overview

This document describes the Cordless Rechargeable Soldering Iron, an 8-watt tool designed for various soldering tasks.

Function Description

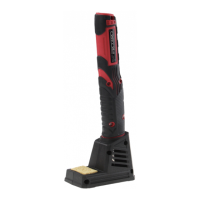
The device is a cordless, rechargeable soldering iron, providing portability and ease of use without being tethered to a power outlet. It is equipped with a replaceable soldering tip (A) and features a power button (B) for activation. A battery indicator (C) keeps the user informed about the remaining power. The touch sensor (D) is crucial for activating and deactivating the device, as well as for initiating the heating process. Temperature indicator LEDs (E) provide visual feedback on the iron's heating status, while work lights (F) illuminate the work area. The device charges via a USB charging port (G) and comes with a stand (H) for safe storage when not in use. A tip cleaning sponge (I) is included for maintenance, and a USB charging connector lead (J) facilitates recharging.

Important Technical Specifications

  • Lithium battery: 3.7V 1800mAh
  • Charge time: 1.5 hours (approximately)
  • Charging method: USB (PC, laptop, or USB mains adaptor)
  • Rated voltage: 5 V DC
  • Rated power input: 8W
  • Max temperature: 480°C
  • Max continuous working time: 1 hour
  • Auto shut-off: Approximately 3 minutes
  • Accessories included: Stand, USB cable, tip-cleaning sponge, 1 tube lead-free soldering wire

Usage Features

First Use and Activation: Before first use, the touch sensor (D) must be activated by pressing it 3 times (Fig 1). This prepares the device for operation.

Turning On: To turn the soldering iron ON, press the power button (B) for 3 seconds (Fig 2). The device will then be ready to begin the warming-up process.

Warming Up and Ready for Use: Once turned ON, the device will begin warming up. This process takes approximately 15 seconds. During warming up, the temperature indicator LEDs (E) will show the progress. Once the LEDs indicate that the device is ready for use, it has reached its optimal soldering temperature (Fig 3).

Heating and Heat Off: To initiate heating, press the touch sensor (D). The temperature indicator LEDs (E) will illuminate, indicating that the tip is heating up. To turn the heat OFF, press the touch sensor (D) again. The LEDs will turn off, and the tip will begin to cool down.

Turning Off: To turn the soldering iron OFF completely, press the power button (B) (Fig 4).

Charging: The device is charged via the USB charging port (G) using the provided USB charging connector lead (J). Connect the lead to a USB power source such as a PC, laptop, or USB mains adaptor (Fig 5).

Battery Indicator: The battery indicator (C) provides visual feedback on the remaining power:

  • 30% Power: One LED illuminated.
  • 60% Power: Two LEDs illuminated.
  • 100% Power: Three LEDs illuminated.
  • Recharge Immediately: Flashing LEDs indicate that the battery is low and requires immediate recharging (Fig 6).

Storage: For storage, the touch sensor (D) needs to be deactivated by pressing it 8 times (Fig 7). This prevents accidental activation and conserves battery life.

Changing the Soldering Tip: The soldering tip (A) is replaceable. To change it, unscrew the existing tip from the device and screw in the new tip (Fig 8).

Maintenance Features

  • Cleaning: Before cleaning, always disconnect the device from any power source. Clean the equipment with a dry cloth.
  • Storage: If the device will not be used for a period of time, store it in a dry and ventilated place. Keep it out of reach of children.
  • Tip Cleaning: The included tip cleaning sponge (I) should be used to remove excess solder from the tip. If the sponge does not operate well, moisten it slightly. Do not attempt to remove excess solder from the tip by shaking it, as hot solder can land on skin and cause burns and blisters.
  • Tip Immersion: Do not cool the tip by immersing it in water.
  • Environmental Considerations: Do not allow pets or children into the area where the soldering iron is being used.
  • Temperature Indicator: If the soldering tip is badly fitted or loose, the red temperature indicator LED (E) will flash continuously.
  • Disassembly: Do not attempt to open, disassemble, modify, or service the battery pack.
  • Moisture and Wet Conditions: Do not let the device get wet or use it in damp or wet conditions.
  • Temperature Exposure: Do not expose to temperatures above 60°C (140°F).
  • Storage: Keep the device clean and store it in a dry and secure area.
  • Disposal: Dispose of the device according to relevant local authority guidelines.
  • Product Integrity: No liability is accepted for incorrect use of this product. Do not use the product if it is not designed for. Use the product correctly and with care. Failure to do so may cause damage and/or personal injury and will invalidate the warranty.

Precautions

  • Always wear approved eye and hand protection.
  • Read and understand these instructions thoroughly.
  • The soldering tip gets very hot in use (480°C). Ensure the work area is clean, uncluttered, and there are no flammable or combustible materials near the work area.
  • Do not leave the tool unattended after use (fire hazard).
  • Always place the soldering iron in its stand when not in use.

Disposal Method

Waste electronic products should not be disposed of together with household garbage. Please recycle where there are facilities. Consult your local authority or retailer for recycling recommendations.

FROGBRO LD006A Specifications

General IconGeneral
BrandFROGBRO
ModelLD006A
CategoryPower Tool
LanguageEnglish