EasyManua.ls Logo

Frontgate Alden 167126A MIN - User Manual

Default Icon
3 pages
Print Icon
To Next Page IconTo Next Page
Loading...
Page 1 / 3
CINMAR ITEM NUMBER: 167126A MIN & 167126B MIN & 167126A NAL & 167126B NAL
PRODUCT DIMENSION: 132"W X 42"D X 30.5"H
CINMAR ITEM DESCRIPTION: Alden Rectangular Expandable Dining Table Top & Base
"PRODUCTS ARE NOT INTENDEND FOR COMMERCIAL USE"
PARTS INCLUDED
NO
ITEM
DESCRIPTION
QTY.
A
Top
1 pc
B
Base
2 pcs
C
Extension Leaf
2 pcs
D
Connecting Bar
1 pc
E
Curved Washer
2 pcs
F
Nut
2 pcs
G
Wood Peg
4 pcs
H
Wrench
1 pc
I
Bolt
4 pcs
J
Flat Washer
4 pcs
K
Alley Key
1 pc
Note: When unpacking, lay the parts on a padded clean surface. Be sure to locate all
hardware before throwing away any packaging.
Question and Answer IconNeed help?

Do you have a question about the Frontgate Alden 167126A MIN and is the answer not in the manual?

Summary

Assembly Instructions

Step 1: Insert Wood Pegs

Insert wood pegs into the designated holes on the table bases.

Step 2: Attach Connecting Bar

Connect the bar to the bases using washers and nuts, securing with a wrench.

Step 3: Attach Top to Bases

Position the table top onto the bases and fasten with bolts and flat washers.

Assemble Extension Leaves

Fasten Locks and Placement

Care and Maintenance

Overview

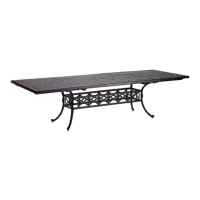
This document provides assembly instructions and product details for the Alden Rectangular Expandable Dining Table Top & Base, manufactured by FRONTGATE. The table is designed for indoor use and is not intended for commercial purposes.

Product Description and Function:

The Alden Rectangular Expandable Dining Table is a versatile piece of furniture designed to accommodate varying seating needs through its expandable feature. The table consists of a main top, two bases, and extension leaves that can be added or removed to adjust the table's length. This allows users to easily transition the table from a smaller, everyday dining size to a larger configuration suitable for entertaining guests. The expansion mechanism involves a connecting bar that links the two bases, and extension leaves that are inserted into the center of the table top. Locks are provided to secure the table in its expanded or contracted state.

Technical Specifications:

  • Cinmar Item Numbers: 167126A MIN & 167126B MIN & 167126A NAL & 167126B NAL
  • Product Dimensions (Expanded): 132"W x 42"D x 30.5"H
  • Components:
    • Top (A): 1 pc
    • Base (B): 2 pcs
    • Extension Leaf (C): 2 pcs
    • Connecting Bar (D): 1 pc
    • Curved Washer (E): 2 pcs
    • Nut (F): 2 pcs
    • Wood Peg (G): 4 pcs
    • Wrench (H): 1 pc
    • Bolt (I): 4 pcs
    • Flat Washer (J): 4 pcs
    • Allen Key (K): 1 pc

Assembly Instructions:

The assembly process is divided into four main steps, requiring the use of various hardware components and tools provided.

Step 1: Insert Wood Pegs [G] into the holes on the bases [B].

This initial step involves preparing the table bases by inserting four wooden pegs into designated holes. These pegs likely serve as alignment guides or structural supports for subsequent assembly stages.

Step 2: Attach the connecting bar [D] to the bases. Place the Curved Washer [E] and Nut [F] through the holes, and tighten with Wrench [H].

This step connects the two table bases using a connecting bar. The connecting bar ensures the stability and proper spacing of the bases. Curved washers and nuts are used to secure the connecting bar to the bases, and a wrench is provided to tighten these fasteners, ensuring a secure connection.

Step 3: Put the top [A] on the bases. Place the Bolt [I] and Flat Washer [J] through the holes, and tighten with Allen Key [K].

After the bases are connected, the main table top is placed onto the assembled bases. Bolts and flat washers are then inserted through pre-drilled holes to secure the top to the bases. An Allen key is used to tighten these bolts, firmly attaching the table top to its support structure.

Step 4: Assemble the extension leaves [C].

This step details the process of integrating the extension leaves into the table. While the visual aid shows the leaves being inserted into the center of the table, the specific mechanism for sliding the table apart to create space for the leaves is implied. The leaves are designed to fit seamlessly into the table top, extending its length.

Step 4 (continued): Fasten the locks on both sides.

Once the extension leaves are in place (or removed, depending on the desired configuration), locks located on the underside of the table are fastened. These locks secure the table top sections together, preventing them from separating or shifting during use, whether the table is expanded or contracted.

Usage Features:

  • Expandable Design: The primary feature of this dining table is its ability to expand, offering flexibility in seating capacity. This makes it suitable for both everyday family meals and larger gatherings.
  • Indoor Use Only: The table is specifically designed and intended for indoor environments. Exposure to outdoor elements is not recommended and may damage the product.
  • Non-Commercial Use: This product is manufactured for residential use and is not built to withstand the rigors of commercial settings.

Maintenance Features:

  • Cleaning: The table should be cleaned periodically by wiping it with a soft, clean cloth.
  • Avoid Harsh Cleaners: Abrasive cleaners and chemical cleaners should not be used, as they can damage the table's finish.
  • Temperature Control: Keep the table away from high temperatures to prevent damage.
  • Sunlight Exposure: Avoid direct sunlight, as prolonged exposure can affect the table's material and finish.

Customer Support:

For assembly assistance or questions, customers can contact Frontgate Product Specialists:

  • Phone: 1-800-537-8484
  • Email: ps@frontgate.com
  • Availability:
    • Weekdays: 8:00 am to 8:00 pm EST
    • Saturday: 9:30 am to 6:00 pm EST

Important Notes:

  • Unpacking: When unpacking, it is recommended to lay the parts on a padded, clean surface to prevent scratches or damage.
  • Hardware Check: Before discarding any packaging, ensure all hardware components are located to avoid missing parts during assembly.

This comprehensive description covers the Alden Rectangular Expandable Dining Table's design, functionality, assembly process, care instructions, and support information, providing a complete overview for the user.

Frontgate Alden 167126A MIN Specifications

General IconGeneral
BrandFrontgate
ModelAlden 167126A MIN
CategoryIndoor Furnishing
LanguageEnglish

Related product manuals