4. Install ISM-01 Student Pass-Around Microphone battery
5. Connecting PFM device to Juno Audio Out port
1. Connect an audio cable to the classroom audio receiver
output jack. If recording, first connect a splitter cable (1a),
then attach the audio cable (1b).
2. Turn on the student's PFM transmitter.
3. Connect the 3.5mm audio cable to the transmitter
audio in jack.
4. Set audio output volume on classroom receiver as desired
by student.
5. If recording, connect a second audio cable from the splitter
to the audio in (microphone) jack of a computer.
NOTE: The use of high quality audio cables is recommended
to avoid the introduction of interference to the system.
Personal
FM Transmitter
1a
4
1
1b
5
Teacher's
Computer
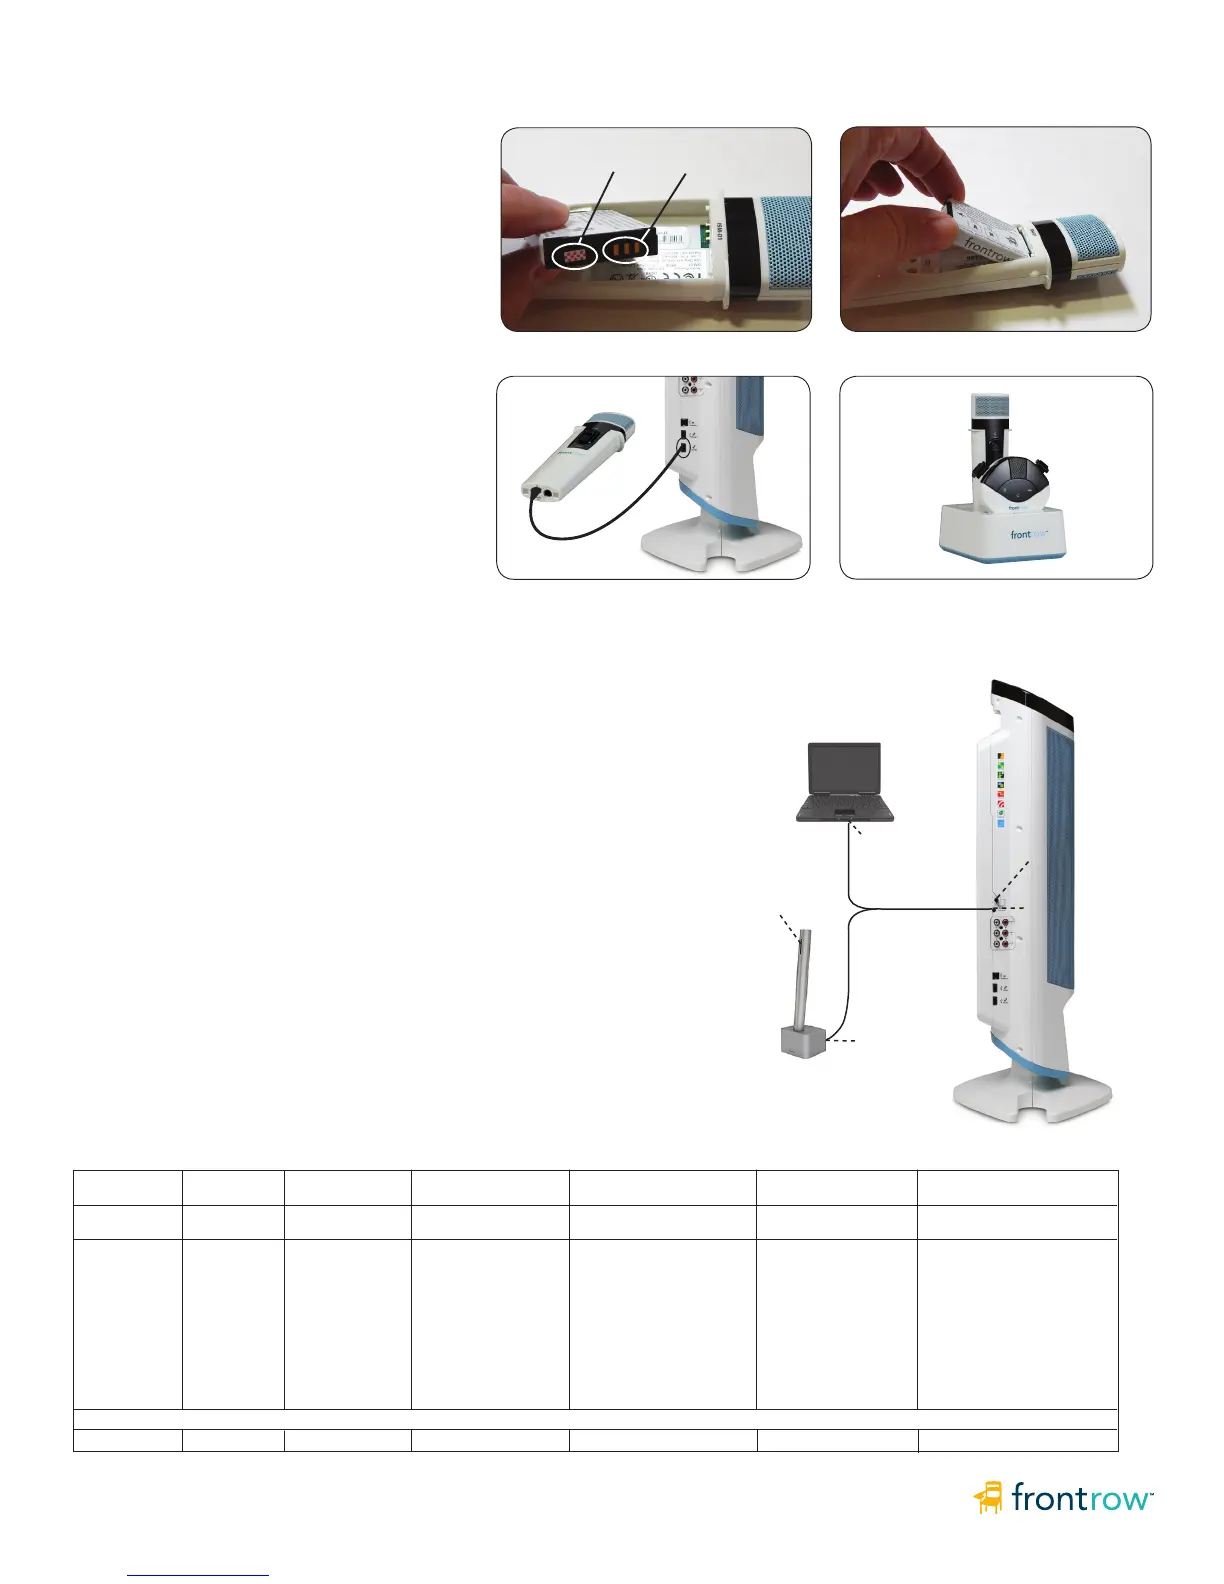
1. Unscrew battery door on the back of the
microphone using the supplied Phillips head
screwdriver.
2. Locate the charge contacts on the battery
and on the microphone. See Image 1
3. Insert battery into compartment - battery contacts
first, then push the battery into place. See Image 2
4. Replace battery door.
Charging the microphone
1. Connect the USB cable to one of the Juno
Tower’s charge ports and the other end to the
charge port on the microphone. See Image 3
or
2. Place in IMC-01 Charging Stand to charge battery.
See Image 4
NOTE: For best performance, charge battery
overnight before initial use.
Image 1 Image 2
Image 4
Phonak Campus
Oticon Amigo T5 Oticon Amigo T10 Oticon Amigo T30 S/SX Phonak Inspiro Phonak Roger Pen
On PFM transmitter,
Audio In (3.5mm) Audio In (3.5mm Mic In (2.5mm) Audio In (3.5mm) Audio In (3.5mm) Audio In (3.5mm)
connect cable to...
Notes
• Turn the transmitter
OFF (don't worry; it
will detect the audio
signal and transmit)
• Skip Step 3 – patch cord
acts as antenna
• Note that the Mic in jack is
2.5mm – an adapter may be
needed or use 2.5mm to
3.5mm patch cord
• Turn capsule on MM8 lapel mic
to 'X' to mute the mic
• Phonak disables "Dynamic
FM" when connected to
classroom amplification
• Audio Input setting must
be set to "iPod Nano" from
"General"
• Settings > Audio input >
iPod nano
• Mute the transmitter
• Turn the transmitter on first, then
connect for best results
• Connect Aux-in audio cord to the
Juno, by connecting one 3.5mm
audio plug into the Audio Out socket,
and connect the other 3.5mm audio
plug into the Roger Pen Docking
Station. NOTE: the Roger Pen should
be switched on and paired with the
Roger receiver, and be docked into the
docking station.
Suggested Classroom Audio Output Settings (adjust as needed for student preference)
FrontRow Juno 8 8 1 / 2.5* 8 7 / 8* 6
Tips for Specific PFM Transmitters and Classroom Amplification Receivers:
• Mute the
transmitter
2
3
Image 3
Moisture
Indicator
Charge
contacts
FrontRow UK
Cadzow Industrial Estate, Low Waters Road, Hamilton, Lanarkshire, ML3 7QE • www.gofrontrow.com • 01698 208268
 Loading...