Home
Fuji Xerox
Printer
DocuCentre-V C7775
Fuji Xerox DocuCentre-V C7775 User Manual
5
of 1
of 1 rating
463 pages
Give review
Manual
Specs
To Next Page
To Next Page
To Previous Page
To Previous Page
Loading...
Store to
USB
321
Scan
5
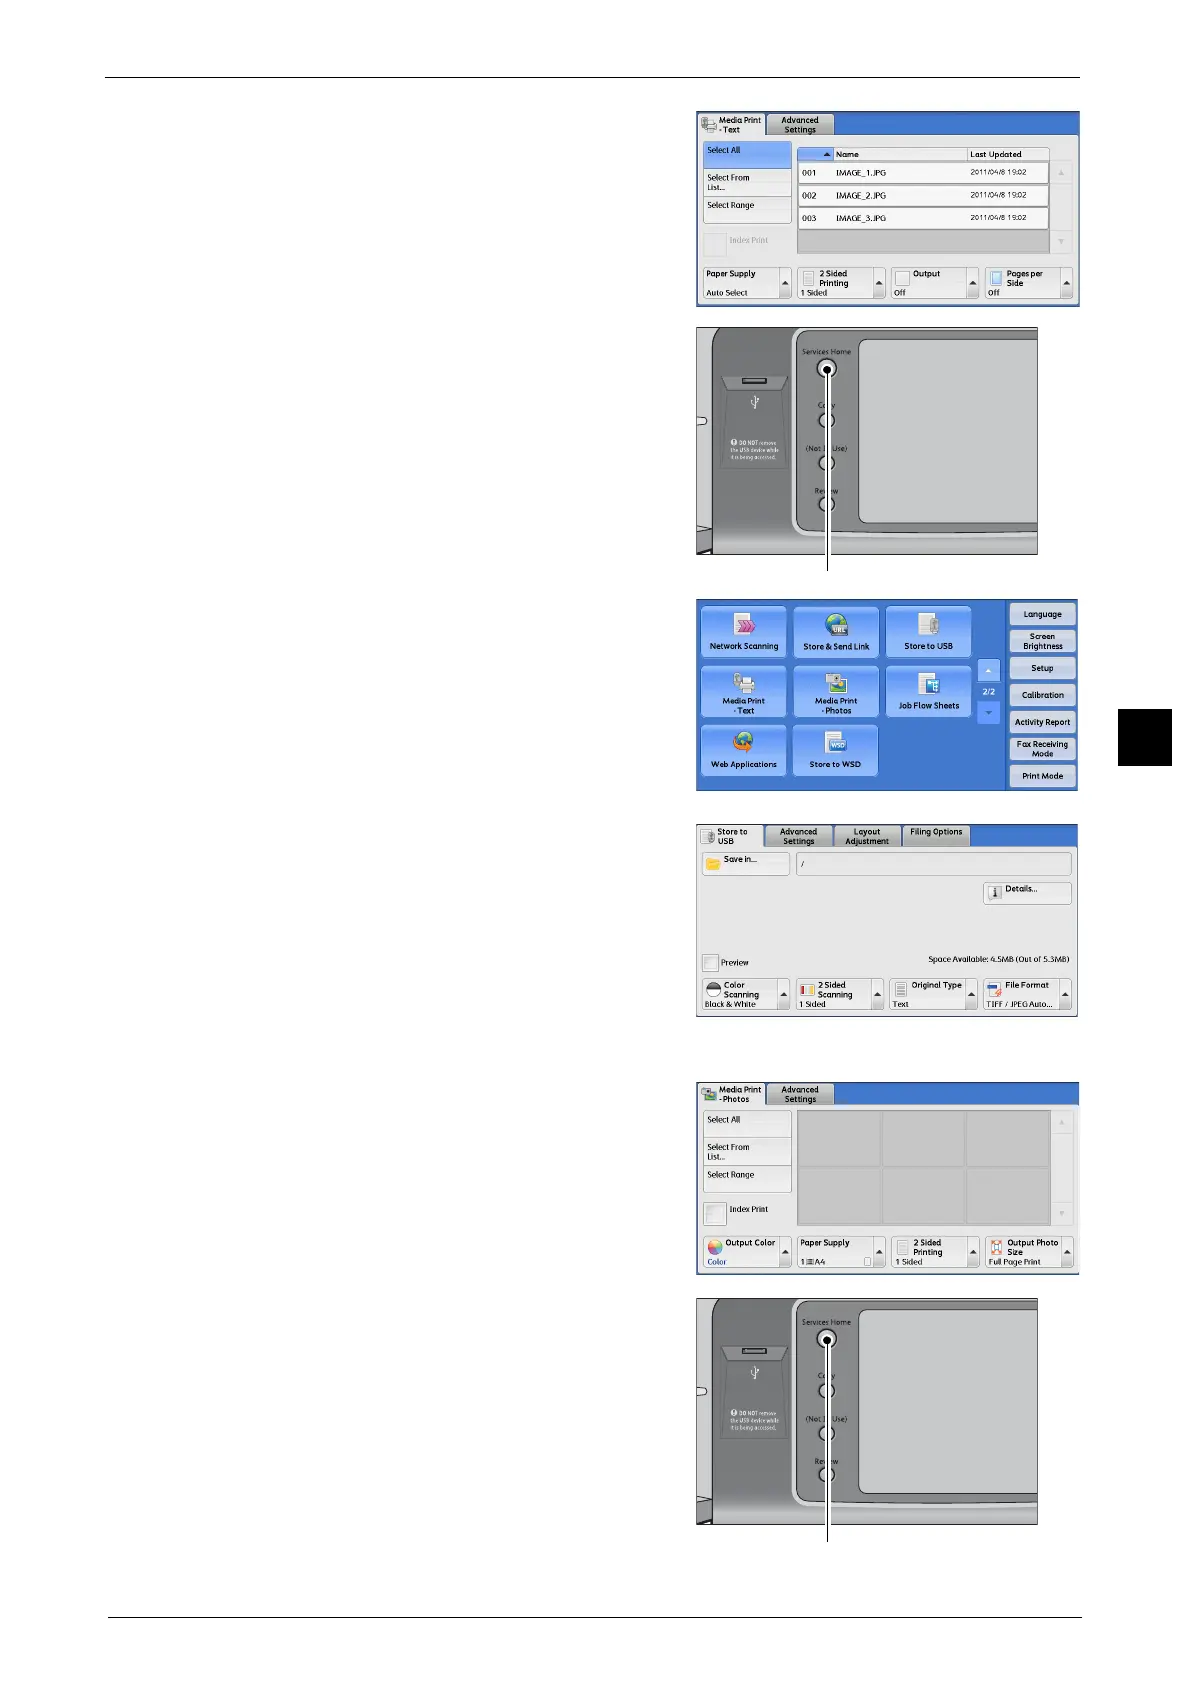
When the [Media Print - Text]
Screen Appears
1
Press the <Serv
ices Home> b
utton.
2
Select [Store to USB] on the Service
s
Home
screen.
3
The [Store to USB] screen appears.
When the [Media Print - P
h
otos] Screen Appears
1
Press the <Serv
ices Home> b
utton.
<Services Home> button
* WS
D s
tand
s for We
b Serv
ices o
n De
vices.
<Services Home> button
322
324
Table of Contents
Table of Contents
5
Table of Contents
3
Table of Contents
5
Before Using the Machine
13
Preface
14
Types of Manuals
15
Using this Guide
16
Organization of this Guide
16
Conventions
17
Safety Notes
19
Electrical Safety
20
Machine Installation
21
Operational Safety
26
Location of Warning and Caution Labels
29
Consumable
30
Regulation
31
Others
31
Radio Frequency Emissions (Class B)
31
Regulatory Information for RFID
31
Environment
32
About License
33
Heimdal
33
JPEG Code
33
Libcurl
33
Rsa Bsafe
33
Freebsd
34
About License
35
Openldap
35
Des
36
Aes
37
EDICT and COMPDIC
37
ICC Profile (Little Cms)
37
TIFF (Libtiff)
37
XML Paper Specification (XPS)
37
Cyrus SASL
38
About QT
39
Lgpl2.1
39
Other Licenses
47
Legal Notice
48
2 Product Overview
49
Machine Components
50
Power Source
61
Switching the Main Power on
61
Switching the Power on
61
Switching the Power off
62
Switching the Main Power off
63
Circuit Breaker
64
Energy Saver Mode
66
Entering the Energy Saver Mode
66
Exiting the Energy Saver Mode
67
Smart Welcomeyes
67
Control Panel
68
Control Panel
70
Exiting the Energy Saver Mode
71
Large Size Color UI
72
Screens and Buttons Displayed
75
About the Services Home Screen
76
Message Field
76
Login Information Field
77
Service Buttons
77
Touch Screen
77
Print Mode
80
Touch Screen
81
Entering Text
83
Installing the Tray Attachment on the Finisher-B1
84
Copy
85
Copying Procedure
86
Document Feeder
86
Step 1 Loading Documents
86
Document Glass
87
Step 2 Selecting Features
88
Step 3 Entering a Quantity
89
Step 4 Starting the Copy Job
90
Step 5 Confirming the Copy Job in Job Status
91
Operations During Copying
92
Stopping the Copy Job
92
Changing the Number of Copies
93
Interrupting the Copy Job
94
Simple Copy
95
Paper Supply (Selecting the Paper for Copying)
95
Reduce/Enlarge (Making Enlarged/Reduced Copies)
96
Auto / Color / Black & White (Selecting the Color for Copying)
97
Sided Copying (Making 2 Sided Copies)
97
Simple Copy
97
Lighten/Darken (Adjusting the Copy Density)
98
Pages Per Side (Copying Two Pages Onto One Sheet)
98
Staple
99
Copy
100
Reduce/Enlarge (Making Enlarged/Reduced Copies)
100
Paper Supply (Selecting the Paper for Copying)
100
Step 1 Loading Documents
101
Paper Supply (Selecting the Paper for Copying)
103
Adjust Paper Curl
105
Paper Size
105
Paper Type
105
Output Color (Selecting the Color for Copying)
106
Sided Copying (Making 2 Sided Copies)
110
Copy Output (Specifying Finishing Options)
110
Pages Per Side (Copying Multiple Pages Onto One Sheet)
111
Lighten/Darken (Adjusting the Copy Density)
111
Image Quality
112
Original Type (Selecting the Document Type)
112
Image Options (Adjusting Copy Density/Sharpness/Saturation of Images)
113
Image Enhancement
114
(Erasing the Background Color of Documents/Adjusting Contrast)
114
Color Effects (Selecting an Image Quality)
115
Color Balance (Adjusting Color Balance)
116
Color Shift (Adjusting the Color Tone)
117
Layout Adjustment
118
Sided Copying (Making 2 Sided Copies)
118
Book Copying (Copying Facing Pages Onto Separate Sheets)
120
Sided Book Copying (Making 2 Sided Copies of Facing
121
Original Size (Specifying the Scan Size for the Document)
122
Mixed Size Originals (Scanning Different Size Documents Simultaneously)
123
Edge Erase (Erasing Edges and Margin Shadows of the Document)
124
Image Shift (Adjusting the Image Position)
126
Invert Image (Making Reversed Copies of Images)
128
Image Rotation (Changing the Orientation of Images)
129
Original Orientation (Specifying the Orientation of Loaded Documents)
129
Output Format Output Format
131
Output Format
131
Sided Copying (Making 2 Sided Copies)
131
Select [Copy] on the Services Home Screen
131
Booklet Creation (Creating a Bound Booklet)
132
Covers (Attaching Covers to Copies)
135
Pages Per Side (Copying Multiple Pages Onto One Sheet)
136
Poster (Making Enlarged Copies Spread over Multiple Sheets)
137
Repeat Image (Making Multiple Copies on One Sheet)
138
Annotations (Adding a Comment/A Date/Page Numbers to Copies)
139
Watermark (Printing Control Numbers on the Background of Copies)
144
Secure Watermark (Managing Document Security)
147
Folding (Outputting Bi-Folded/Tri-Folded Paper)
149
Preset Repeat Image (Making Multiple Copies on a Single Sheet)
150
Transparency Options (Inserting Blank Sheets between Transparencies)
151
Copy Output (Specifying Finishing Options)
152
Separator Tray
152
Handout Tray
152
ID Card Copy (Copying both Sides of an ID Card)
156
Job Assembly
158
Build Job
158
(Processing Documents Scanned with Different Settings as One Job)
158
Select [Copy] on the Services Home Screen
158
Booklet Creation (Creating a Bound Booklet)
159
Job Assembly
160
Sample Job (Checking the Finished Output of the Copy)
162
Combine Original Sets (Adding Originals)
163
Delete Outside/Delete Inside (Deleting Outside or Inside of the Selected Area)
164
Stored Programming (Calling a Stored Program for Build Job)
166
Fax
169
Fax Procedure
170
Step 1 Loading Documents
170
Step 2 Selecting Features
172
Step 3 Specifying Destinations
173
Step 4 Starting the Fax Job
175
Step 5 Confirming the Fax Job in Job Status
176
Operations During Faxing
177
Stopping the Fax Job
177
Previewing the Read Images During a Fax Job
178
Changing the Scan Settings
180
About Internet Fax
182
Internet Fax Features
182
Sending Internet Fax
182
Sending Internet Fax
184
Receiving Internet Fax
185
Useful Features
186
About IP Fax (SIP)
189
IP Fax (SIP) Features
190
Feature Comparison with Regular Fax
192
Sending IP Fax (SIP)
192
Receiving IP Fax (SIP)
193
About Server Fax
194
Sending Server Fax
194
Simple Fax
196
Specifying a Destination Using the Numeric Keypad
196
Speed Dialing (Specifying a Destination Using an Address Number)
197
Specifying a Destination Using a One Touch Button
198
Previewing the Read Images During a Simple Fax Job
198
Resolution (Specifying the Scanning Resolution)
199
Original Type (Selecting the Document Type)
199
Sided Scanning (Transmitting 2-Sided Originals)
200
Fax/Internet Fax
201
Internet Fax / Fax / IP Fax (SIP) (Selecting Internet Fax / Fax / IP Fax (SIP))
201
Add (Sending Faxes to Multiple Recipients)
202
Specifying a Destination Using the Address Book
202
Address Book (Specifying a Destination Using the Address Book [Type 1])
203
Address Book (Specifying a Destination Using the Address Book [Type 2])
206
List All Public Entries
206
Speed Dialing (Specifying a Destination Using an Address Number)
207
Add New Address (Registering a Destination on the Address Book)
208
Specifying a Destination Using a One Touch Button
210
Specifying a Destination Using the Keyboard Screen
211
Specifying a Destination Using the Redial Feature
212
Specifying a Line (Port)
212
Entering Specific Symbols
214
Removing/Confirming a Recipient
214
Lighten/Darken (Adjusting Fax Density)
215
Previewing the Read Images During a Fax/Internet Fax Job
215
Sided Scanning (Transmitting 2-Sided Originals)
216
Original Type (Selecting the Document Type)
217
Resolution (Specifying the Scanning Resolution)
218
Layout Adjustment
219
Sided Scanning (Transmitting 2-Sided Originals)
219
Original Type (Selecting the Document Type)
219
Resolution (Specifying the Scanning Resolution)
219
Mixed Size Originals (Scanning Different Size Documents Simultaneously)
220
Book Faxing (Scanning Facing Pages Onto Separate Sheets)
221
Reduce/Enlarge (Specifying a Scan Ratio)
222
Stamp (Adding a Stamp When Scanning a Document)
223
Fax/Internet Fax Options
225
Acknowledgement Report (Confirming Transmission Results)
225
Starting Rate (Selecting a Communication Mode)
227
Priority Send/Delay Start (Specifying Send Priority/Send Time)
228
Delay Start
229
Priority Send
229
Cover Page (Transmitting Documents with a Cover Page)
230
Transmission Header Text (Adding Sender Name and Phone Number to Faxes)
230
Internet Fax Message (Editing the Internet Fax Mail Contents)
232
Internet Fax Subject (Specifying the Internet Fax Subject)
232
Recipient Print Sets (Printing Multiple Sets at the Remote Machine)
233
Pages Per Side (Combining Multiple Pages into One Sheet)
234
Remote Folder (Using Remote Folder)
234
F Code (Using F Code Transmission)
237
Internet Fax Profile (Specifying Internet Fax Profiles)
240
Digital Signature (Sending Internet Fax with a Digital Signature by S/MIME)
242
Encryption (Sending Internet Fax Encrypted by S/MIME)
242
More Options
243
Remote Polling (Retrieving Files from Remote Machines)
243
Select [Fax/Internet Fax] on the Services Home Screen
243
Store for Polling
245
(Storing Files on the Machine that a Remote Machine Can Retrieve)
245
On-Hook (Confirming Remote Machine Response Prior to Transmission)
247
Line Cut
248
Broadcast
249
Broadcast Send (Transmitting to Multiple Recipients)
249
Relay Broadcast (Transmitting Documents through a Relay Station)
250
Fax Signal Method
251
F Code Method
252
Remote Relay Broadcast (Performing Relay Broadcast to Remote Locations)
253
Receiving Faxes
257
Switching between Auto Receive and Manual Receive
257
Using Auto Receive
258
Using Manual Receive
258
Using Folder Receive
258
Facsimile Information Services
260
Using the Receiver
260
When Not Using a Receiver
260
Scan
263
Scanning Procedure
264
Step 1 Loading Documents
264
Step 2 Selecting the Features
266
Step 3 Starting the Scan Job
269
Step 4 Confirming the Scan Job in Job Status
270
Step 5 Saving the Scanned Data
271
Operations During Scanning
272
Stopping the Scan Job
272
Previewing the Scanned Images During a Scan Job
273
Changing Scan Settings
276
E-Mail
277
Address Book
278
Address Book (Specifying a Destination Using the Address Book [Type 1])
278
Address Book (Specifying a Destination Using the Address Book [Type 2])
281
Search Network
282
Search Public
282
Add New Address (Registering a Recipient on the Address Book)
284
Specifying a Destination Using a One Touch Button
285
New Recipient (Specifying an E-Mail Address)
286
Add Me (Adding the Sender's Address)
287
Recipient(S) (Editing a Recipient)
288
From (Setting the Sender's Address)
289
Color Scanning (Selecting an Output Color)
290
Message (Entering the E-Mail Body)
290
Preview (Previewing the Scanned Images During a Scan Job)
290
Subject (Setting the Subject)
290
Sided Scanning (Scanning both Sides of a Document)
291
Original Type (Selecting the Document Type)
292
File Format (Selecting a File Format for Output Data)
293
Specific Color
296
Language of the Original
298
Network Scanning
305
Preview (Previewing the Scanned Images During a Scan Job)
306
Color Scanning (Selecting an Output Color)
306
Original Type (Selecting the Document Type)
306
File Format (Selecting a File Format for Output Data)
306
Scan to PC
307
Transfer Protocol (Selecting a Transfer Protocol)
308
Address Book
308
Address Book (Specifying a Destination Using the Address Book [Type 1])
309
Address Book (Specifying a Destination Using the Address Book [Type 2])
310
Add New Address (Registering a Destination PC on the Address Book)
311
Specifying a Destination PC Using a One Touch Button
313
Browse (Specifying a Destination PC by Browsing Your Network)
314
Specifying a Destination (Specifying a Destination PC Using the Screen Keyboard)
315
Shared Name
316
Preview (Previewing the Scanned Images During a Scan Job)
317
Color Scanning (Selecting an Output Color)
317
Sided Scanning (Scanning both Sides of a Document)
317
Original Type (Selecting the Document Type)
317
File Format (Selecting a File Format for Output Data)
318
Store to Folder
319
Color Scanning (Selecting an Output Color)
319
Sided Scanning (Scanning both Sides of a Document)
320
Original Type (Selecting the Document Type)
320
Preview (Previewing the Scanned Images During a Scan Job)
320
Store to USB
321
Save in (Specifying a Storage Location in the USB Memory Device)
325
Details (Displaying the Details of a Storage Location in the USB Memory Device)
325
Preview (Previewing the Scanned Images During a Scan Job)
326
Color Scanning (Selecting an Output Color)
326
Sided Scanning (Scanning both Sides of a Document)
326
Original Type (Selecting the Document Type)
326
File Format (Selecting a File Format for Output Data)
326
Store & Send Link
328
Scan to (Displaying the E-Mail Address of the Authenticated User)
328
From (Displaying the E-Mail Address of the Authenticated User)
329
Color Scanning (Selecting an Output Color)
329
Message (Entering the E-Mail Body)
329
Original Type (Selecting the Document Type)
329
Preview (Previewing the Scanned Images During a Scan Job)
329
Sided Scanning (Scanning both Sides of a Document)
329
Subject (Setting the Subject)
329
File Format (Selecting a File Format for Output Data)
330
Store to WSD
331
Computer (Starting a Scan Job Via Computer Operation)
331
This Device (Storing Data Scanned by the Machine on a Network Computer)
332
Advanced Settings
334
Color Scanning (Selecting an Output Color)
334
Original Type (Selecting the Document Type)
334
Image Options (Adjusting Scan Density and Image Sharpness)
335
Photographs (Scanning a Color Photograph)
335
(Erasing the Background Color of Documents/Adjusting Contrast)
336
Image Enhancement
336
Image Enhancement (Erasing the Background Color of Documents/Adjusting Contrast)
336
Color Space (Specifying the Color Space)
337
Shadow Suppression (Suppressing the Document Background)
336
Layout Adjustment
338
Resolution (Specifying a Scanning Resolution)
338
Sided Scanning (Scanning both Sides of a Document)
339
Book Scanning (Scanning Facing Pages on Separate Sheets)
339
Original Size (Specifying a Scan Size)
340
Mixed Size Originals (Scanning Different Size Documents Simultaneously)
341
Edge Erase (Erasing Edges and Margin Shadows in the Document)
342
Reduce/Enlarge (Specifying a Scanning Ratio)
343
Original Orientation (Specifying the Orientation of the Loaded Document)
344
E-Mail Options/Filing Options
345
On the Services Home Screen, Select [E-Mail], [Store to Folder], [Network Scanning], [Scan to PC], [Store & Send Link], or [Store to USB]
345
Quality/File Size (Specifying an Image Compression Ratio When Scanning)
345
File Format (Selecting a File Format for Output Data)
346
Read Receipts (Specifying Read Receipts)
346
File Name (Specifying a Name for the File to be Sent)
347
Split Send (Sending in Sections)
347
File Name Conflict (Setting the Action to be Taken for File Name Conflict)
348
Reply to (Specifying a Reply Address)
348
Encryption (Sending E-Mail Encrypted by S/MIME)
349
File Name (Specifying a Name for the File to be Saved)
349
Digital Signature (Sending E-Mail with a Digital Signature by S/MIME)
350
Login Name
350
Meta Data
350
Password
350
6 Send from Folder
351
Default Chapter
352
Folder Operating Procedure
352
Step 1 Opening the [Send from Folder] Screen
352
Step 2 Selecting a Folder
352
Step 3 Checking/Selecting Files in a Folder
353
Step 4 Operating Files in a Folder
353
Selecting a Folder
354
Checking/Operating Files in a Folder
355
Checking File Details
357
Printing Files in a Folder
360
Batch Print
361
Configuring/Starting Job Flow
363
[Link Job Flow Sheet to Folder] Screen
364
Job Flow Restrictions
367
Job Flow Sheets (Apeosport Series Models Only)
369
Job Flow Procedure
370
Step 1 Opening the [Job Flow Sheets] Screen
370
Step 2 Selecting a Job Flow Sheet
370
Step 3 Confirming/Changing the Job Flow Sheet
371
Step 4 Starting the Job Flow Sheet
371
Selecting/Changing a Job Flow Sheet
372
Stored Programming
375
Stored Programming Overview
376
Registering/Deleting/Renaming Stored Programs
377
Notes and Restrictions on Registering Stored Programs
378
Registering Stored Programs
378
Deleting Stored Programs
380
Registering Stored Programs for Build Job
380
Assigning/Changing Icons for Stored Programs
381
Entering/Changing a Stored Program Name
381
Calling a Stored Program
383
Calling a Stored Program for Build Job
384
Web Applications (Apeosport Series Models Only)
385
Web Applications Overview
386
Accessing Web Applications
387
Accessing Using Buttons Registered on the Services Home Screen
388
Media Print (Text and Photos)
390
Overview of Media Print
390
Notes and Restrictions on Media Print
391
Supported Media and File Formats
391
Inserting USB Memory Device
393
Media Print - Text
396
Selecting Files
396
[Select from List] Screen
396
Media Print - Photos
398
Selecting Files
398
[Select from List] Screen
399
Selecting the Printing Options
400
Media Print - Photos
400
Media Print - Text
401
Index Print
402
11 Job Status
403
Default Chapter
404
Checking Completed Jobs
404
Checking Current/Pending Jobs
404
Job Status Overview
404
Printing Pending Jobs
404
Checking Current/Pending Jobs
405
Checking Completed Jobs
407
Printing and Deleting Stored Jobs
408
Secure Print
408
Sample Set
411
Delayed Print
414
Charge Print
416
Private Charge Print
419
Public Folder
422
Undelivered Faxes
423
Printing Pending Jobs
425
Handling Error Terminations
426
12 Computer Operations
427
Features Overview
428
Print
429
Print Features
429
Direct Printing
430
Printing
431
Setup
431
E-Mail Printing
433
Receiving E-Mail
433
Setup
433
Sending Fax
435
Registering Destinations
435
Importing Scanned Data
438
Importing to a TWAIN Compatible Application
438
Importing Scanned Data
439
Importing Using Stored File Manager 3
440
Importing Using Centreware Internet Services
442
Centreware Internet Services
442
Centreware Internet Services
445
Browser Settings
447
Proxy Server and Port Number
447
Starting Centreware Internet Services
447
13 Appendix
449
Glossary
450
Index
457
Circuit Breaker
457
Other manuals for Fuji Xerox DocuCentre-V C7775
Administrator's Guide
771 pages
Quick Reference Notes
5 pages
5
Based on 1 rating
Ask a question
Give review
Questions and Answers:
Need help?
Do you have a question about the Fuji Xerox DocuCentre-V C7775 and is the answer not in the manual?
Ask a question
Fuji Xerox DocuCentre-V C7775 Specifications
General
Brand
Fuji Xerox
Model
DocuCentre-V C7775
Category
Printer
Language
English
Related product manuals
Fuji Xerox DocuCentre-V C3375
463 pages
Fuji Xerox DocuCentre-V C3373
463 pages
Fuji Xerox DocuCentre-V C4475
771 pages
Fuji Xerox DocuCentre-V C2275
771 pages
Fuji Xerox DocuCentre-V C5575
771 pages
Fuji Xerox DocuCentre S1810
202 pages
Fuji Xerox DocuCentre S2011
56 pages
Fuji Xerox DocuCentre S2010
202 pages
Fuji Xerox DocuCentre-VII C4473
12 pages
Fuji Xerox DocuCentre-VII C3373
12 pages
Fuji Xerox DocuCentre-VII C5573
12 pages
Fuji Xerox DocuCentre-VII C3372
12 pages